Welcome to Moda!
60-Degree Log Cabin Blocks
60-Degree Log Cabin Blocks
Published:
Dec 31 2020 - 07:40
If a log cabin block is made by sewing strips around a square, is it still a log cabin if the center isn't a square?
I say "yes!"
Truth be told, the not-square log cabin quilts have always intrigued me the most. While they aren't as popular as the square log cabin blocks, other quilters obviously agree. There are antique versions of log cabin blocks that finish as hexagons, 60° and 45° diamonds, pentagons and octogons, and 60° triangles. There are many modern examples of these different shapes, especially the 60° blocks, often with varying widths of strips.
Before you proceed... is this a pattern? No. Is it a tutorial? Only in the sense that it's a guideline of how to make something like this - a few tips and a few options.
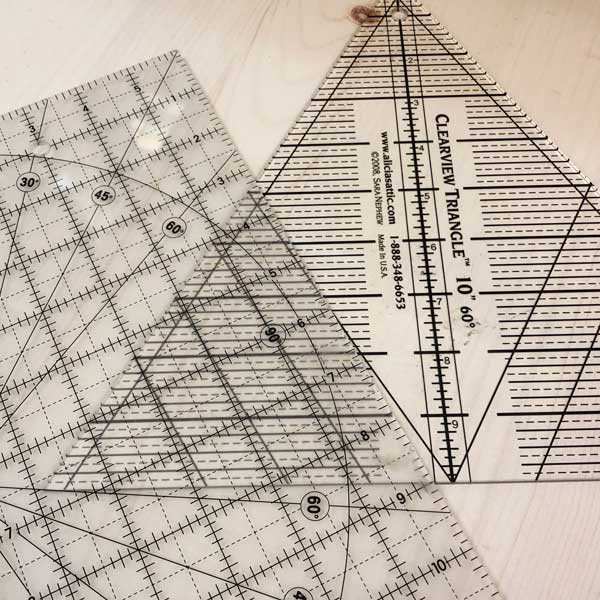
You'll only need two rulers to make these blocks - a regular ruler for cutting strips and trimming logs, and a 60° ruler for cutting the center triangle. And probably for cleaning up the blocks after they're all pieced.
And fabric. You'll need some of that.
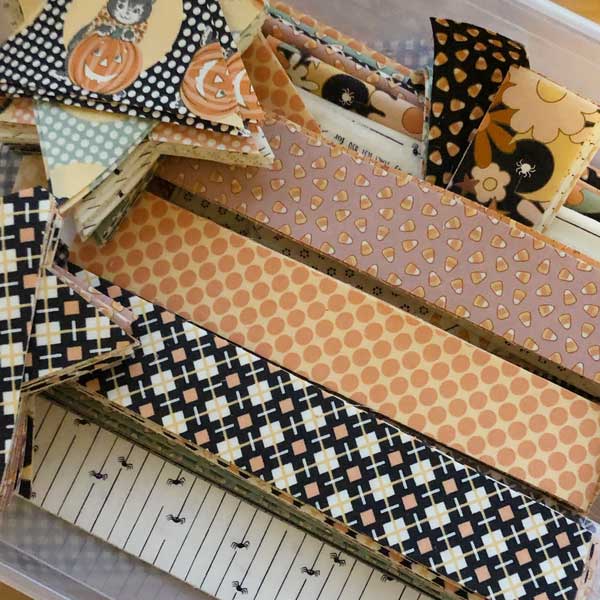
How much? Because this hasn't been written as a finished pattern, I don't know how much yardage you'll need. I started with a fat quarter bundle with 26 prints, added 1/4-yards of a few of my favorite prints, and about 1 yard of additional lights.
The fabrics shown here are the coming-in-May 2021 Kitty Corn by UrbanChiks, with a few additional light prints. The dot prints are from Fig Tree's All Hallow's Eve and the stripe with the spiders is from Stacy Iest Hsu's Ghouls & Goodies.
Size. There isn't an easy math calculation for this, and the finished size of your pieced triangles will probably vary some based on seam allowance, trimming, pressing and so on. My pieced triangles will finish at approximately 8¼" tall with a base that is approximately 10¼" wide. So I'm planning to make 104 blocks set in eight rows of thirteen blocks each. I could cut triangles for the sides - ends of each row - but I have decided I want the entire top to be pieced blocks. So I the blocks on the ends of each row will be trimmed straight after the rows have been assembled. (At least that's the plan.)
The finished quilt should measure about 60" wide by 66" long.
(And yes, I have a Pilot's License that allows me to fly blindly into the quilting unknown.)
Cutting.
- 4" strips for the center triangles
- 1½" x 21" strips for the logs
Note: If you like trimming and "squaring up", the strips for the logs can be cut a skosh wider. An 1/8" will suffice.
How many 4" strips to cut? From one 21" long strip, I was able to cut 6 triangles.
All seams are a scant 1/4". But you knew that.
Unlike square log cabins where the edge of the square and the strip can be aligned for stitching, the strips need to extend past the ends of the triangle to be long enough. I found that between ¾" and 1" was my "sweet spot" - it was generous enough that I didn't have to be exact. (Or measure each time.) I also planned to trim the logs down a bit after each round, so I had a bit of leeway.
Pre-cutting strips. For the reasons already shared, the length of these strips are a starting point. (They're the length I cut.) I suggest making a test block!
- Strip 1 - 7"
- Strip 2 - 8½"
- Strip 3 - 10"
- Strip 4 - 11½"
- Strip 5 - 13"
- Strip 6 - 14½""
Step 1. Join the first strip to one side of the triangle. Press the seam to the strip.
A note about pressing... One of the challenges of log cabins is that strips can be distorted rather easily. If you press with steam, press the seam with a "dry iron" first, then set it with steam.
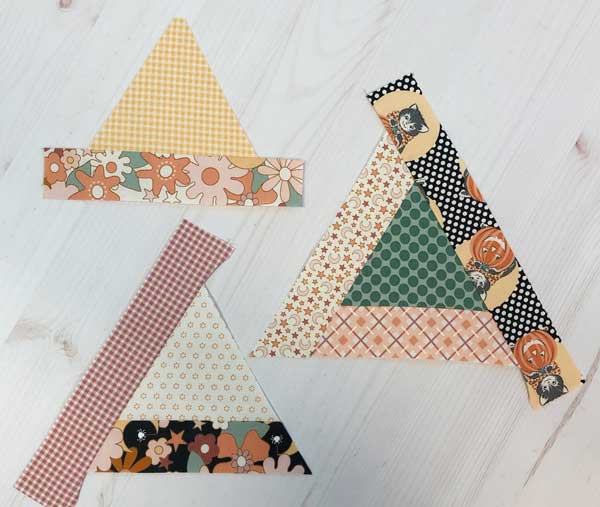
Using a straight ruler, or a 60° ruler, trim the ends of the strip straight to the sides of the triangle.
Step 2. Join the second strip to the next side of the triangle. Press the seam to the strip and trim.
Clockwise or counter-clockwise? Does it matter? I'm sure someone somewhere will say that it does. Do what works for you, what seems-feels right. I usually piece clockwise.
Join the third strip, press and trim.
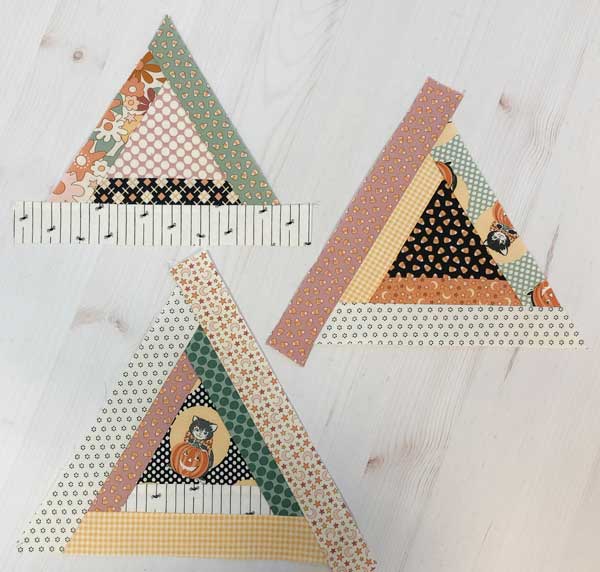
Before adding the next row-round of strips, the strips can be trimmed down. Or not.
I trimmed each strip to measure 1-1/8" wide. After the last row of strips, I'll use the 60° ruler to "square-up" the triangles so they're all the same size.
Steps 4 through 6. Join the next strip to the side of the triangle. Press the seam to the strip and trim the ends.
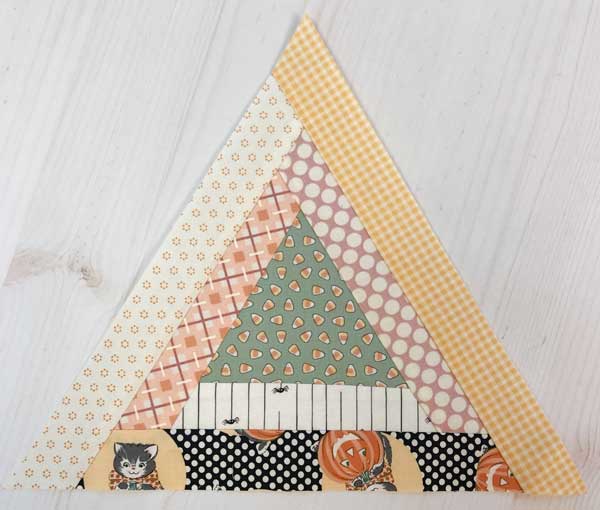
This is a "finished" block. The strips have not been trimmed down yet - I'll do that after the remaining 103 blocks have been pieced. (Probably in 2027.)
Because I know someone will ask... yes, you can trim the ends of the strips on multiple blocks at one time.
Using one of the lines on your cutting mat, align the straight edge of the block as shown.

Off-set the blocks by ½" to ¾" for the seam allowances.
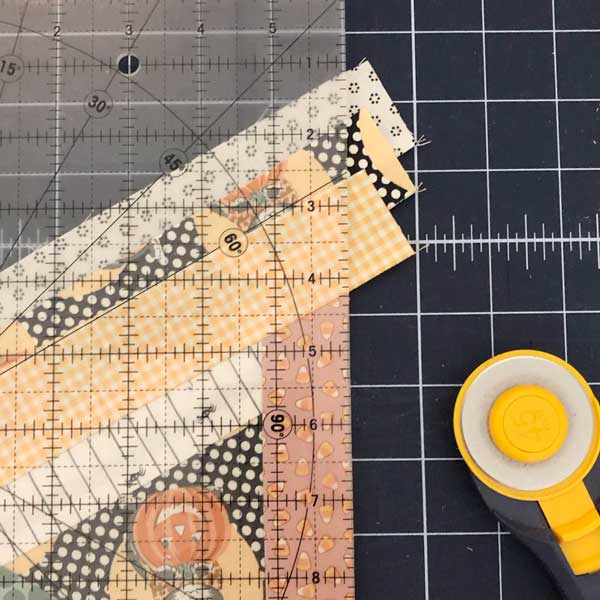
With a straight ruler, trim the ends straight. Does this save lots and lots of time? Probably not. But it feels a bit more efficient.
If a pattern with specific information is more your style, we have a few suggestions for that:
- Log Cabin Love - Patterns, foundation papers and rulers that make log cabin quilts.
- Charm Pack Log Cabin - One charm pack makes one mini, tabletopper or pillow.
And that's it.
If you're still unsure about our plans this weekend, it's simple. We want to end the year doing something we something we love. We want to sew, and create, without any pressure, without any rules. Log cabin blocks and quilts suited that desire... as do four-patches, nine-patches, English Paper Piecing.
We thank you for stitching with us this past year, and we look forward to sharing more next year.
Happy 2021 - we hope it's a "best ever" kind of year for you.