Welcome to Moda!
At the Seashore - Sailing Flag Sampler
At the Seashore - Sailing Flag Sampler
Published:
Jun 6 2019 - 11:00

Welcome to the 2019 Moda Bake Shop At the Seashore Quilt Along! All summer we will be sewing 12” blocks with the goal of making a sampler quilt at the end of the summer. Unlike previous sew alongs, we decided to change things up a bit and show our setting options first. This allows you to plan ahead with your fabric purchases and lets you squeeze in filler blocks as you have time! So, grab your suntan lotion and sunglasses and join us at the shore!
Sailing Flag Sampler was inspired by the nautical flags you often see on boats, docks or marinas. I have always thought they look like tiny quilt blocks and knew right away I wanted to incorporate them into my design.
This post is part of our summer quilt-along series. Find the rest of the posts by clicking {here}.
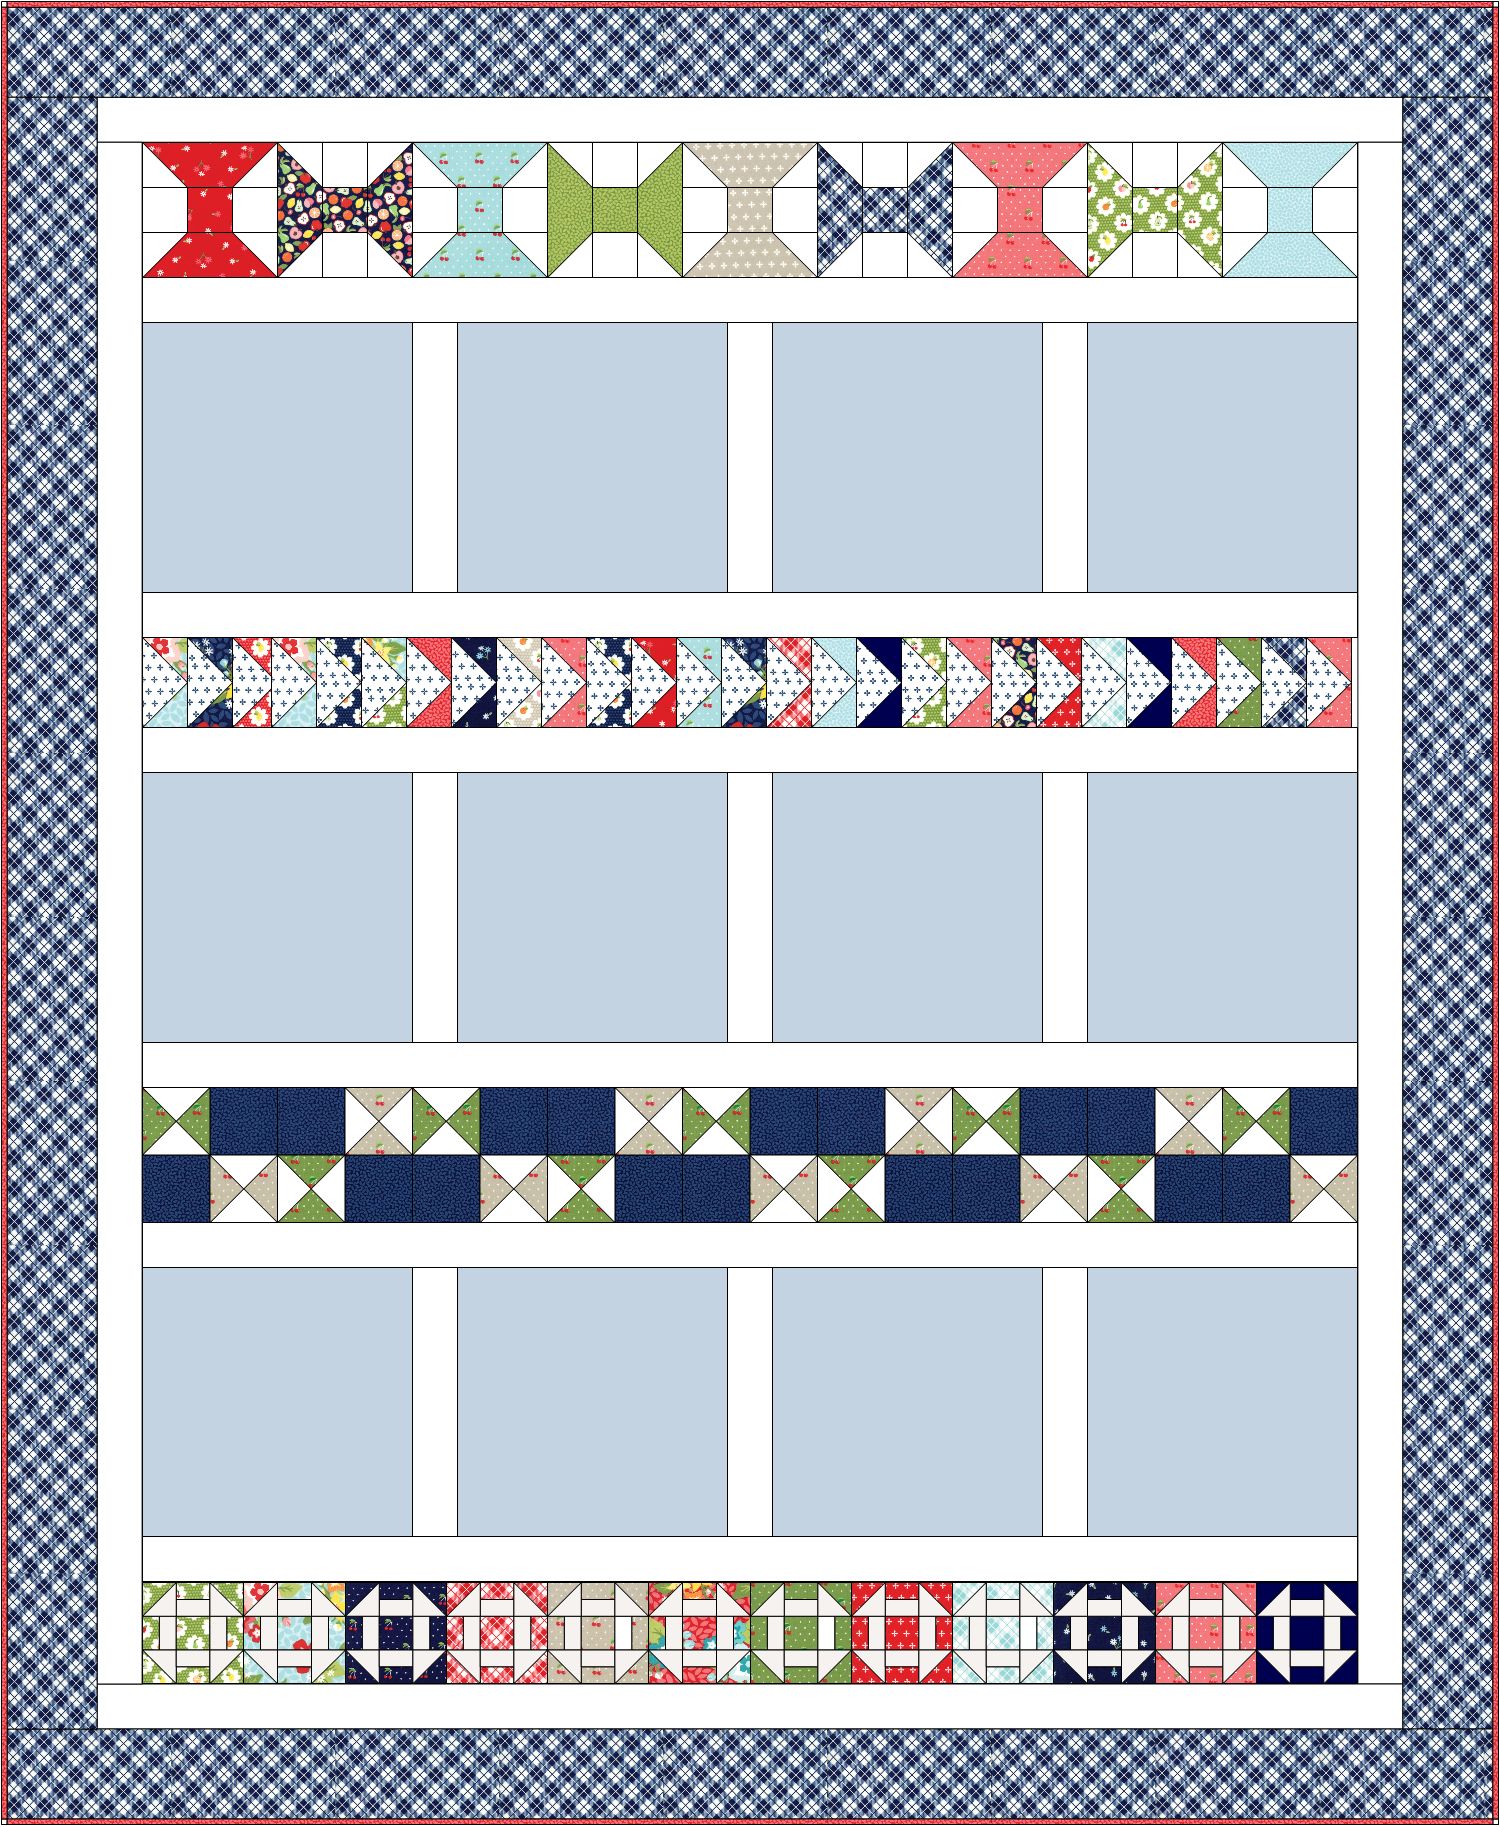
In between the flag rows, there is room for the 12” blocks you will be creating from the quilt along. You might be wondering why there are only spaces for 12 blocks when there will be 20 fabulous blocks to choose from. The answer is simple. Summertime is busy with gardening, vacations, BBQ’s and family time and we don’t want anyone to feel like they couldn’t finish a quilt. Additionally, a wide variety of blocks will be presented, with some straight-line piecing, a few curves and some appliqué. It is a perfect time for you to try a new technique or skill and create a stunning beach-themed quilt all at the same time!
Hint: If you do make all 20 blocks, have no fear, they don’t need go to waste. You can piece the remaining blocks into your backing to make a fabulous two-sided quilt!
Ready to hit the seas? Let’s get sailing!
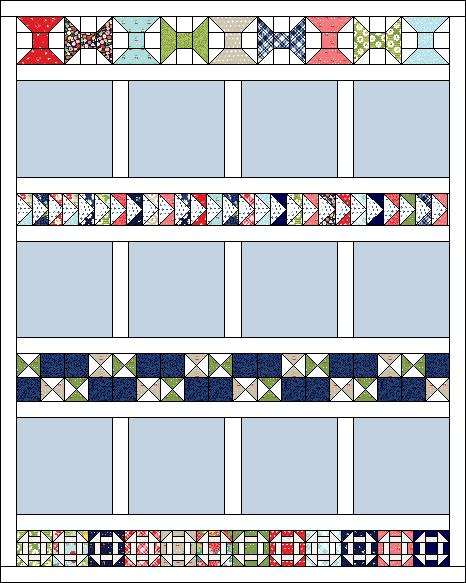
Sailing Flag Sampler
SIZE (66 ½” x 81”)
![]()
Materials for the Quilt Setting: (Individual fabric cutting instructions will be listed with each row's directions).
(Note: The fabric requirements listed below are only for the quilt setting and do not include the fabrics you will be using to create your 12” blocks.)
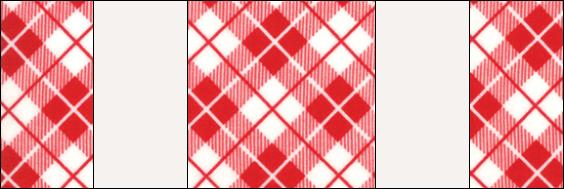
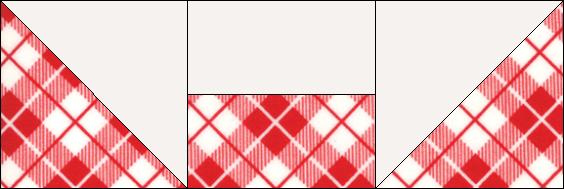
- Scraps left over from piecing blocks from the quilt. If you don’t have enough scraps left, 12-15 Fat Eighths (9" x 22") would give you variety and a scrappy look.
- Background: 2 ¼ yards
- Low volume print: 1/3 yard
- Tan print: ¼ yard
- Green print: ¼ yard
- Blue print: ¼ yard
- Outer border: 1 ¼ yards
- Binding: 2/3 yard
- Backing: 5 yards
![]()
We will be starting off Sailing Flag Sampler with construction of the filler block rows, so you can jump right in constructing your quilt! The specific cutting and piecing directions for each row are listed individually. This will allow you to mix and match your rows and to truly make your quilt unique to you!
Spool Blocks: (Make 9)
6” blocks finished/ 6 ½” blocks unfinished
Fabrics Required:
From each of (9) fabrics cut:
(2) 2 ½” x 6 ½ ” rectangles
(1) 2 ½ ” x 2 ½”" square
Background fabric:
Cut (4) 2 ½ ” WOF strips. Subcut into (54) 2 ½ ” x 2 ½” squares.
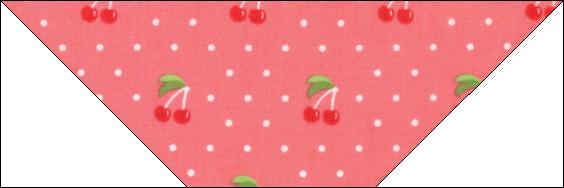
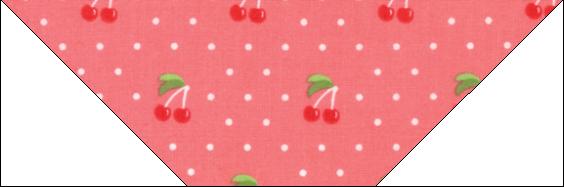
Draw a diagonal line on the back of (4) 2 ½ ”x 2 ½ ” squares. Using the stitch and flip technique, arrange one background square on the right hand side of the 2 ½ ” x 6 ½ ” rectangle. Sew along on the drawn line and trim ¼” away from the seam. Press out.
Repeat by placing a second background triangle on the left hand side of the rectangle.
Sew (2) 2 ½” x 2 ½” background squares to either side of a 2 ½”x 2 ½” print square. Combine created units as shown to create a spool block.

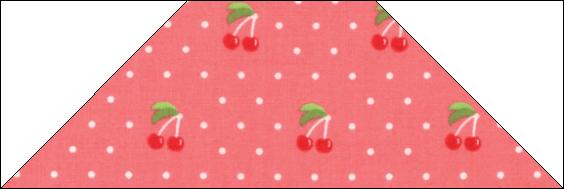
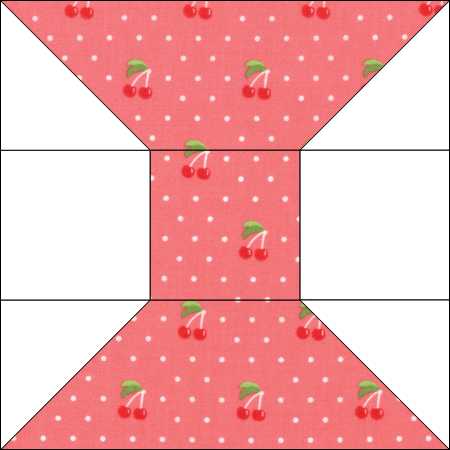
Blocks measure 6 ½ ”unfinished. Make (9) blocks.
Sew all nine blocks together to form a 6 ½” x 54 ½” (unfinished) row, alternating the direction of the blocks as shown.
 Flying Geese Blocks: (Make 27 blocks)
2” x 4” blocks/2 ½ ” x 4 ½ ” blocks unfinished
Fabrics Required:
(27) pairs of 2 ½ ” x 2 ½” squares for a total of 54 squares.
Cut (4) 2 ½” WOF strips. Subcut into (27) 2 ½” x 4 ½” low volume rectangles.

Draw a diagonal line on the back of each 2 ½ ” x 2 ½” print fabric. Place a print square right sides together on the right hand side of a 2 ½” x 4 ½” low volume rectangle. Sew along the line and trim ¼” away from the seam. Press out. Repeat on the left hand side, creating a flying geese block. Make (27) flying geese blocks. Each flying geese block will measure 2 ½” x 4 ½” unfinished.
 Sew flying geese together as shown to create a row that is 4 ½” wide by 54 ½” Press seams open to reduce bulk.
Quarter Square Triangle Row: (Make 9 Blocks)
(6” square /6 ½” square unfinished)
Fabrics Needed:
Cut (1) 4 ¼” by WOF strips of Green fabric. Subcut into (5) 4 ¼” x 4 ¼” squares.
Cut (1) 4 ¼” by WOF strips of Tan fabric. Subcut into (5) 4 ¼” x 4 ¼” squares.
Cut (2) 4 ¼” by WOF strips of Background fabric. Subcut into (10)4 ¼” x 4 ¼” squares.
Cut (2) 3 ½” by WOF strips of Blue fabric. Subcut into (18) 3 ½” x 3 ½” squares.
Make Half Square Triangle Units:
Draw a line on the back of each 4 ¼” x 4 ¼” background square. With right sides together, layer one background square and one 4 ¼” x 4 ¼” green fabric square. Sew ¼” on each side of marked lines. Cut along the diagonal line. Press and trim squares to 4” square. Make (10) green and white Half Square Triangles.
 Make Quarter Square Triangle Units:
Gather two matching Half Square Triangle units (created in above step) together and layer with opposite prints on top of each other. Draw a diagonal line on the back of the top square and sew ¼” on each side of marked line. Cut apart and press open. Trim blocks to 3 ½” square. Make (10) Quarter Square Triangle Blocks. (One will be extra)
 Repeat above steps with white background fabric and tan print fabric making (10) additional Quarter Square Triangle blocks. (One block will be extra)
Combine Quarter Square Triangle blocks with blue fabric squares as shown to create a 6 ½” unfinished blocks. Press seams open to reduce bulk.
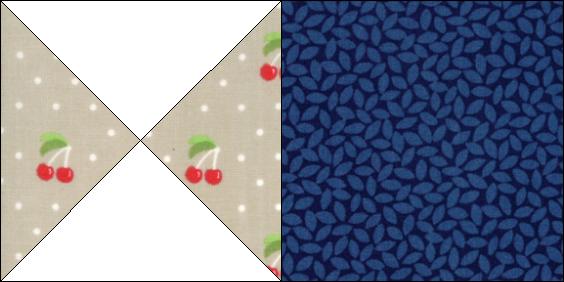
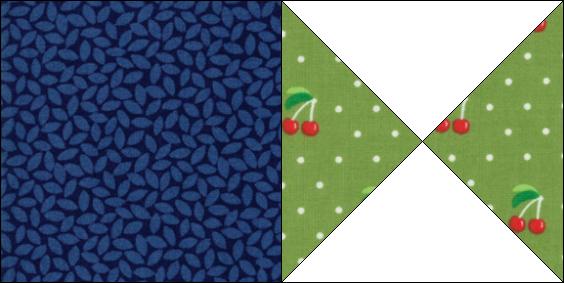
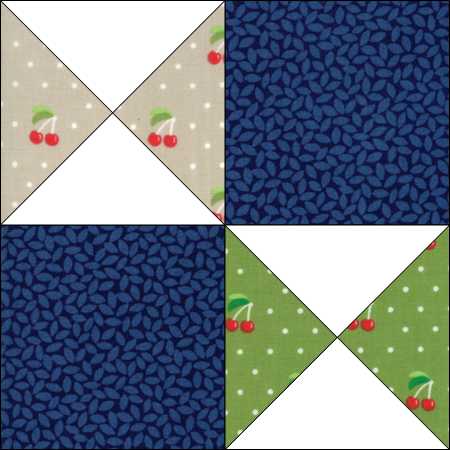
Make 9 Blocks.
Sew (9) blocks together into a row measuring 6 ½” x 54 ½” long, paying attention to rotate blocks as shown. Press seams open.
 Mini Churn Dash Blocks: (Make 12)
(4 ½” finished, 5” unfinished)
From each of 12 fabrics:
(4) 1 ¼” x 2” rectangles
(1) 2” x 2" square
(2) 2 ½” squares
From Background:
Cut (2) 2” by WOF strips. Subcut into (48) 1 ¼” x 2” rectangles.
Cut (2) 2 ½” by WOF strips. Subcut into (24) 2 ½” x 2 ½” squares.
Make Half Square Triangle Units:
Draw a line on the back of each 2 ½” x 2 ½” background square. With right sides together, layer one background square and one 2 ½” print fabric square. Sew ¼” on each side of marked lines. Cut along the diagonal line. Press and trim squares to 2” square. Repeat to make (4) Half Square Triangle units from each fabric.
Join 1 ¼” x 2” rectangle of a background and a print fabric together as shown. Repeat for a total of (4) units per fabric.
Join rectangle and Half Square Triangle units into rows and sew rows together to create a 5" unfinished Churn Dash block.

Repeat the above process with each of the remaining 11 fabrics for a total of (12) 4 ½” (5” unfinished) blocks. Sew together in one row measuring 5” x 54 ½" unfinished.

Quilt Assembly:
From Background Fabric:
Cut (19) 2 ½” by WOF strips. Subcut (3) strips into (9) 2 ½” x 12 ½” sashing pieces.
Save remaining strips for horizontal sashing and inner border.
Gather 12 blocks that you made from the Moda Bake Shop "At the Seashore" quilt along. Lay out your 12 blocks and your pieced filler rows until you are happy with the arrangement.
Hint: Keep in mind that the pieced filler rows are all the same length so their order in the quilt can be shifted. Simply alternate a pieced filler row of your choice with a pieced block row to create a custom quilt!
Assemble the (3) block rows by alternating blocks with 2 ½” x 12 ½” sashing strips as shown. Press towards sashing.

Using (9) WOF strips of background fabric, assemble (6) horizontal sashing rows. Piece 2 ½” strips together and cut to 2 ½ ” x 54 ½ ” strips.
Sew the pieced filler block rows, sashing strips, and block/sashing rows as shown. Press seams to the sashing rows.
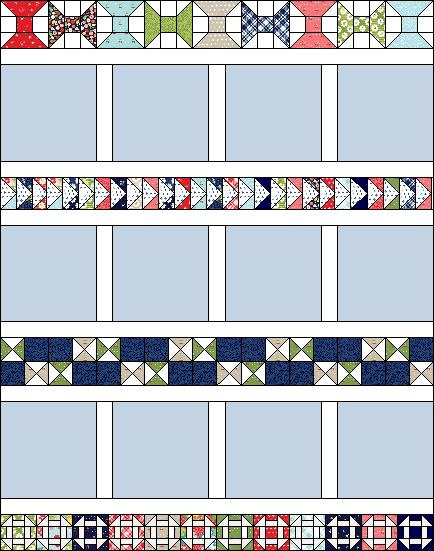
Hint: Feel free to substitute solid rows of fabric or different size rows into the mix! Don't be afraid to make your quilt individual to you! Just be sure to make any changes you need with your inner border or sashing strips.
Using the remaining (7) 2 ½” strips of fabric, piece together strips to form (2) 2 ½” x 69” left and right borders, and (2) 2 ½” x 58 ½” top and bottom borders.
Add left and right borders, and press out. Add top and bottom borders and press out.
 Cut (8) 4 ½” WOF strips from border fabric. Sew ends together to form (2) 4 ½” x 73” left and right borders, and (2) 4 ½” x 66 ½” top and bottom borders.
Add left and right outer borders and press out. Add top and bottom borders and press out.
Quilt as desired and bind with (8) 2 ½” by WOF strips.
![]()
This quilt finishes at 66½” x 81”.
I can't wait to see y'all "At the Seashore" this summer! I will be sewing along-- making and posting my blocks on my Instagram feed (@thefeltedpear). Be sure to stop by and say "Hello"! I'd love to see what you are making and cheer you along.
Susan Vaughan- The Felted Pear
{instagram: TheFelted Pear}
![]()
Comments