Warehouses Closed June 6-13 For Exclusive Event
Dec 4: Regent Street Star
Dec 4: Regent Street Star
Published:
Dec 3 2018 - 23:00

![]()
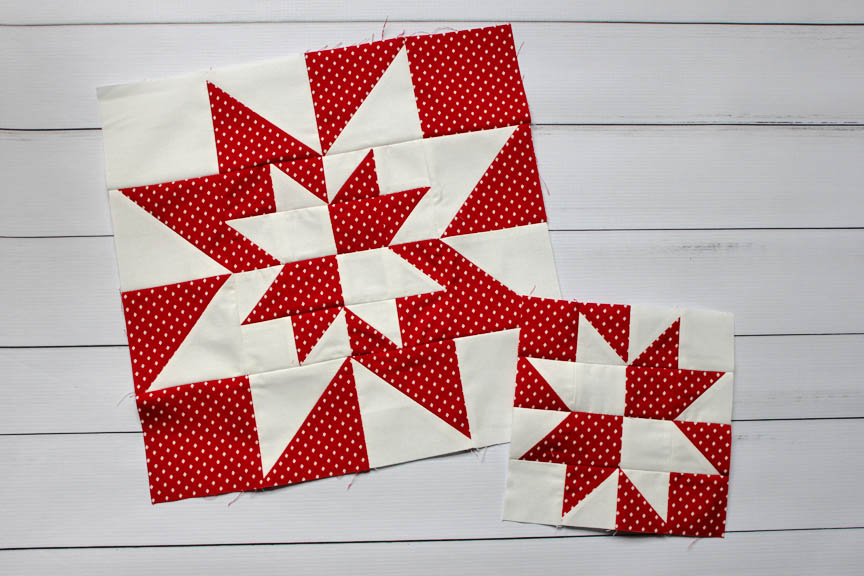
Hi! It's Kristina from Center Street Quilts. I'm happy to be joining with you to share today's Countdown to Christmas block! The block for today is called Regent Street Star and is based on the jumbo star block tutorial I shared earlier this year HERE. This time, the block has been shrunk and made with only two fabrics--one red print and a white background fabric. The Regent Street Star block will be perfect to add to your own Countdown to Christmas quilt project.
You might have noticed from the photo that the 6" and 12" blocks aren't identical (gasp!). ;) To shrink the Regent Street Star block down to a 6" size, there were some pretty tiny pieces! So instead of causing you undue stress, I decided to take the center star from the Regent Street Star block and use that by itself for the 6" block.
This block finishes at 6" or 12" square.
![]()
| 6" Block | 12" Block |
|---|---|
| From the red fat quarter, cut (4) 2 ½” squares and (4) 2" squares | From the red fat quarter, cut (2) 3½" squares, (4) 4" squares, (4) 2½” squares, and (4) 2" squares |
| From the white fat quarter, cut (4) 2 ½” squares and (4) 2" squares. | From the white fat quarter, cut (2) 3½" squares, (4) 4" squares, (4) 2 ½” squares, and (4) 2" squares |
![]()
We'll start by constructing the center star. This center star makes up the entirety of the 6" block and makes up the center portion of the 12" block. So whether you're making the 6" or 12" block, follow the instructions below to make the center star.
Gather the four red 2 ½” squares and the four white 2 ½” squares. Referring to the image below, follow the steps 1-4 to make (8) 2" half-square triangles.
- Draw a line corner-to-corner on the wrong side of the white 2½” squares.
- Pair a white square right sides together with a red 2 ½”" square. Sew two seams, each 1/4" away from the drawn line.
- Cut the pieces apart on the drawn line.
- Press the seams open and trim the half-square triangles to 2" x 2". Repeat with the remaining 2 ½” squares to make a total of (8) 2" x 2" half-square triangles.

Using the figure below as a guide, lay out the (8) half-square triangles along with the (4) white 2" squares and the (4) red 2" squares.

Assemble each row, pressing the seams open.

Sew the rows together, pressing seams open to reduce bulk. The completed center star should measure 6 ½” square.

If you are making the 6" block, you are done! Yay!
If you are making the 12" block, continue on with the remaining directions.
Gather the (4) 4" white squares and the (4) 4" red squares. Referring to the image below, follow the directions to make (8) half-square triangles.
- Draw a line corner-to-corner on the wrong side of the white 4" squares.
- Pair a white square right sides together with a red 4" square. Sew two seams, each 1/4" away from the drawn line.
- Cut the pieces apart on the drawn line.
- Press the seams open and trim the half-square triangles to 3½" x 3½". Repeat with the remaining 4" squares to make a total of (8) 3½" x 3½" half-square triangles.
Gather the remaining red and white squares along with the (8) half-square triangles and the center square to lay out the block according to the image below.

Assemble the top and bottom rows and the left and right middle sections.

Sew the left and right middle sections to the center star unit.

Sew the top and bottom rows to the center section. The finished Regent Street Star quilt block should measure 12½" x 12½".

![]()
This block finishes at 6" or 12" square (6 ½" or 12 ½" unfinished).
Thanks for following along with the Regent Street Star quilt block! I really enjoyed making my blocks and hope you do, too! Please share on Instagram using the hashtag #centerstreetquilts so I can see all of your wonderful creations! Happy Holidays and make sure to check back tomorrow for the next Countdown to Christmas block. :)
Kristina Brinkerhoff
{blog: Center Street Quilts}
{instagram: @centerstreetquilts}
{shop: Center Street Quilts on Etsy}
![]()
Posted in:
Comments