Welcome to Moda Fabrics!
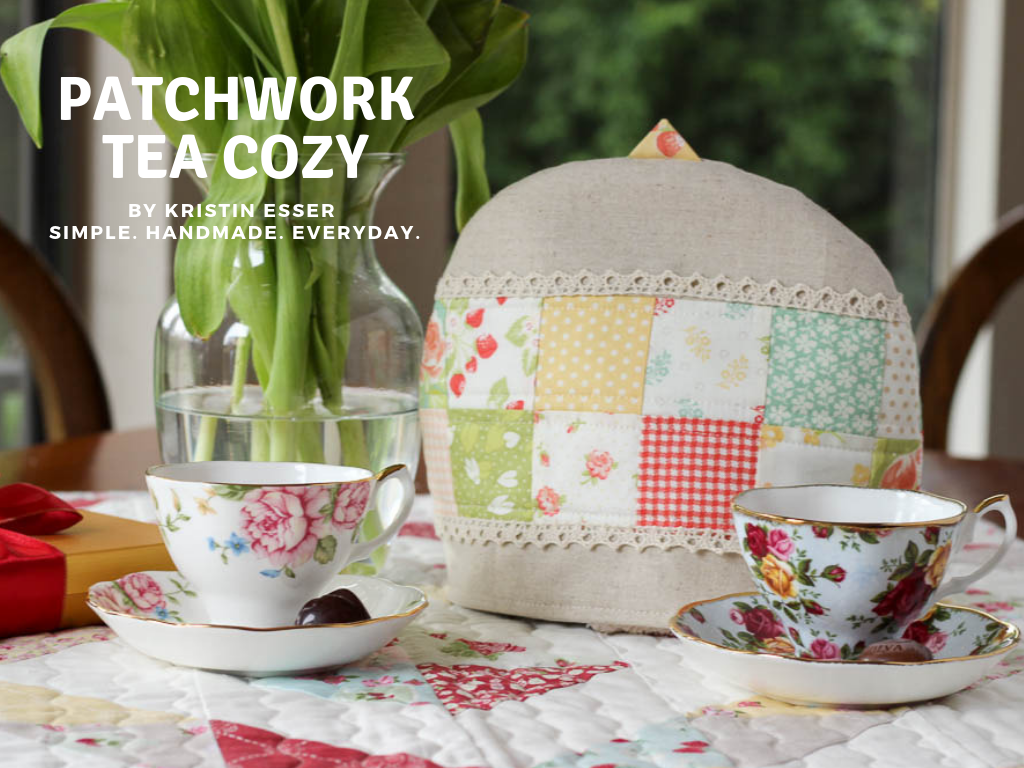
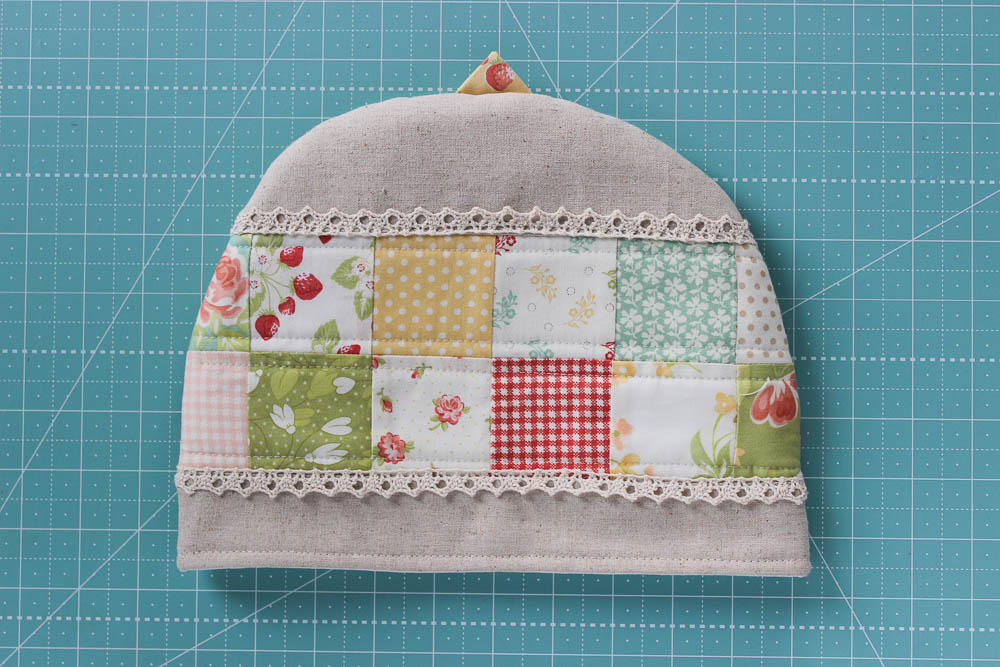
Patchwork Tea Cozy
Patchwork Tea Cozy
Published:
Oct 24 2018 - 23:00
![]()
Hi! I'm Kristin Esser from Simple. Handmade. Everyday. and I have a deep and abiding love for all things tea. From the ceremony of it, to the delicate tea cups and tea pots, to the beautiful utility of the tea cozy. I have several teapots, all different sizes and shapes, and they all need different size tea cozies to keep that cuppa warm while you chat with a friend.
So, instead of a tutorial on how to make a tea cozy for my teapot, I thought it would be more useful to give you some instructions on how to make a tea cozy to fit any teapot. And if you are anything like me, you’ll need more than one.
This project finishes at 10" x 9.5", but yours may be different.
![]()
Note: The exact amount of fabric needed depends on the size of your teapot

¼- ½ yard linen or neutral cotton fabric
1 Moda Candy (mini charms)
¼- ½ yard cotton fabric for lining
¼- ½ yard Insul-Bright (insulated batting) or cotton batting (such as Warm and Natural)
Freezer paper or several sheets of printer paper
![]()
1 ½ yards of cotton trim (optional)
![]()
(Seam allowance is ¼”, unless otherwise noted.)
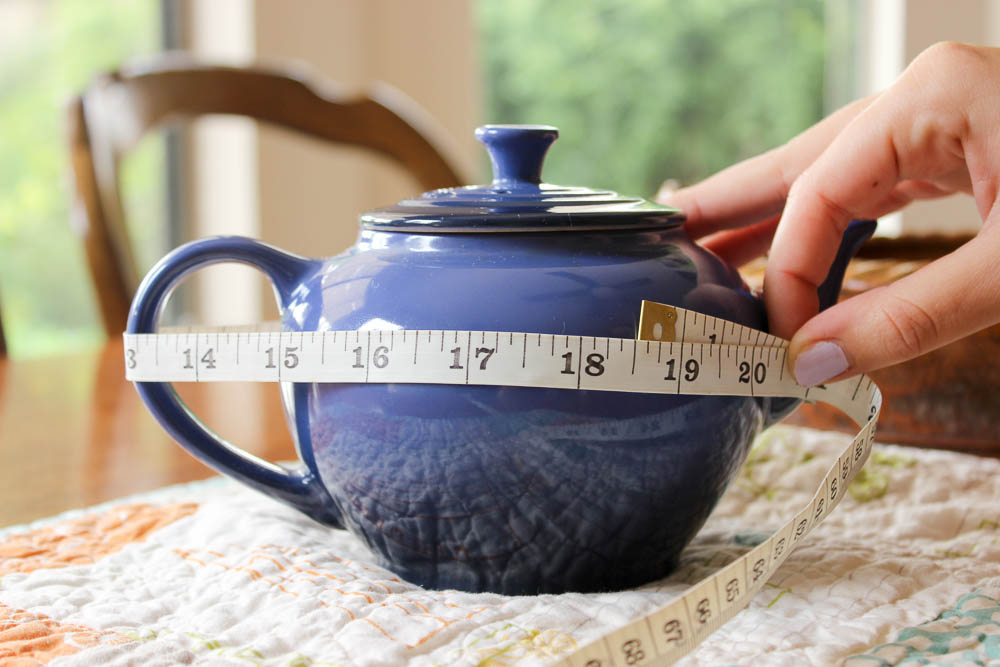
Measure Your Teapot
Measure the width of your teapot around the widest point and jot down the measurement. Mine is 18.5″.
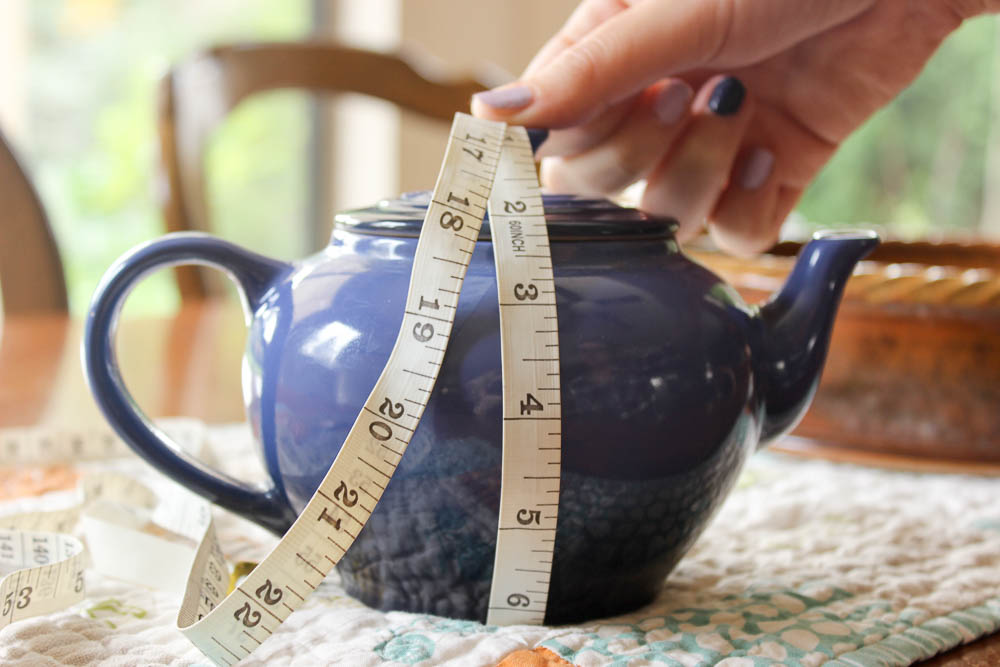
Measure the height of your teapot all the way around, top to bottom. Mine is 15.5″.
Take the width measurement, divide by 2 and add 1.5″. For mine this is: 18.5 ÷ 2 + 1.5= 10.7
Take the height measurement and divide by 2 and add 1.25″. For mine this is: 15.5 ÷ 2+1.25= 9.
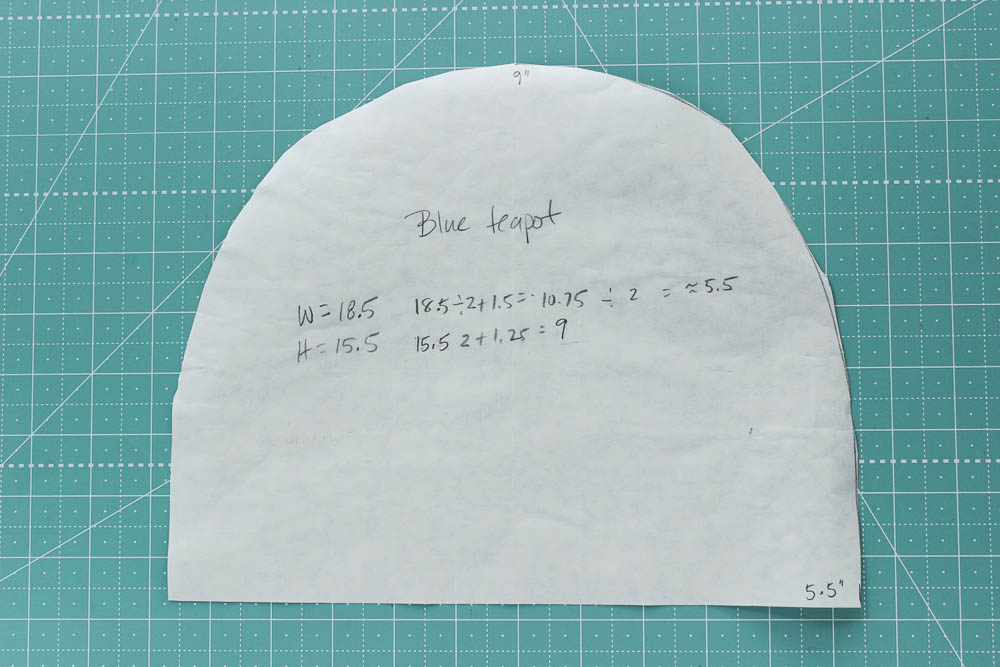
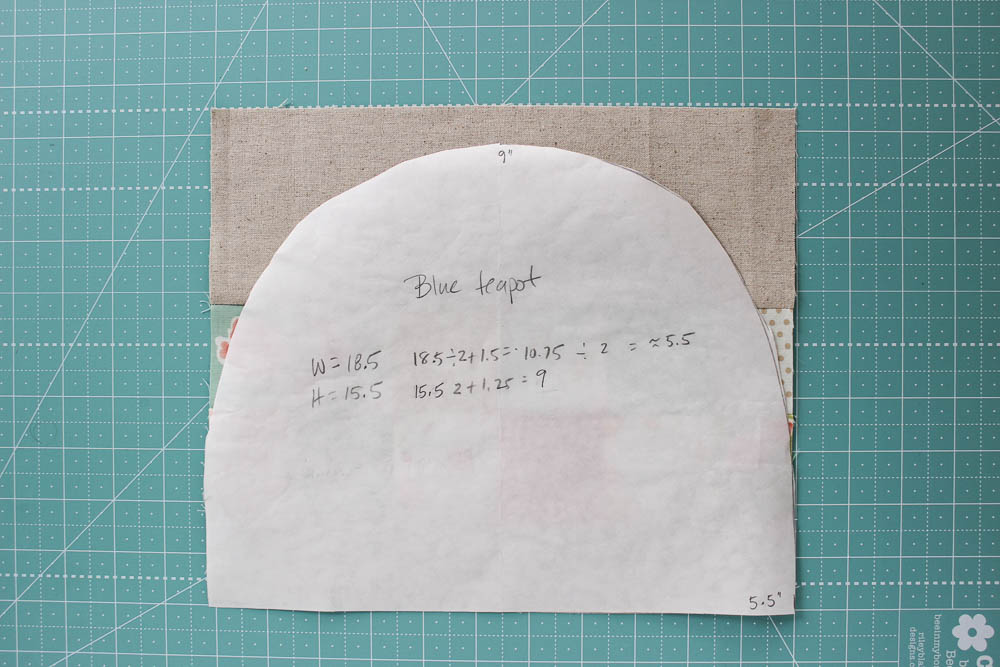
Make the Pattern
Take a length of freezer paper and fold in half. You can also use plain printer paper taped together, but freezer paper has the advantage of sticking to the fabric when you iron it, eliminating the need for pinning the pattern to the fabric later on.
Mark the height of your teapot on the freezer paper. Mine is 9″.
Divide the width measurement by 2 and mark on the freezer paper. Mine is actually 5.375″, so I rounded to 5.5″
Draw a curve from one point to the other. Cut out on the line and unfold. I like to write which teapot this is for and what the formula was, for future reference.

Make the Exterior
From the linen fabric, cut 2 rectangles that are the (width) x (height -3″). For mine that is 11″ x 6″.
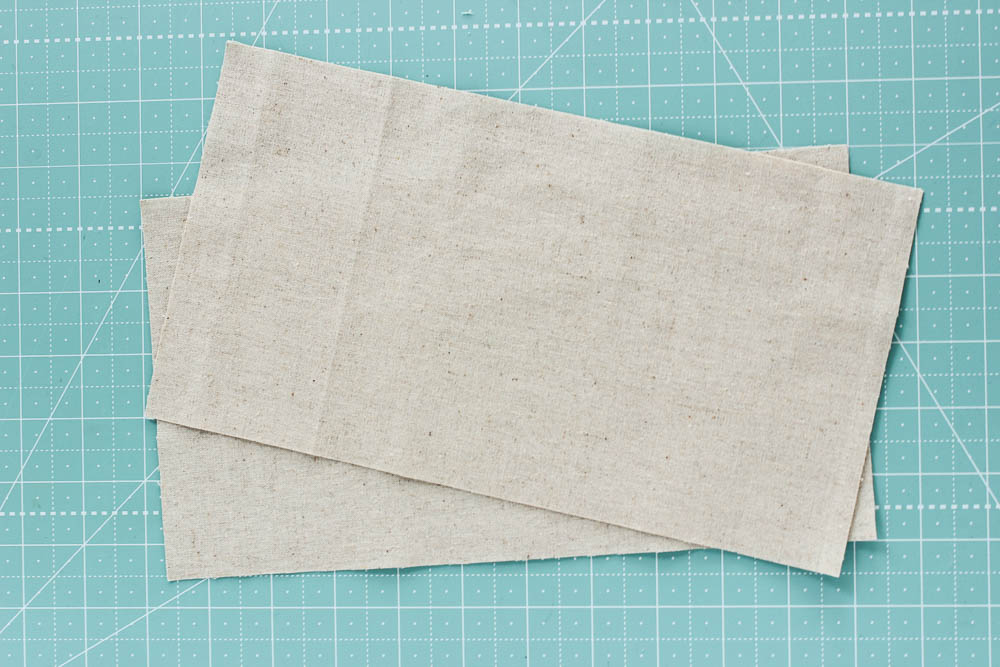
Cut a 2″ strip from the linen, across the width.
Layout the patchwork squares in a pleasing pattern. Alternating light and dark works well. Layout as many as you need to reach the width of your teapot. It takes 6 squares to reach the width I need for my teapot. Layout 2 sets of 2 rows of patchwork squares.
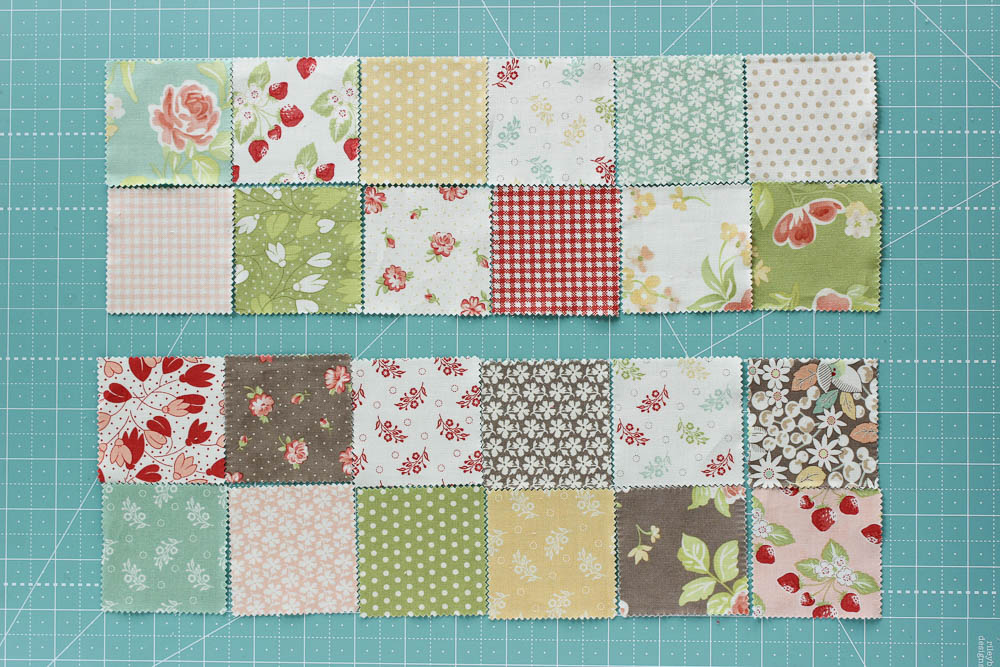
Sew together each row of squares. Press the seam allowances to the right on one row and to the left for the other row. This will help to match up the seams when you sew them together.
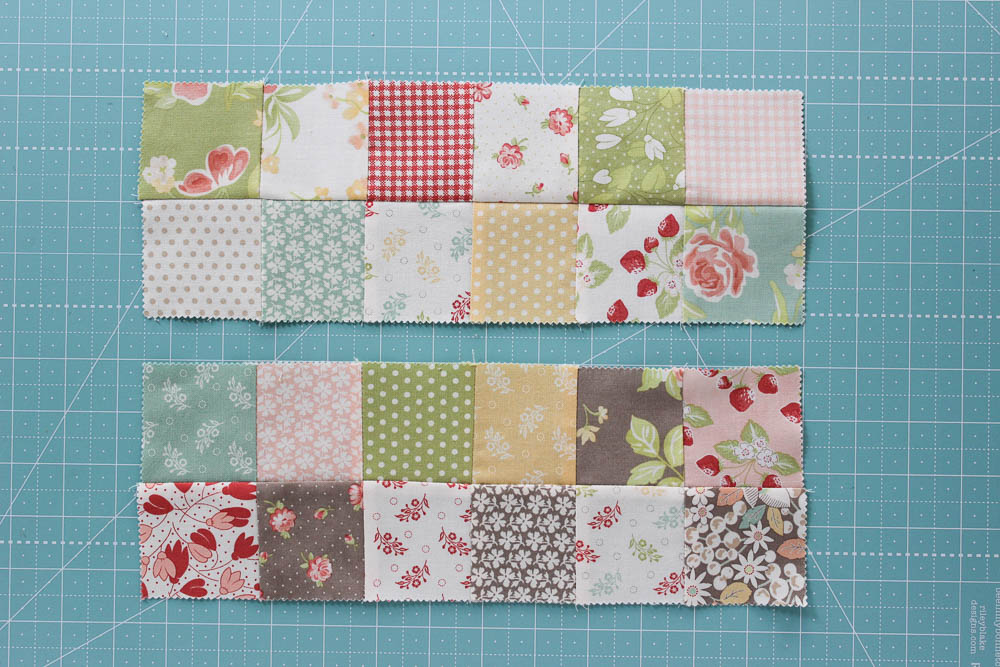
Sew the two rows together, carefully matching the seams. Press.
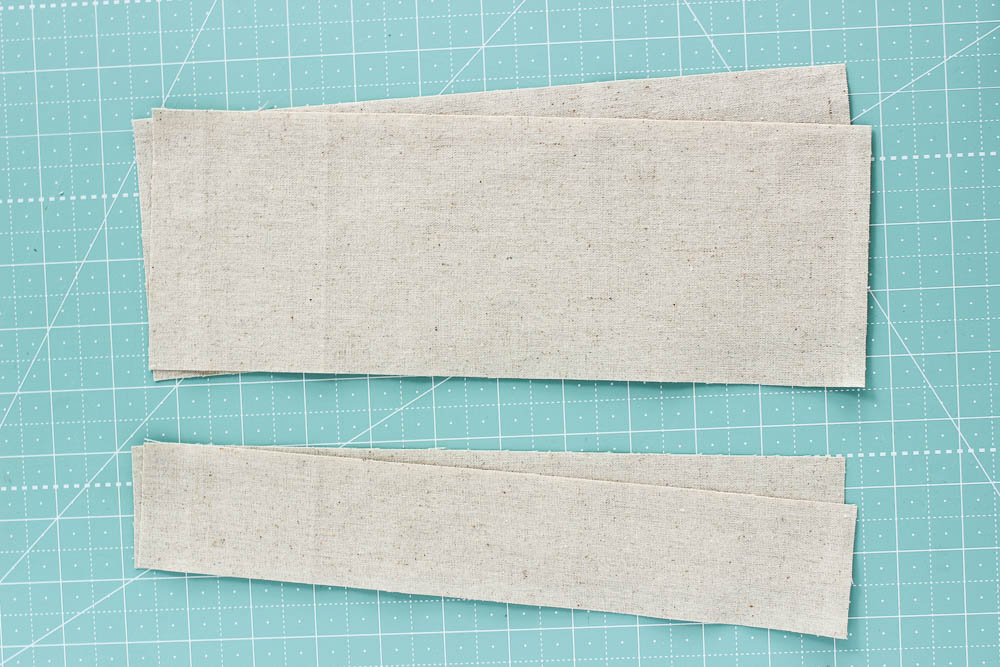
Trim the patchwork piece to the width of the linen. For me this is 11″.
Sew the patchwork piece to the 2″ strip of linen. Press.
Sew the remaining piece of linen to the top of the patchwork. Press.
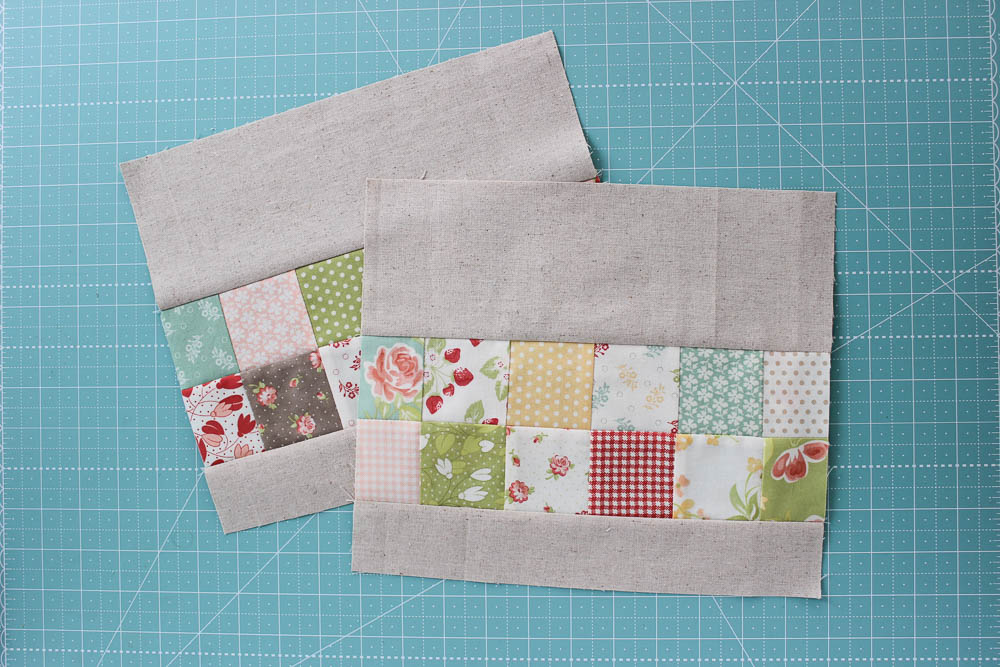
Repeat to make the second side of the cozy.
Cut Out All Pieces
Place the Tea Cozy Pattern on top of the exterior piece, with the narrower linen strip on the bottom. If you use freezer paper for your pattern, place the shiny side down (toward the fabric) and iron the pattern in place. It will temporarily fuse to the fabric, but easily lifts off after cutting. Otherwise, pin the pattern in place.
Cut out both exterior pieces following the pattern.
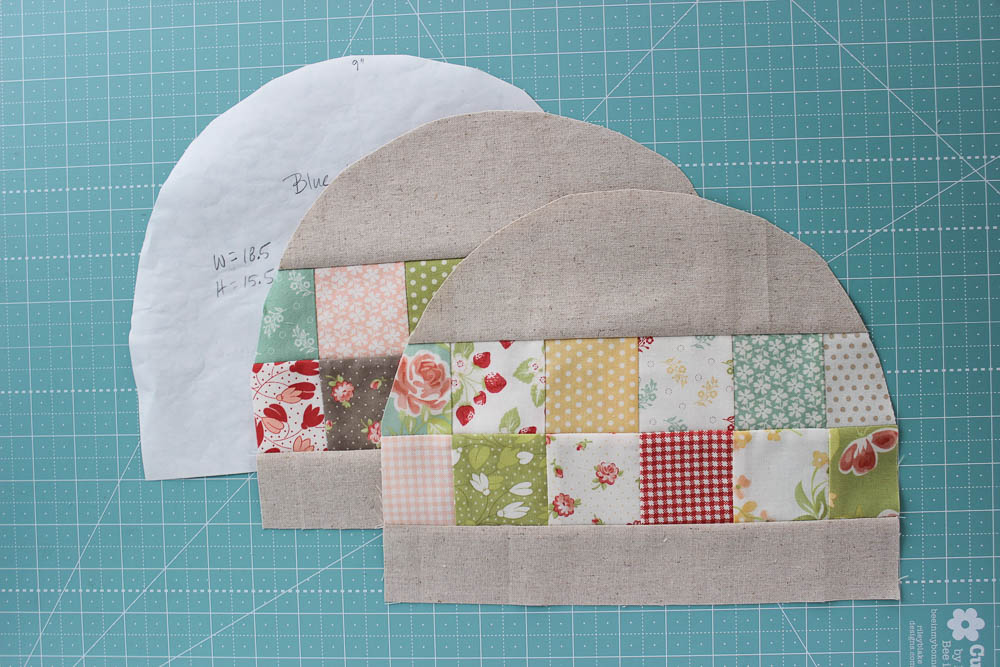
Repeat, cutting out 2 lining pieces.
Repeat cutting out 2 Insul-Bright/batting pieces.
(Note: Do not fuse the pattern to the batting pieces! It does not easily peel off from those.)
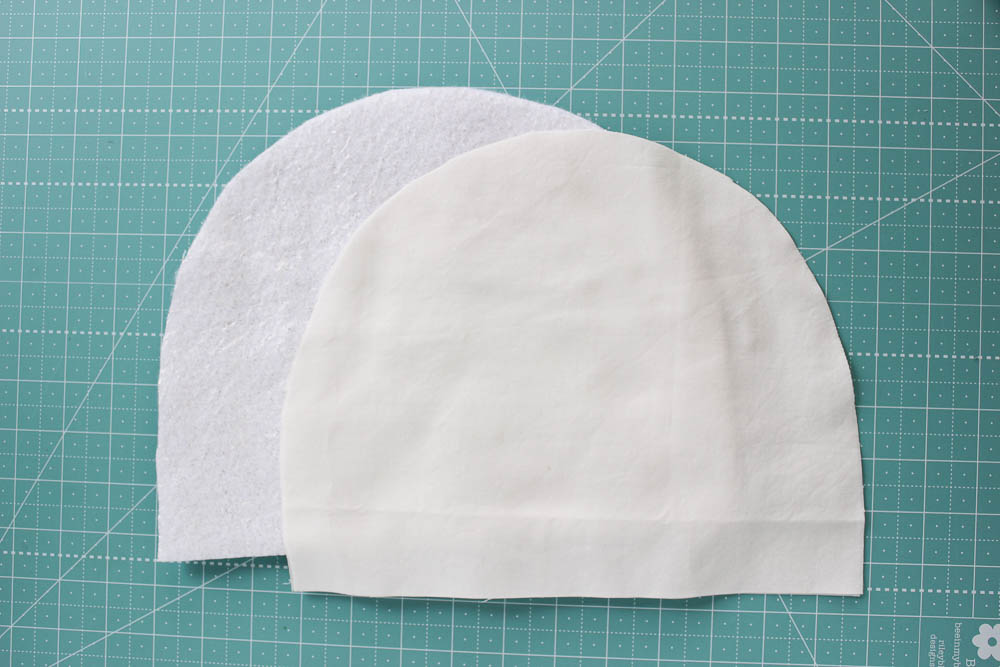
Finish the Exterior
Place an exterior piece on top of a piece of batting (shiny side down, if using Insul-Brite), and pin or spray baste together.
Quilt the patchwork. I simply stitched ¼” from each horizontal seam. I increased my stitch length to 3.0 and used a walking foot for the quilting, but a regular foot works fine too. Repeat for second exterior piece.

Sew the trim to the top and bottom of the patchwork (optional). Repeat for second exterior piece.

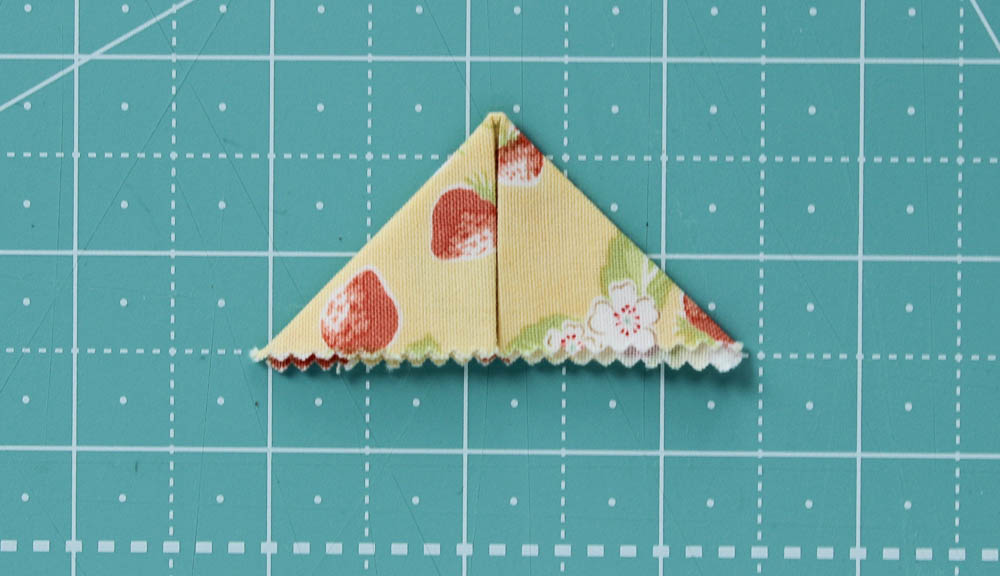
Make the Pull Tab
Note: This is optional. You can leave it off, or use a 3″ piece of ribbon, folded in half.
Fold a 2.5″ square of fabric in half and press.

Find the center of the rectangle by folding it in half again and finger press to make a crease.
Fold the edges to the center crease and press well. Set aside.
Put it Together
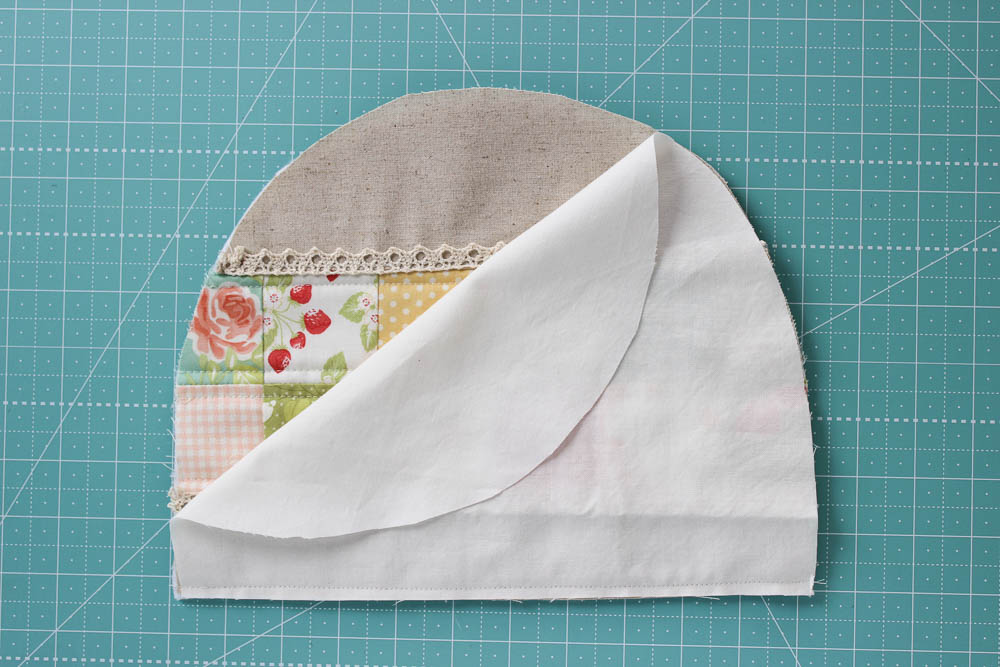
Lay the exterior piece on top of a lining piece, right sides together, and stitch along the straight edge, backstitching at the beginning and ending of the seam. Repeat on the remaining exterior and lining pieces. Press the seam allowance toward the lining.
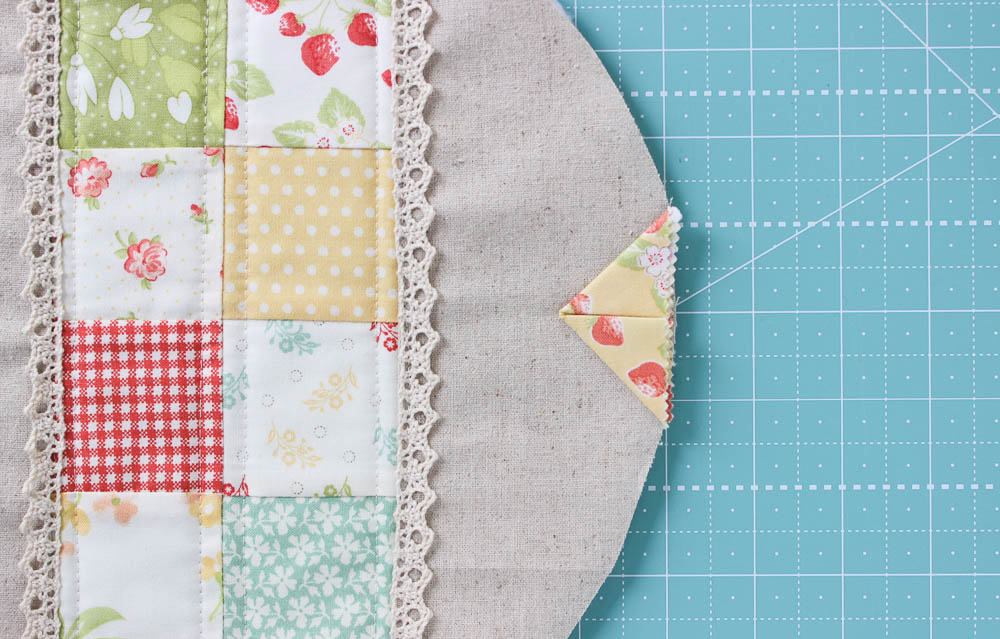
Find the top center of the exterior piece by folding in in half and finger pressing to make a crease. Place the pull tab at the top center, matching raw edges. Pin in place.
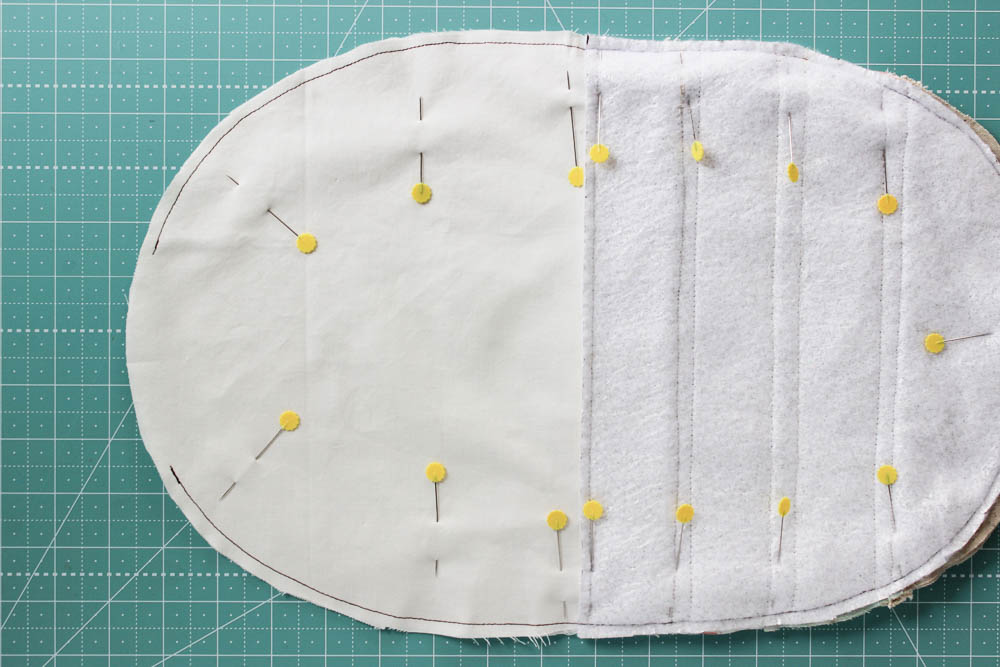
Lay the other exterior piece on top, right sides together, stacking the exterior pieces on top of each other and the lining pieces on top of each other. Pin well—making sure to match the seams where the exterior and lining meet, and where the patchwork meets.

Sew around the outside edge of the tea cozy, leaving a 3″ gap for turning in the lining. (I have sewn this in dark thread, to show where I started and stopped.)
Turn right-side out, through the gap.
Press well, turning the seam allowance in the gap under.
Sew the gap closed, either by machine—sewing about 1/8″ from the edge of the fabric, with the edges tucked in, or hand sew it closed.
Push the lining into the tea cozy and press the opening well.
Top stitch ¼” from the edge of the opening.
![]()
This project finishes at 10" x 9.5", but yours may be different.
Variations:
Feel free to play around with this pattern to make it your own! I have created several variations for my teapots over the years.

The blue one is with a single fabric on the outside, and an accent fabric was used for the lining and pulled down a half inch before top stitching so that it is used as trim. You can also fussy cut a favorite piece of fabric to highlight a certain detail, like the Downton Abbey cozy. This one also uses a lining fabric that is pulled down a bit, to act as trim. The possibilities are endless!
Kristin Esser
{blog: Simple. Handmade. Everyday. }
{instagram: kristin_esser}
{facebook: Simple. Handmade. Everyday.}
![]()
Posted in:
Comments