Welcome to Moda Fabrics!
Charm-ing Army Star Medallion
Charm-ing Army Star Medallion
Published:
Apr 17 2018 - 23:00
![]()
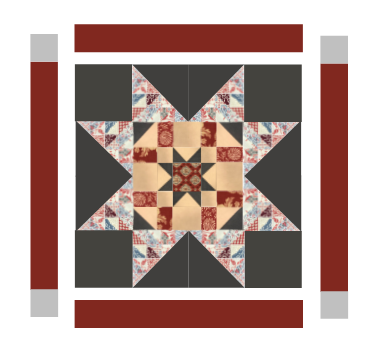
America’s history is shown throughout the history of quilts. This medallion was made with a charm pack & pays tribute to those who helped shape America with their service. Hello, I am Vicki McCarty of Calico Patch Designs. This quilt also has special meaning to me because it was quilted by my husband, Tom, who is retired from the Army National Guard.
This quilt/project finishes at 20" x 20".
![]()
1- Pondicherry Charm Pack (or use 42- 5” Squares of assorted colors)
1/2 Yard 13529 153 Indian Blue
1/6th Yard 13783 16 Indian Red
1/6th Yard Muslin
![]()
Please read directions before starting. Use 1/4” seams unless indicated. I usually have the cutting directions first, but in order to make sure we have the correct pieces from the charm pack, this pattern is going to have you make half square triangles (HST) first.
From Pondicherry Charm Pack make HST for the large star points:
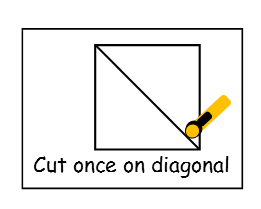
Choose 12 dark and 12 light charm squares and pair them up, one light to one dark. Place right sides together. Sew a quarter-inch seam all the way around the outside of the block. Cut diagonally from each corner to opposite corner. This will give you four perfect HST. Trim them down to 1 1/2” and press seems open. Makes 48 HST.

Choose 1 red charm square and cut 1- 2 1/2" square (for center)
Choose 3 red charm squares and cut 8- 1 1/2” x 2 1/2"
Choose 1 charm square and cut 4- 2 1/2" squares (for border corners)
Cut 12– 2" squares from assorted colors, then cut each square once on diagonal
From Solid Blue
Cut 4- 1 7/8" squares (for flying geese)
Cut 1- 5 1/2" square
Cut 4- 4 1/2" squares
Cut 3- 2 1/4" x 42” (for binding)
Cut 4- 5" squares, cut each square once on diagonal
From Red
Cut 4- 2 1/2" x 16 1/2" (for borders)
From Muslin
Cut 1- 3 1/4" square (for flying geese)
Cut 4- 1 1/2" squares
Cut 4- 2 1/2" squares
Cut 1- 5 1/2" square
Take the 5 1/2" square muslin and the 5 1/2" square solid blue and place them right sides together. Sew a quarter-inch seam all the way around the outside of the block. Cut diagonally from each corner to opposite corner. Makes 4. Press to the dark and trim each to 2 1/2" square.
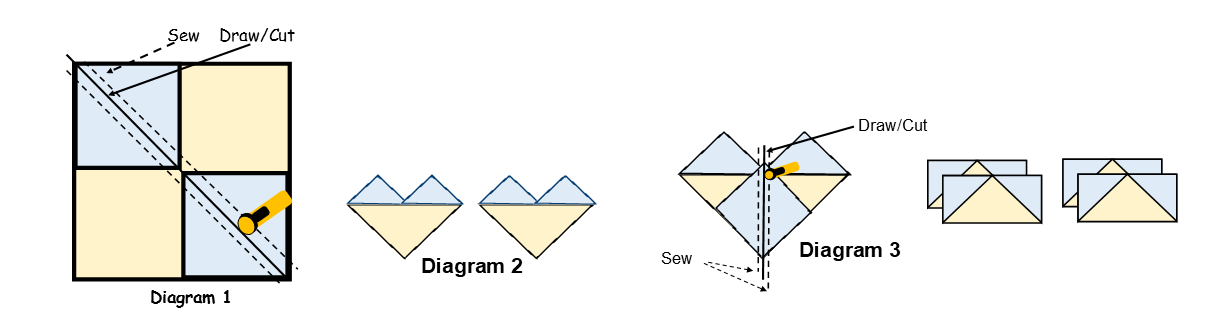
Make 4- 1 1/2" x 2 1/2" flying geese using the quick flying geese method. Begin with a 3 1/4" muslin square and 4- 1 7/8" blue solid squares. Draw a line corner to corner on wrong side of the blue squares. Place 2 blue squares on top of the muslin square right sides together as in diagram 1. Stitch 1/4” from each side of the drawn line. Cut on the line. This makes 2 heart-shaped squares as shown in diagram 2. Press to the blue. Place another blue square at the bottom of each of the two heart-shaped pieces with line as shown in diagram 3. Stitch 1/4” on each side of the line. Cut on the line and press to the blue. This makes 4 flying geese.
Trim to 1 1/2" x 2 1/2".
Next, lay your square out as shown in the diagram (next page) and stitch up in rows. Press all seams open. Pin at seams and sew rows. Press. Block should measure 8 1/2" square.

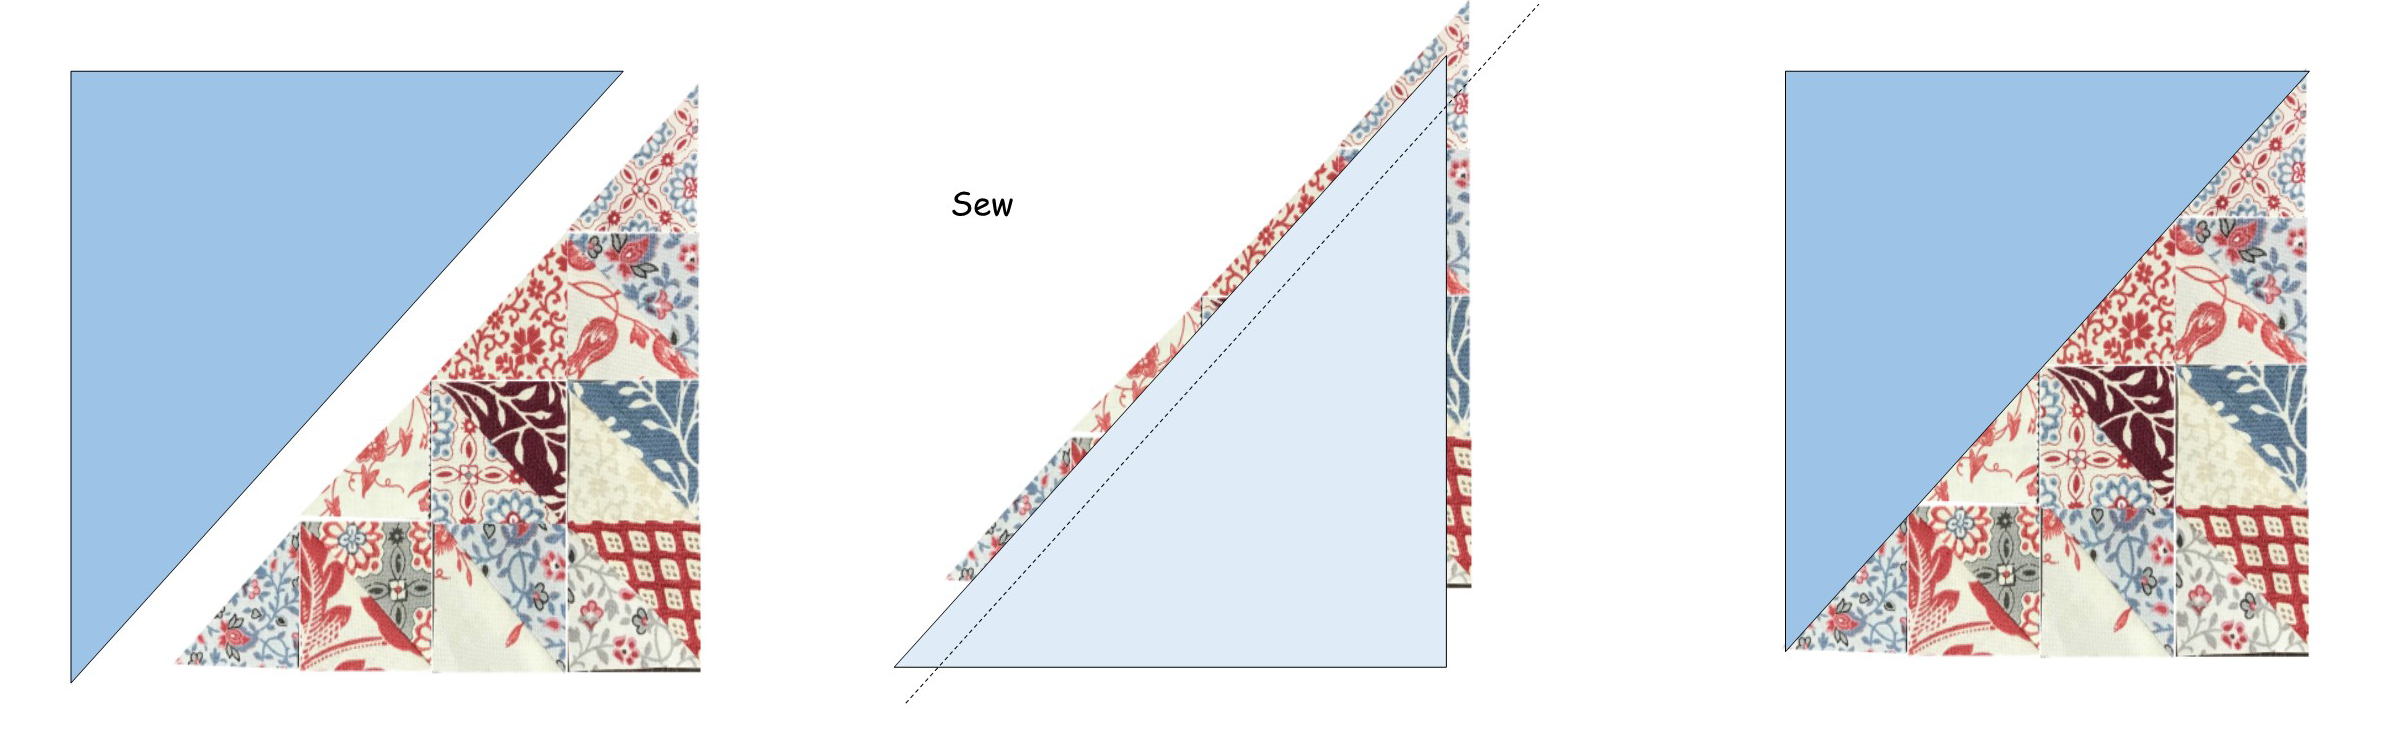
The large star points are made from the 48 scrappy 1 1/2” HST made in the very first step and the charm pack triangles cut from the 2” squares cut on the diagonal. Lay out as shown and sew together in rows. Pin at the seams and sew rows together. Press seams open as you go. Make 8. Place each scrappy triangle with a solid blue 5" triangles with the right sides together. Sew 1/4" seam and press to the blue. Trim to 4 1/2". Make 8.

Lay out blocks as shown below. Sew the top row together, the sides together and the bottom row. Press to the blue. Sew the two sides onto the Army Star. Press seams towards the star. Pin at the seams and sew the top and bottom rows onto the middle section. Press. Trim block to 16 1/2" square.

Time for borders. Sew one red 2 1/2" x 16 1/2" border on the top and bottom. Press towards border. Sew a 2 1/2" square, cut from the charm pack, to each end of two 2 1/2" x 16 1/2" side borders and press towards the red border. Pin in place and sew to each side of quilt. Press.
Quilt, Bind and Enjoy!
![]()
This quilt finishes at 20" x 20".
I Hope you enjoy this project. I have quilted for over 40 years and owned and operated Calico Patch Quilt shop for over 15 years. Ask for my patterns at your local quilt shop and please follow me on Instagram and Facebook, @calicopatchdesigns. Watch for my booth and classes at AQS Quiltweeks across the country as well as other favorite quit shows. Visit calicopatchdesigns.com or stop by the shop if passing through the Blue Grass State!
Vicki McCarty
Calico Patch Designs
![]()
Posted in:
Comments