Welcome to Moda Fabrics!
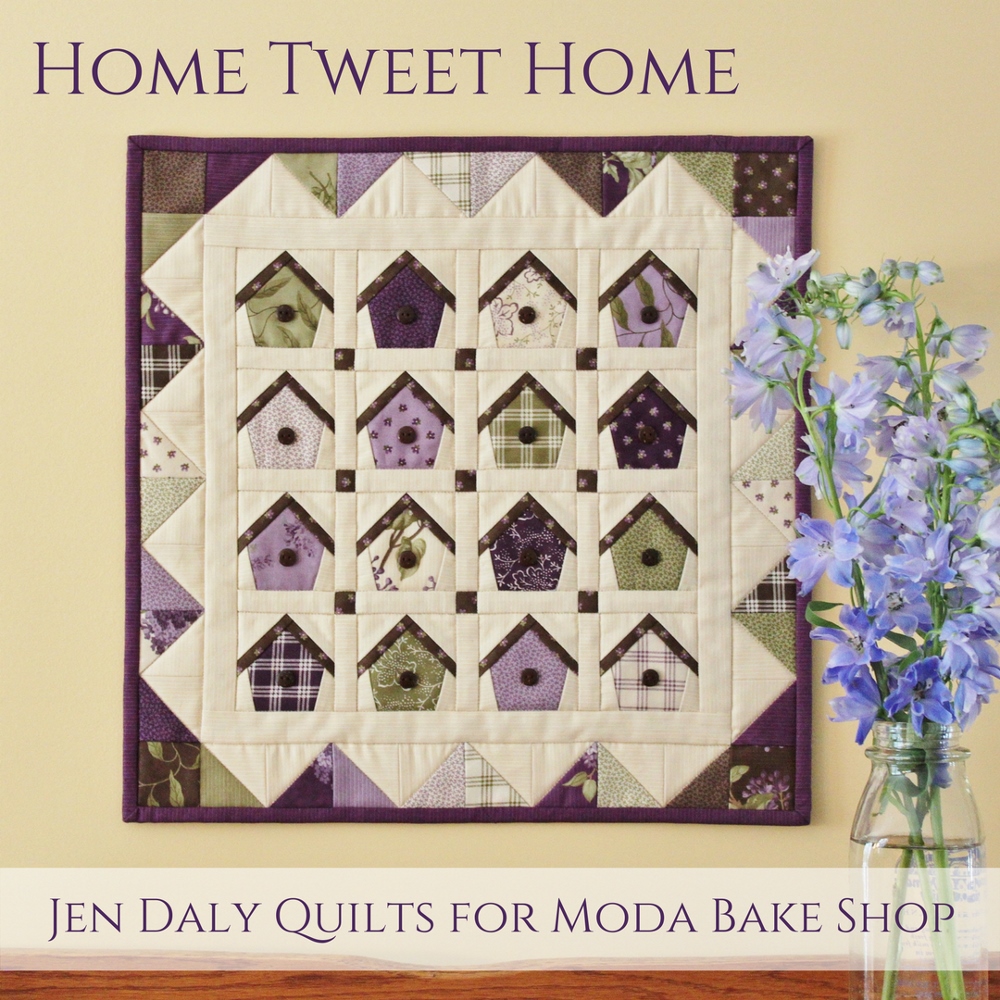
Home Tweet Home Mini Quilt
Home Tweet Home Mini Quilt
Published:
Jan 23 2018 - 23:00
![]()
Hi there! I'm Jen Daly and I'm so happy to be back at the Moda Bake Shop today with my new mini charm pack project, Home Tweet Home. If you're feeling a little winter-weary, this sweet mini quilt is the perfect reminder that spring is right around the corner. I made my quilt with "Lilac Ridge" by Jan Patek Quilts and I just love the combination of pretty florals and subtle plaids and stripes—beautiful!
This little quilt finishes at 15½" x 15½".
Now let's get started!
![]()

1 Mini Charm Pack (shown in Lilac Ridge by Jan Patek Quilts for Moda)
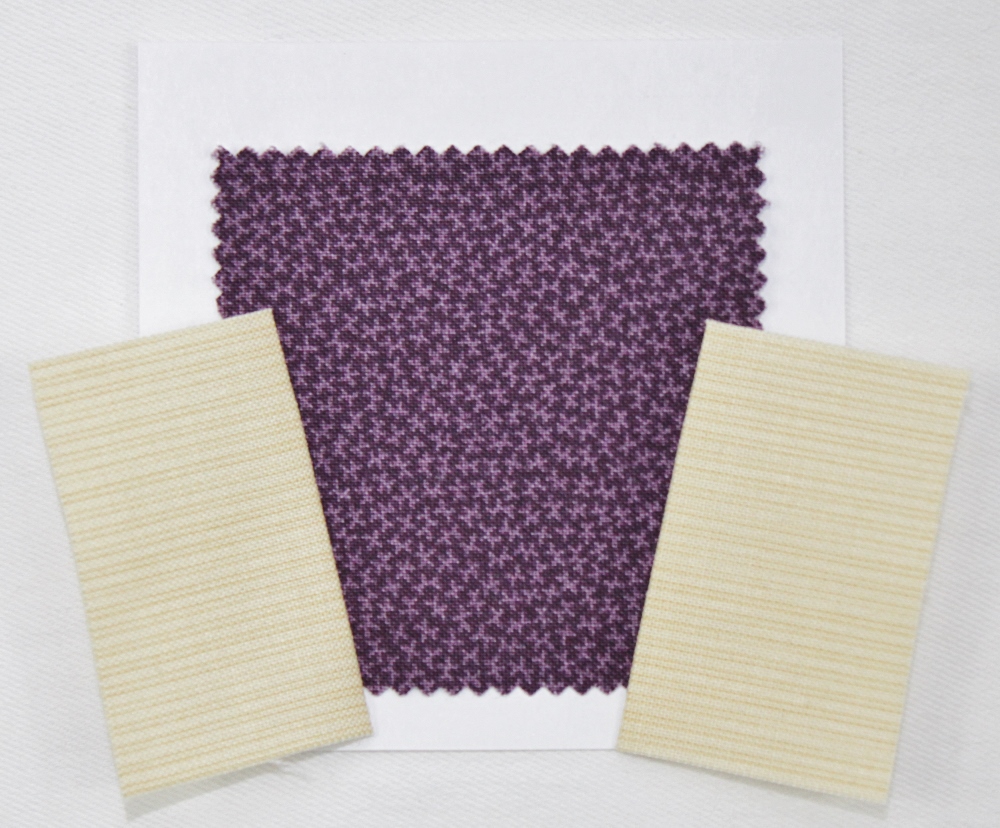
½ yard background fabric (shown in Lilac Ridge Cream—2212 11)
⅛ yard birdhouse roof fabric (shown in Lilac Ridge Earth Brown—2216 15)
½ yard backing fabric (shown in Lilac Ridge Purple—2212 16)
¼ yard binding fabric (shown in Lilac Ridge Purple—2215 16)
batting measuring 18" x 18"
![]()
16—⅜" (or 9mm) buttons
![]()
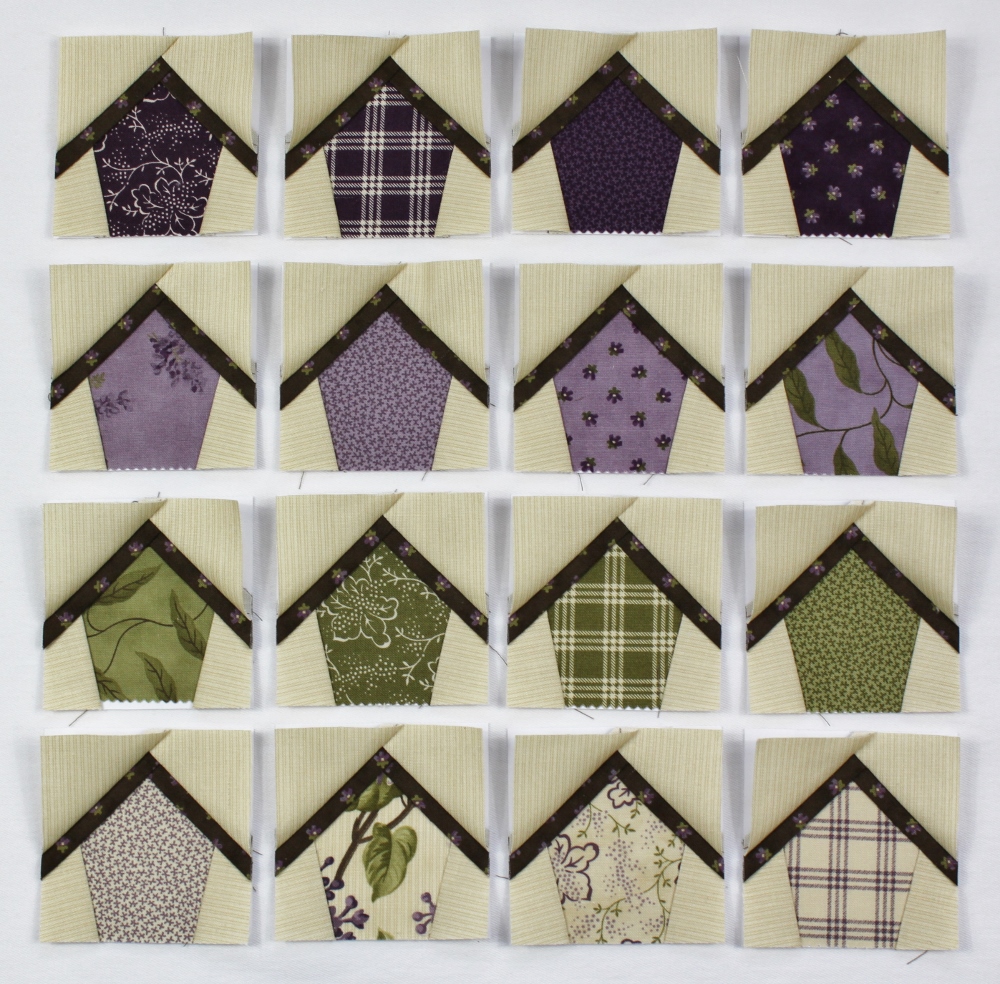
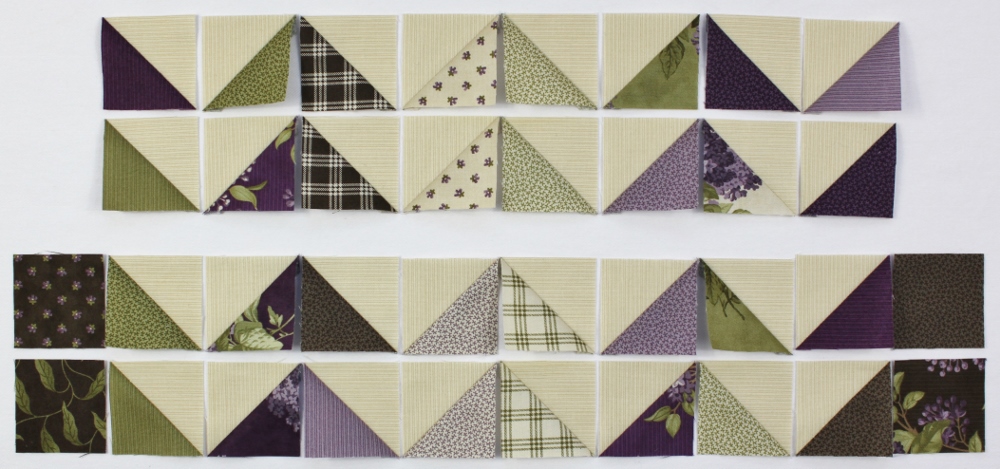
Before you begin, it may help to take a few moments to sort your mini charm squares. You'll need 16 mini charm squares for the birdhouses, 16 for the half-square-triangle units in the outer border and 4 for the corners in the outer borders.
Here are the charm squares that I chose for my birdhouses:

Here are the charm squares that I chose for the half-square-triangle units in the outer border (note that I set aside a couple extra charm squares just in case I wanted a bit more variety):
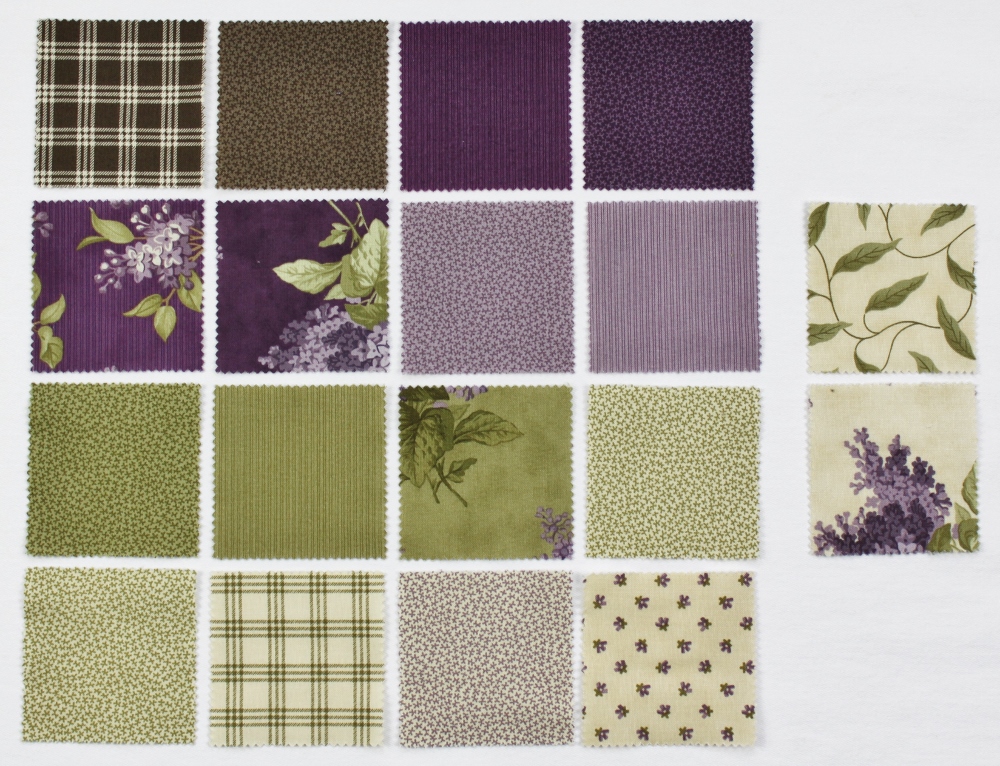
And finally, here are the charm squares that I chose for the corners of the outer border:

Cutting:
From the background fabric, cut:
- 32 squares, 2½" x 2½" — further cut 16-2½" squares in half diagonally to yield 32 triangles
- 32 rectangles, 1½" x 2"
- 24 sashing strips, 1" x 2¾"
- 2 border strips, 1¼" x 11"
- 2 border strips, 1¼" x 12½
From the roof fabric, cut:
- 32 rectangles, 1" x 2¾"
You'll also need to cut 9 cornerstones, 1" x 1". You can cut these from leftover mini charm squares or from the roof or binding fabric. I originally planned to use the purple binding fabric for my cornerstones and they are pictured below, but when I assembled the quilt, I decided that I would prefer to use the brown roof fabric and cut new cornerstone squares.

Make the birdhouse blocks:
Before we begin, here are a few tips for paper piecing. If you're new to paper piecing, you might also find it helpful to check out some online video tutorials first—YouTube has several.
- When positioning fabric shapes for sewing, it helps to hold the foundation patterns and fabric shapes up to a light source (window, light box, lamp) to check your positioning.
- Shorten your stitch when paper piecing to 18-20 stitches per inch. This helps you to more readily remove the paper from the back of your work when you're finished.
- Foundation papers specifically designed for paper piecing are great to work with and much easier to remove from your finished work. If you don't have access to foundation paper and decide to use regular copy paper, just be very careful when removing it from the back of your work to make sure you don't pull out your stitches.
- Start and stop sewing a few stitches beyond each sewing line.
Here's a link to a pattern sheet containing 6 birdhouse foundation patterns. You'll need to print off three sheets for the 16 birdhouses. Before you begin, make sure that the foundation patterns measure 2¾" x 2¾" from outermost line to outermost line.
To paper piece the birdhouse blocks:
- Place a birdhouse foundation pattern right side down on a flat surface. Position a charm square right side up on the blank side of the paper, making sure that it completely covers section A1 and extends at least ¼" beyond all sides of section A1. Pin charm square in place. Note: I aligned the bottom of the charm square with the bottom outermost line of the foundation pattern to make sure that the block had sufficient seam allowance. This is when tip #1 (above) comes in handy!
2. Position 1 background fabric 1½" x 2" rectangle atop the charm square with right sides together. The long side of the rectangle should run parallel to the line between sections A1 and A2 and should extend into section A2 by at least ¼". Position the background fabric rectangle in such a way that when folded open after sewing, it will completely cover section A2 and extend at least ¼" beyond all edges of the section.

3. Flip your work over and stitch directly on the line between sections A1 and A2. Press seam.
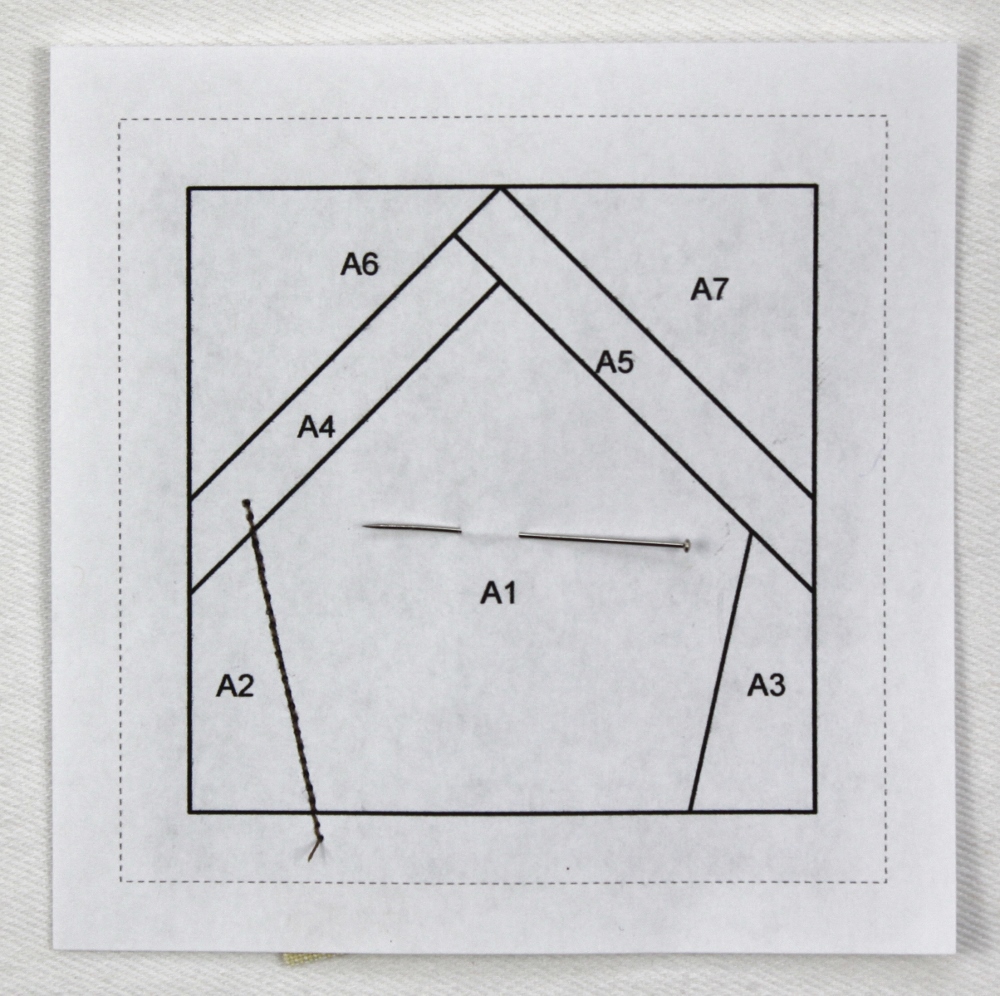

4. Trim seam allowance to a scant ¼".

5. Open fabric and press again. Before moving on to the next area, make sure that the background fabric rectangle covers A2 completely, including an extra ¼" on all sides.

6. Continue in the same manner, covering area A3 with a background fabric 1½" x 2" rectangle.
7. Cover areas A4 and A5 with roof print 1" x 2¾" rectangles.


8. Cover areas A6 and A7 with background fabric triangles (cut diagonally from 2½" squares).
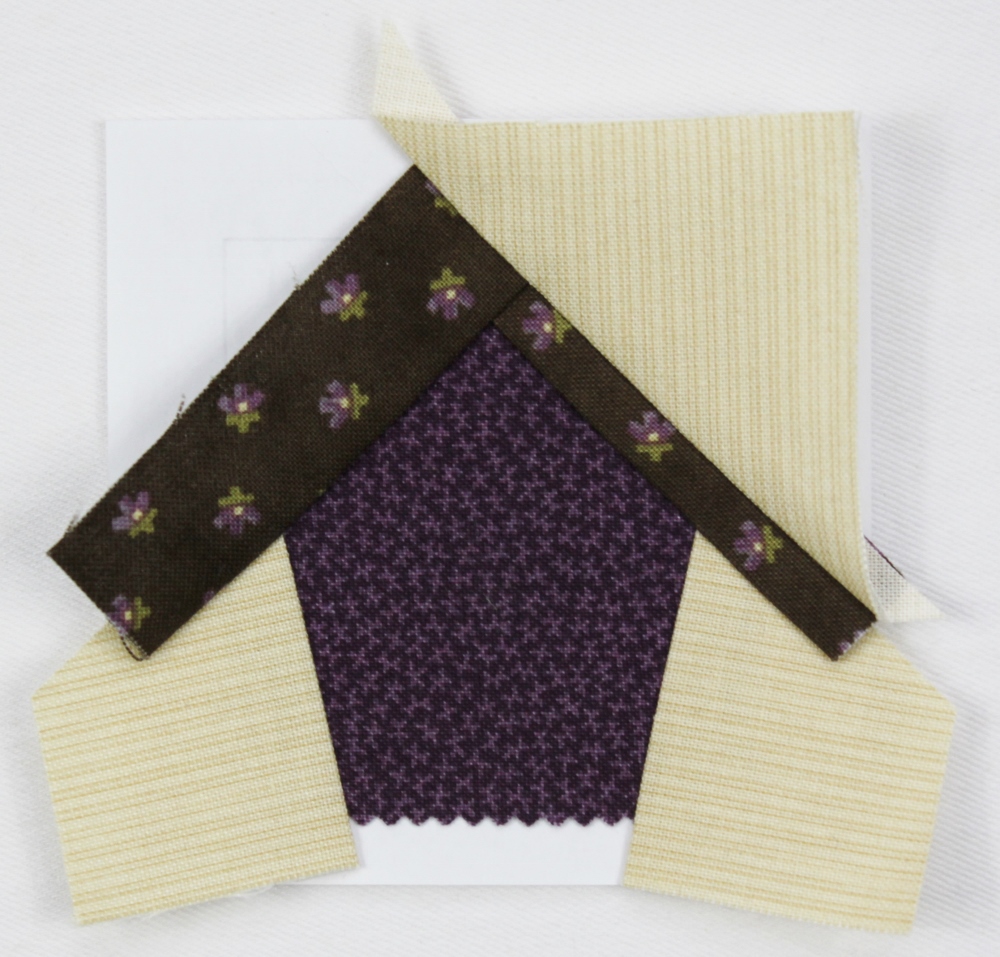

9. Flip work over and trim through all layers carefully along outermost line.

![]()
10. Repeat to make 16 birdhouse blocks measuring 2¾" x 2¾" unfinished.
Make half-square-triangle units:
- On the wrong side of each of the remaining 16 background fabric 2½" x 2½" squares, lightly draw a diagonal line from corner to corner. Then draw a line ¼" away from either side of the center diagonal line.
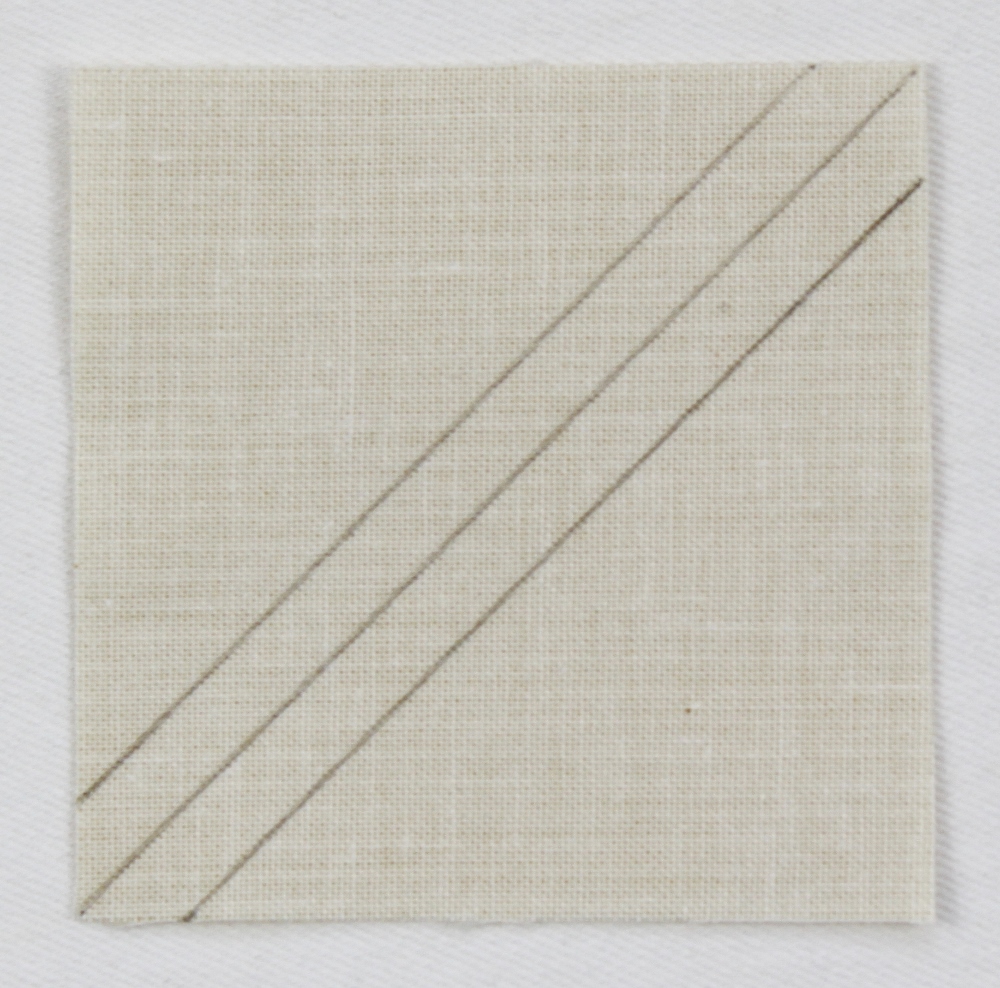
2. Layer a marked background fabric 2½" square atop one of the charm squares that you reserved for your outer border with right sides together.
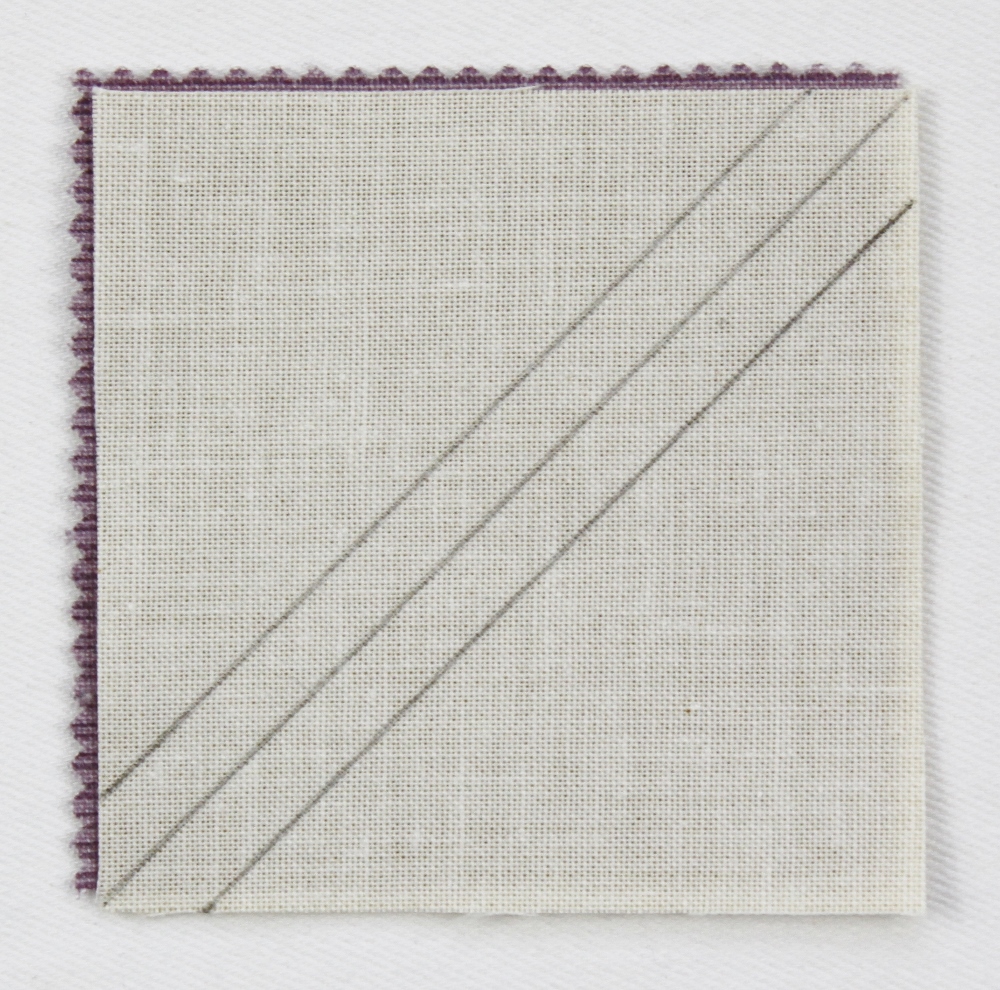
3. Stitch on two outside drawn lines, but not on center drawn line.
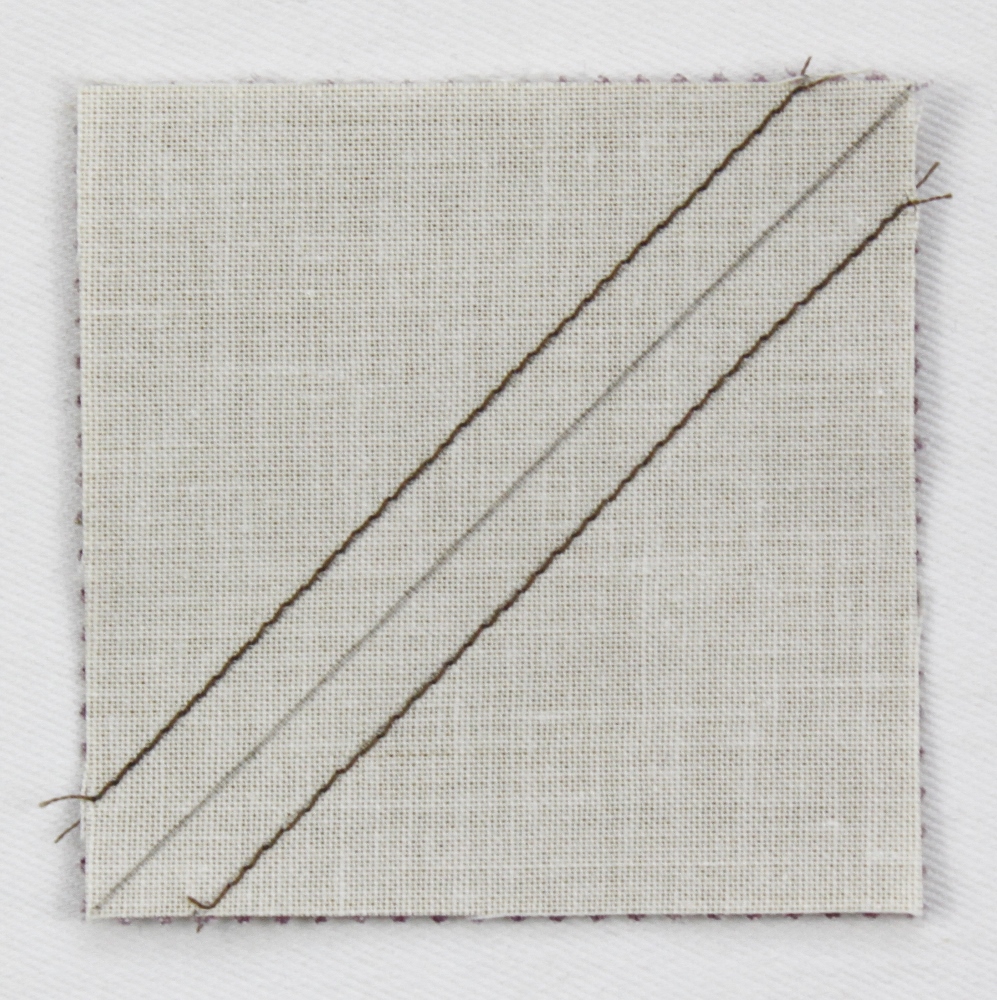
4. Cut unit in half diagonally on center drawn line.
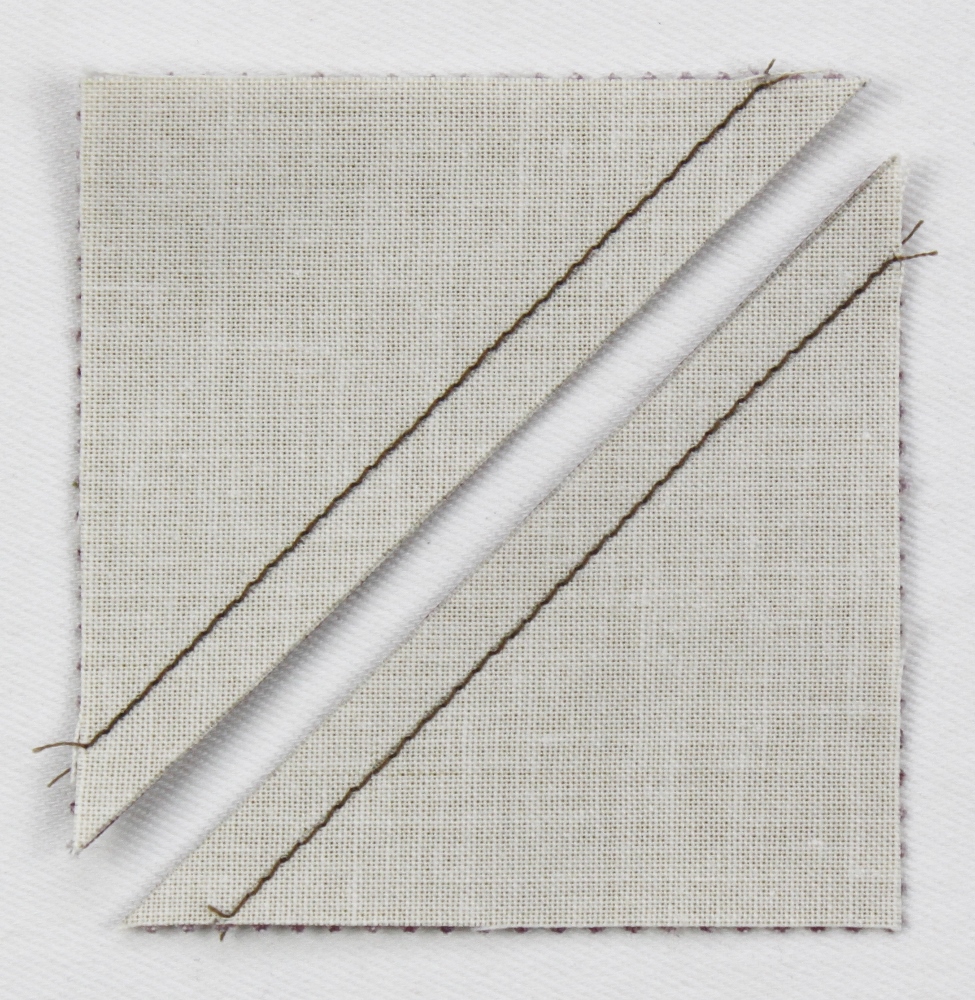
5. Press above units open to create two half-square-triangle units. Press seam allowances away from background fabric.
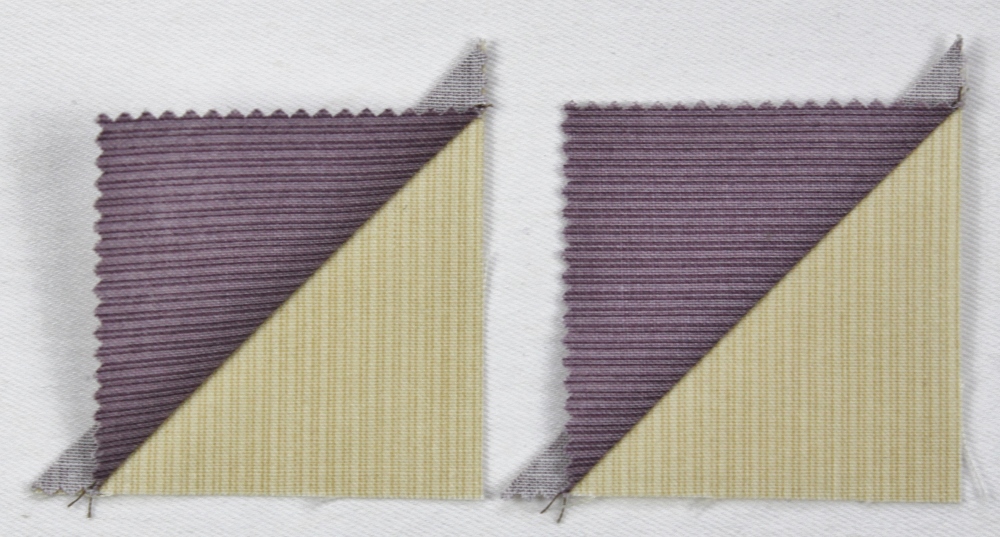
6. Trim half-square-triangle units to 2" x 2" unfinished. It helps to use a ruler with a 45° line on it. Before trimming, make sure that the 45° line runs along the diagonal seam of the half-square-triangle unit. Trim the right and top edges of the unit, then flip 180° and trim the two remaining edges in the same manner.

7. You should end up with 2—2" x 2" unfinished half-square-triangle units.

8. Repeat to make 32—2" x 2" half-square-triangle units.

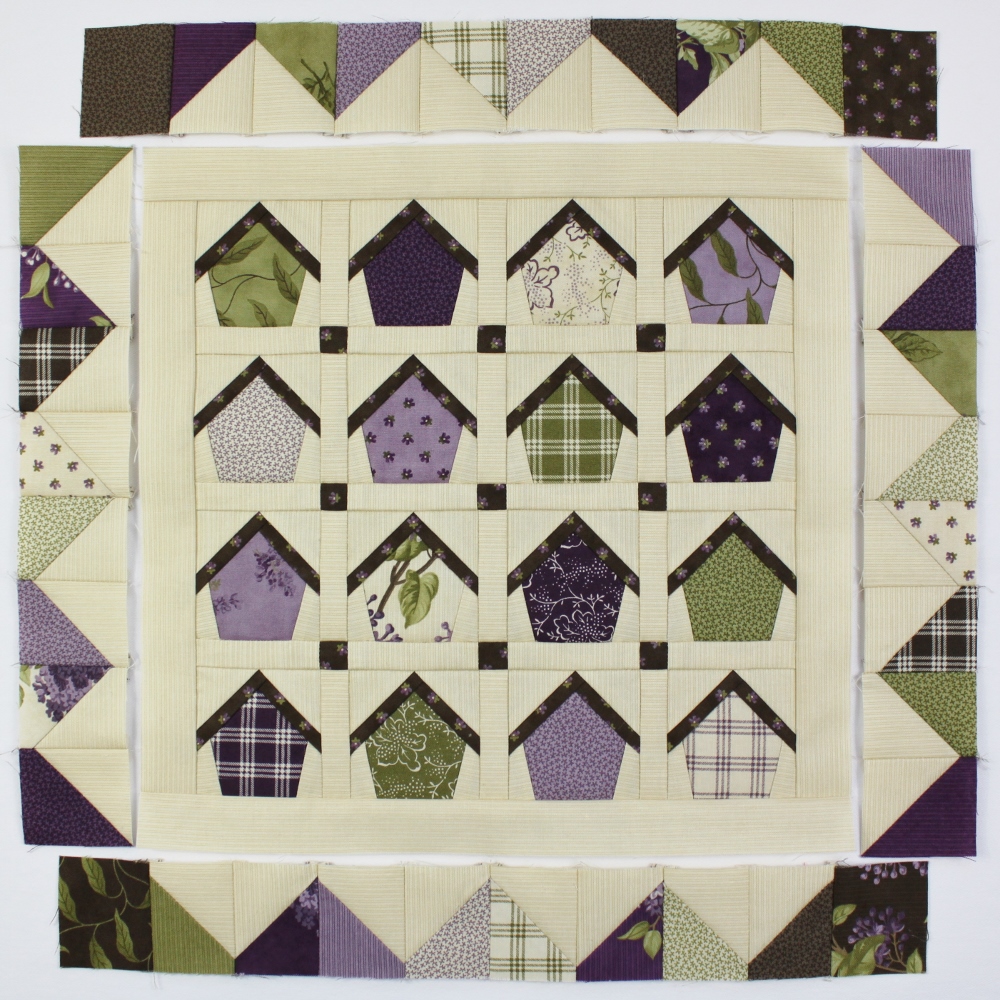
Assemble quilt:
- Lay out 16 birdhouse blocks and 12 background fabric sashing strips in 4 rows, alternating birdhouse blocks and sashing strips as follows.

2. Join the pieces in each row, pressing seam allowances toward the sashing strips.

3. Lay out 12 sashing strips and 9 cornerstones in 3 rows, alternating sashing strips and cornerstones as follows.

4. Join the pieces in each row, pressing seam allowances away from the cornerstones.

5. Lay out 4 birdhouse rows and 3 cornerstone rows as follows.

6. Join together rows, pressing seam allowances toward the cornerstone rows.

7. Sew a 1¼" x 11" background fabric border strip to the left and right sides of the quilt center, pressing seam allowances toward the border strips. Sew a 1¼" x 12½" background fabric border strip to the top and bottom of the quilt center, pressing seam allowances toward the border strips.


8. Trim 4 charm squares reserved for outer border corners to 2" x 2" square.
9. Lay out 2 rows of 8 half-square-triangle units each and 2 rows of 2 corner squares from step 8 above and 8 half-square-triangle units each as follows.
10. Join together pieces in each row, pressing seam allowances open.

11. Sew a short half-square-triangle ("HST") border to the left and right sides of the quilt, pressing seam allowances away from the HST border. Sew a long half-square-triangle border to the top and bottom of the quilt, pressing seam allowances away from the HST border.
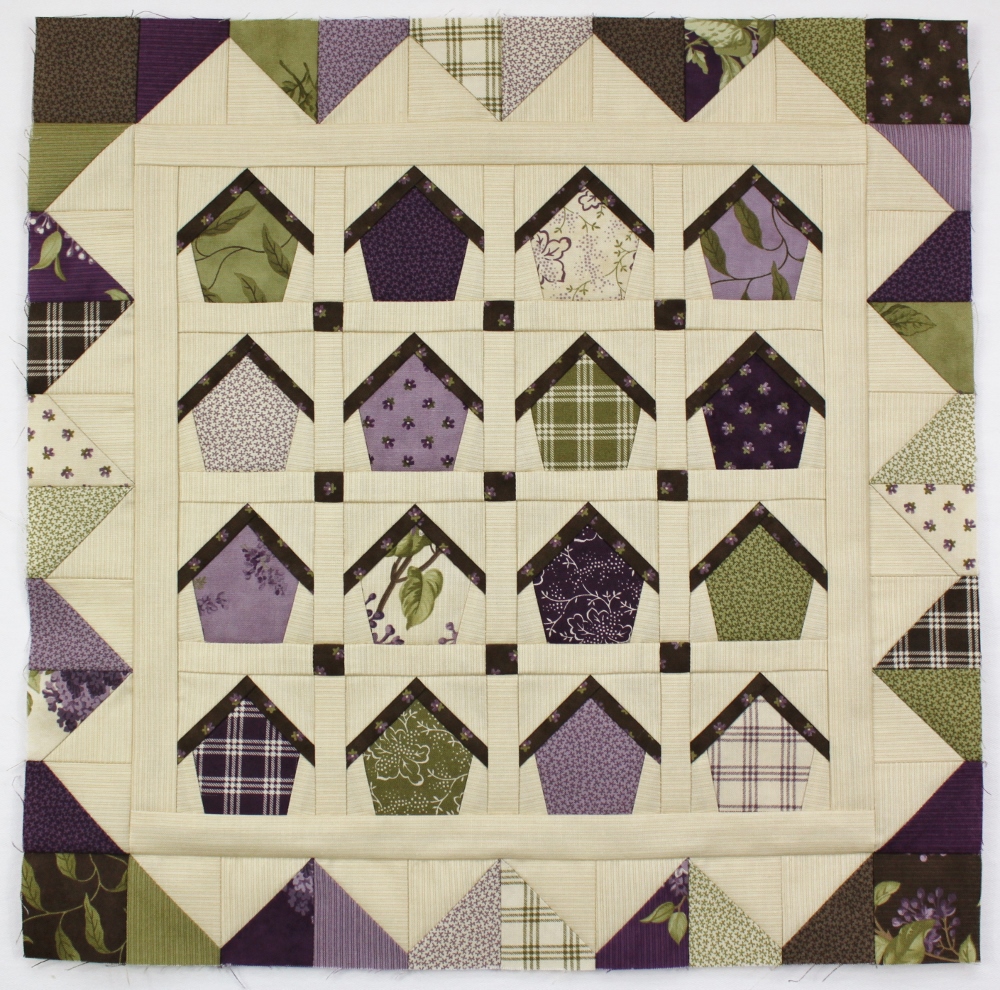
Finish Quilt:
Sew a button to the center of each birdhouse. Then layer the quilt top with batting and backing fabric. Baste, quilt as desired and bind. I machine quilted my little quilt by stitching in the ditch along both sides of the sashing strips and the inner border and in the ditch along the HST seam lines.
![]()
One charming 15½" square little quilt!

I hope you have fun making this sweet mini quilt! And, as ever, I'd love to see what you come up with! Please tag me @JenDalyQuilts if you share your quilts on Instagram or Facebook.
Happy Quilting!
Jen Daly
{JenDalyQuilts.com}
![]()
Posted in:
Comments