Welcome to Moda Fabrics!
A Snowball's Chance Quilt
A Snowball's Chance Quilt
Published:
Jul 1 2017 - 23:00
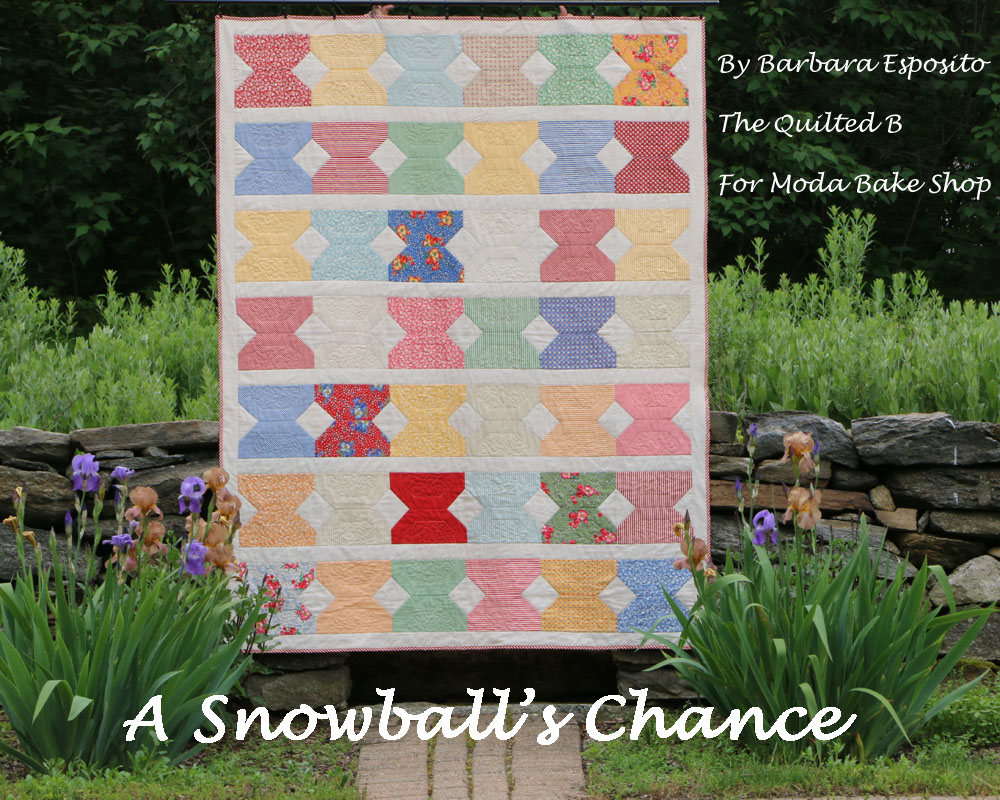

The Traditional Snowball Block is a humble little block that is often overlooked! It rarely gets to shine on it's own, but this pattern gives this unassuming little block "A Snowball's chance"!
This quilt finishes at 62" x 80".
![]()
2-1/2 yards Bella Solid Eggshell 9900-281 (Optional: One Junior Jellyroll and 1-1/4 yards in a different color - Eggshell is not available in Jellyrolls. If you use Jellyrolls simply replace them in the pattern where 2-1/2" strips are called for.)
1 Merry Go Round Layer Cake 21720LC
4 Yards Merry Go Round Yellow 21722 13 Backing
1 Yard Merry Go Round Red Stripe 21727 12 for Bias Binding
Alternate: for straight binding instead of Bias ½ yard
Optional but ever so handy: Rotating Cutting Mat
![]()
All seams are ¼” unless noted.
From the Eggshell Yardage cut twelve 3” strips
TIP: Be sure to check the straight edge of your fabric every few cuts – fabric often misbehaves!
Sub cut these strips into 168 3” blocks
You may need to cut a thirteenth strip to get all 168 blocks if your fabric misbehaved.
If you are familiar with the traditional Snowball Block simply construct 42 blocks using the Layer Cake and all 168 of the 3” blocks. Then roll on down to Part Two!
If you are not familiar with the Traditional Snowball Block then I think it may just melt your heart! It is very versatile and quite easy to construct and you can use it in a flurry of ways. It is rarely alone and is often paired up with a nine-patch block. It’s a great way to show off larger prints or to "fussy cut" that special fabric. We, however, are going to take this humble little block and give it a new look! All on it’s own. No need for any other block friends to help it look cool.
Part One
Constructing the Snowball Blocks
First thing to do is to attach 4 of the 3” blocks to each corner of a Layer Cake square.
 Be sure the diagonal lines are sewn in the directions as shown above (Example 1)
The 3” squares need to be sewn on the diagonal as shown in the picture, right sides together. There are several different ways to attach the corner blocks. A few are listed here:
- Draw on the wrong side of the fabric on the diagonal with pencil
- Fold the square in half on the diagonal and finger or dry iron press (it’s easier to fold the fabric WRONG sides together so you are sewing “in the valley” when you attach it to the Layer Cake)
- Use a product called Clearly Perfect Angles (available at unitednotrions.com)
I prefer to draw a pencil line. It’s time consuming. I get it. But these old eyes can’t always see the pressed line. I like to line them up 4 or 5 at a time on the straight line of my cutting mat and place my ruler on the line (see the picture). I can whack out 4 or 5 in one swipe of my pencil.
 Trace the line onto the squares with a mechanical pencil.
TIP: If you choose to pencil draw the lines, use a cheap mechanical pencil with thin lead. It gets closer to the ruler and the line and that makes for a more accurate seam.
Whichever method you choose, mark all of your 3” squares on the diagonal.
Sew the 3” squares to each corner of a Layer Cake square on the diagonal line as shown in Example 1.
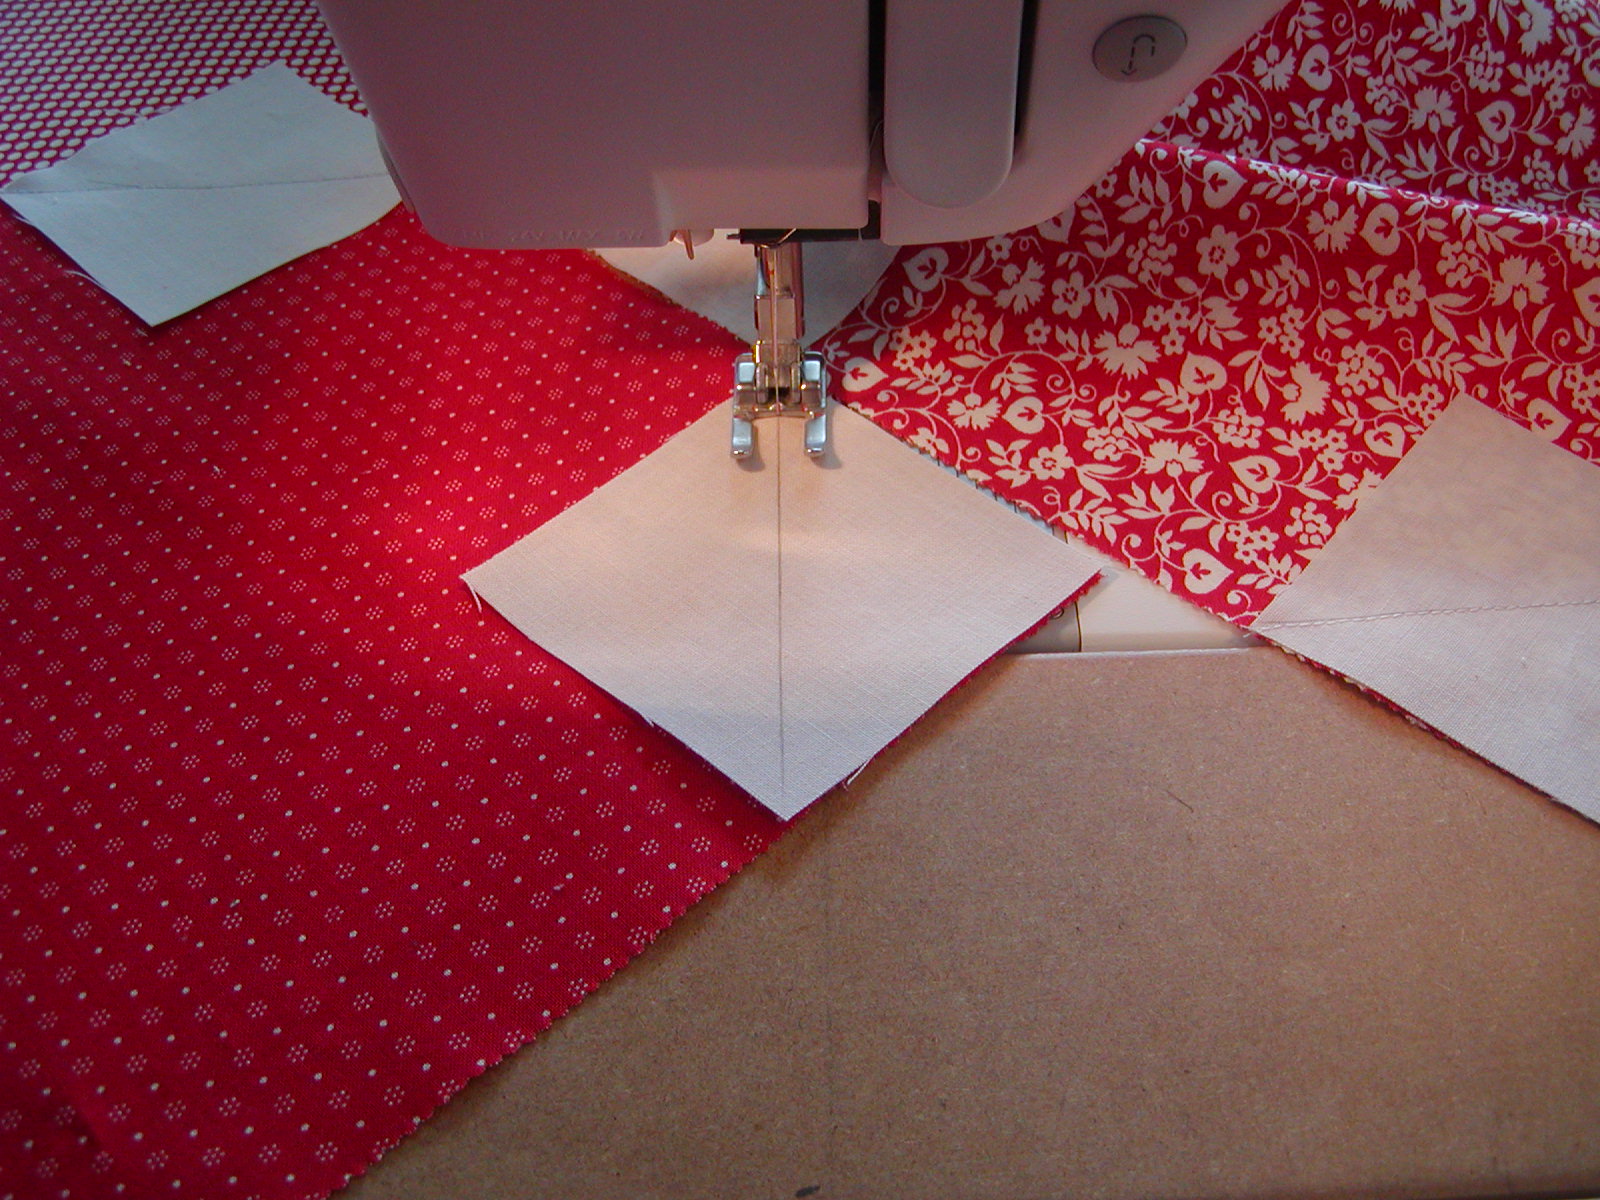 Chain stitch to keep it moving!
Look at this beautiful pile of snowballs!

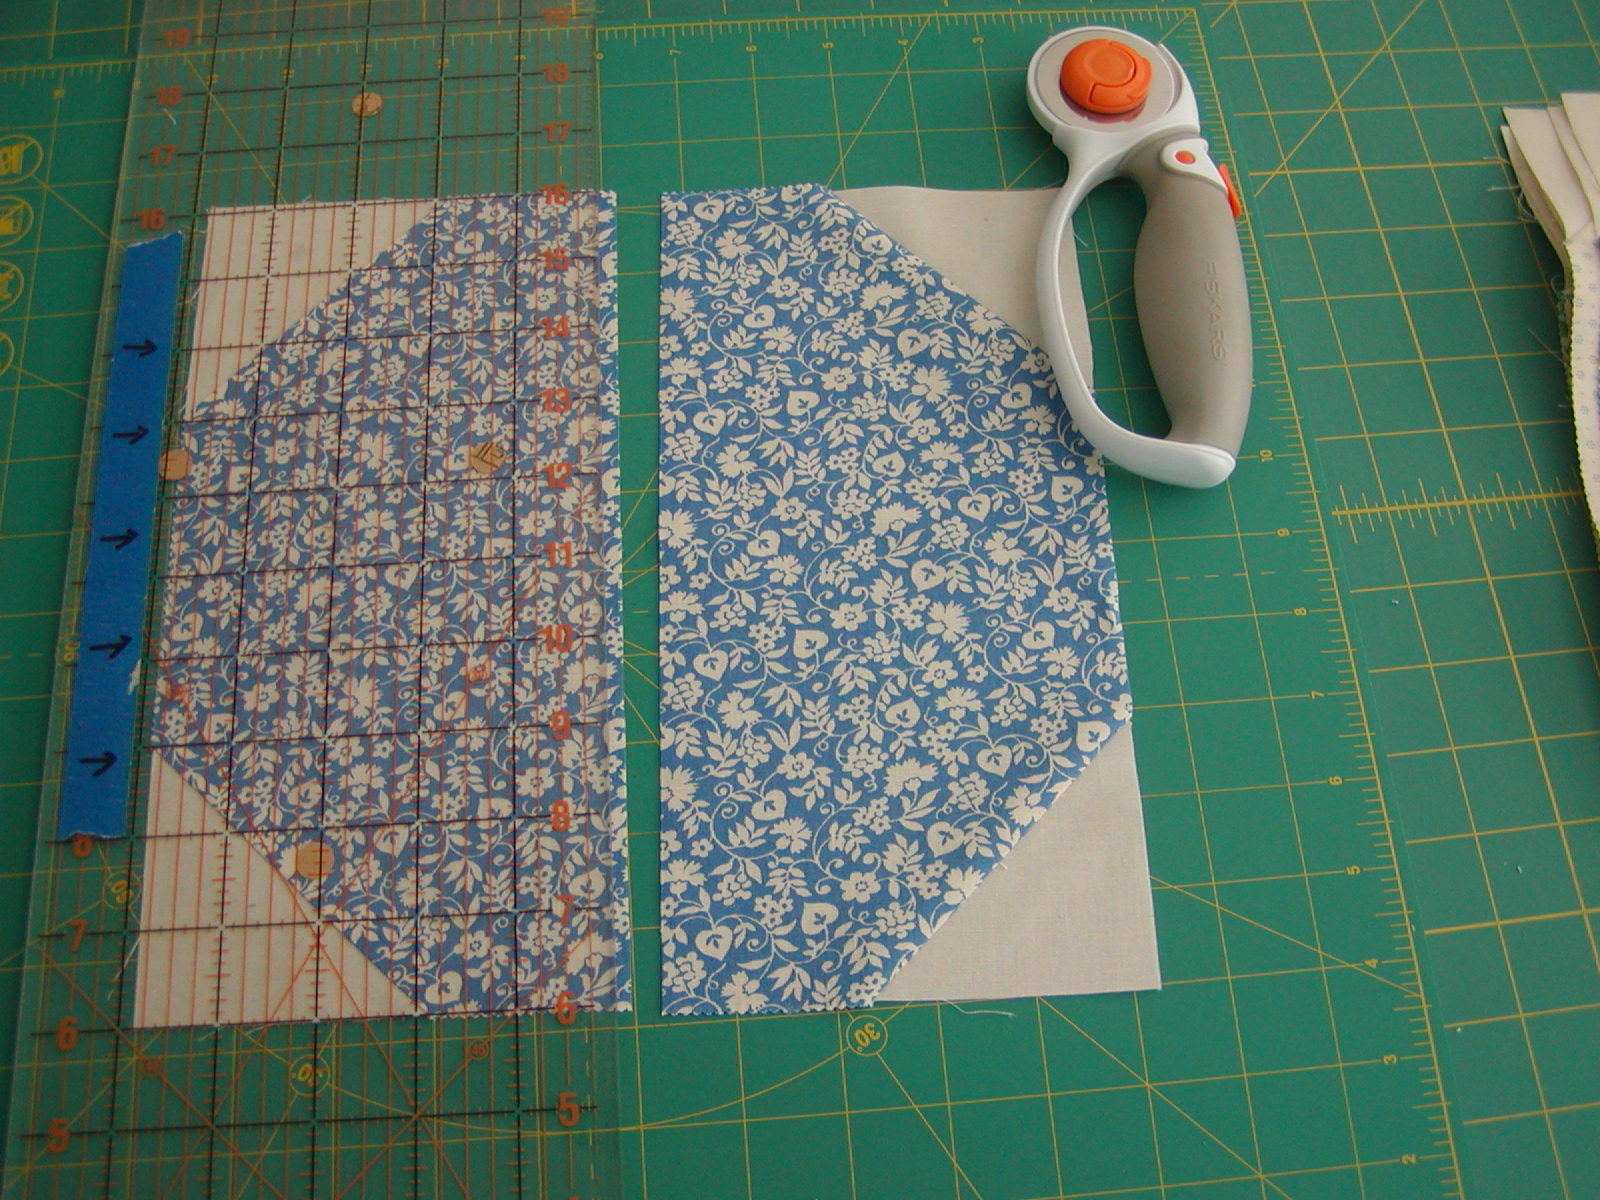
Trim all of the corners ¼” UP from the diagonal line you drew or pressed. Save the cut corners for another project (scroll to the bottom to see what I did with mine!)

This is where it’s very, very handy to have a cutting mat that rotates! Unitednotions.com carries several sizes. It’s one of those things that you don’t use every day, but when you need it you are so so happy you have it. Buy the biggest one you can afford. You won’t regret it!

Now that you have all of these adorable Snowball Blocks trimmed up, press the Eggshell corners up. Press to the dark side. It’s a little more time consuming but it gives a neater finish. Whichever way you decide to press the corners, just be consistent. It’s best not to use steam. It may require a little burst of steam on an unruly seam but try not to use full steam – it can make the blocks all wonky and that requires more squaring up!

Square up these blocks if necessary. They should measure about 10” square. They important thing is to trim them all to the same size.
Nice work! Now go get yourself a Frosty and take a break.
Are you ready for Part Two?
Part Two
The Cool Twist
All 42 of these blocks are going to be cut in half. You may want to pay attention to any fabrics that are directional. There are stripes in the Merry Go Round Layer Cake, so decide which way you want to cut them. Or mix it up and cut some one way and some the other. It’s OK – go a little crazy!
Now take the two halves and flip them, short ends of the 10” block on top of each other.

Using a ¼” seam sew all of the blocks as shown. Press the middle seam open. There is some controversy over pressing seams open but by doing so the finished center diamonds look even. Again, choose your pressing preference and keep it consistent. I don’t allow the Pressing Police to come to my house and neither should you! Do what is comfortable for you to keep the fun in what you love to do.

Once all the blocks are sewn, pressed, and trimmed if necessary, decide on your block placement to make seven rows of six blocks. There will be Eggshell strips between the rows so keep that in mind when you lay out the blocks.
Tip: Use your cellphone to snap pictures of different layouts to help decide. I text my layouts to my sister Nancy, my friend Lindsay, and of course, to Joe to get several viewpoints.
Once you are happy with the layout, gather the blocks in rows and using a ¼” seam, sew the blocks into rows, being sure to match up the center seams.

Tip: Grab some inexpensive alphabet beads and safety pins and use them to keep the blocks in order and to mark the rows.


Once your rows are sewn together, press and trim as necessary.
Now from the remaining Eggshell fabric cut sixteen 2-1/2” strips.
You will need 12 for the sashing between the rows and the upper and lower row borders. Cut four of the strips in half which will give you 8 half strips. Sew these to the remaining 8 whole strips to make eight long strips 2-1/2” wide by one and a half the width of the fabric (now they will be long enough to go across the rows).
Let me say up front that I am not a big “pinner” (unless it’s on Pinterest…), but I am sorry to say you really should pin these rows. Sew an Eggshell strip to the top and bottom of your first row (“A” if you are using alphabet beads!)
Add the second row ("B") to the bottom Eggshell strip, right sides together, matching up the seams between the blocks. And yes, please pin! You won't be sorry you did.

The Eggshell strip is at the bottom of Row "A". the whole strip is turned upside down so I could line up and pin the next row.Sew the next Eggshell strip to the bottom of the second row (“B”).
Tip: Stagger alternating sashing strips to keep the seams on the strips from lining up. It makes the seams less obvious.

Continue until all the sashing strips are sewn to the rows – 6 sashing between seven rows. Add the top and bottom strips for the outer border. Trim the excess.
With the last four 2-1/2" Eggshell strips, sew two sets of strips together for the side borders and add them to the sides of the quilt. Trim the excess and square up the quilt if needed.
Now chill for a bit and admire your work and this beautiful Merry Go Round fabric!
Sandwich, and quilt as desired.
The "Snowball's Chance" binding was cut on the bias in 2-1/4" strips from the Merry Go Round Red Stripe 21727 12. It is single fold, and it required a 29” square which left a comfortable amount to spare.
Tip: When you are ready to cut all the threads on your finished quilt, take a piece of batting scrap about 3" by 6" and pin it to your shirt or pants at the hip on the side away from your scissor hand. I like to use a little Tacky Finger and as I snip the threads I just put them on the batting hanging at my side. No more threads on the floor! I came up with the idea one hot day when the windows were open, the ceiling fan was on, and the trash can was just out of reach. You can only imagine all the blizzard of threads blowing around my sewing room! I call it my Hip Snip Snatcher.
And here is what I did with my corner scraps:

I call it "A Snowball's Second Chance" and it finished at approximately 28" by 31", and yes, I made my first (and perhaps last) attempt at hand binding this little cutie. The size is perfect for a wall hanging or doll quilt.
![]()
The Snowball's Chance quilt finishes at 62" x 80".
Quilting has come a long way from it's humble beginnings. I personally am on a journey now trying to bring the "simple" back to my sewing room, remembering to sew for the love of it, to savor the process, and to share what I make. My hope is that this quilt will help keep the fun in what you love to do. I'd love to hear from you and to see what you have created @thequiltedb #asnowballschance #asnwoballssecondchance Now go sew!
Barbara Esposito
![]()
Posted in:
Comments