Welcome to Moda Fabrics!
Candy Swirls Quilt
Candy Swirls Quilt
Published:
Apr 18 2017 - 23:00


Hi, I'm Suzanne Jackman from Splendid Speck—my splendid little part of the world. I am excited to share my first quilt pattern on Moda Bake Shop. You can see my latest creations in my shop or by following me on Instagram.

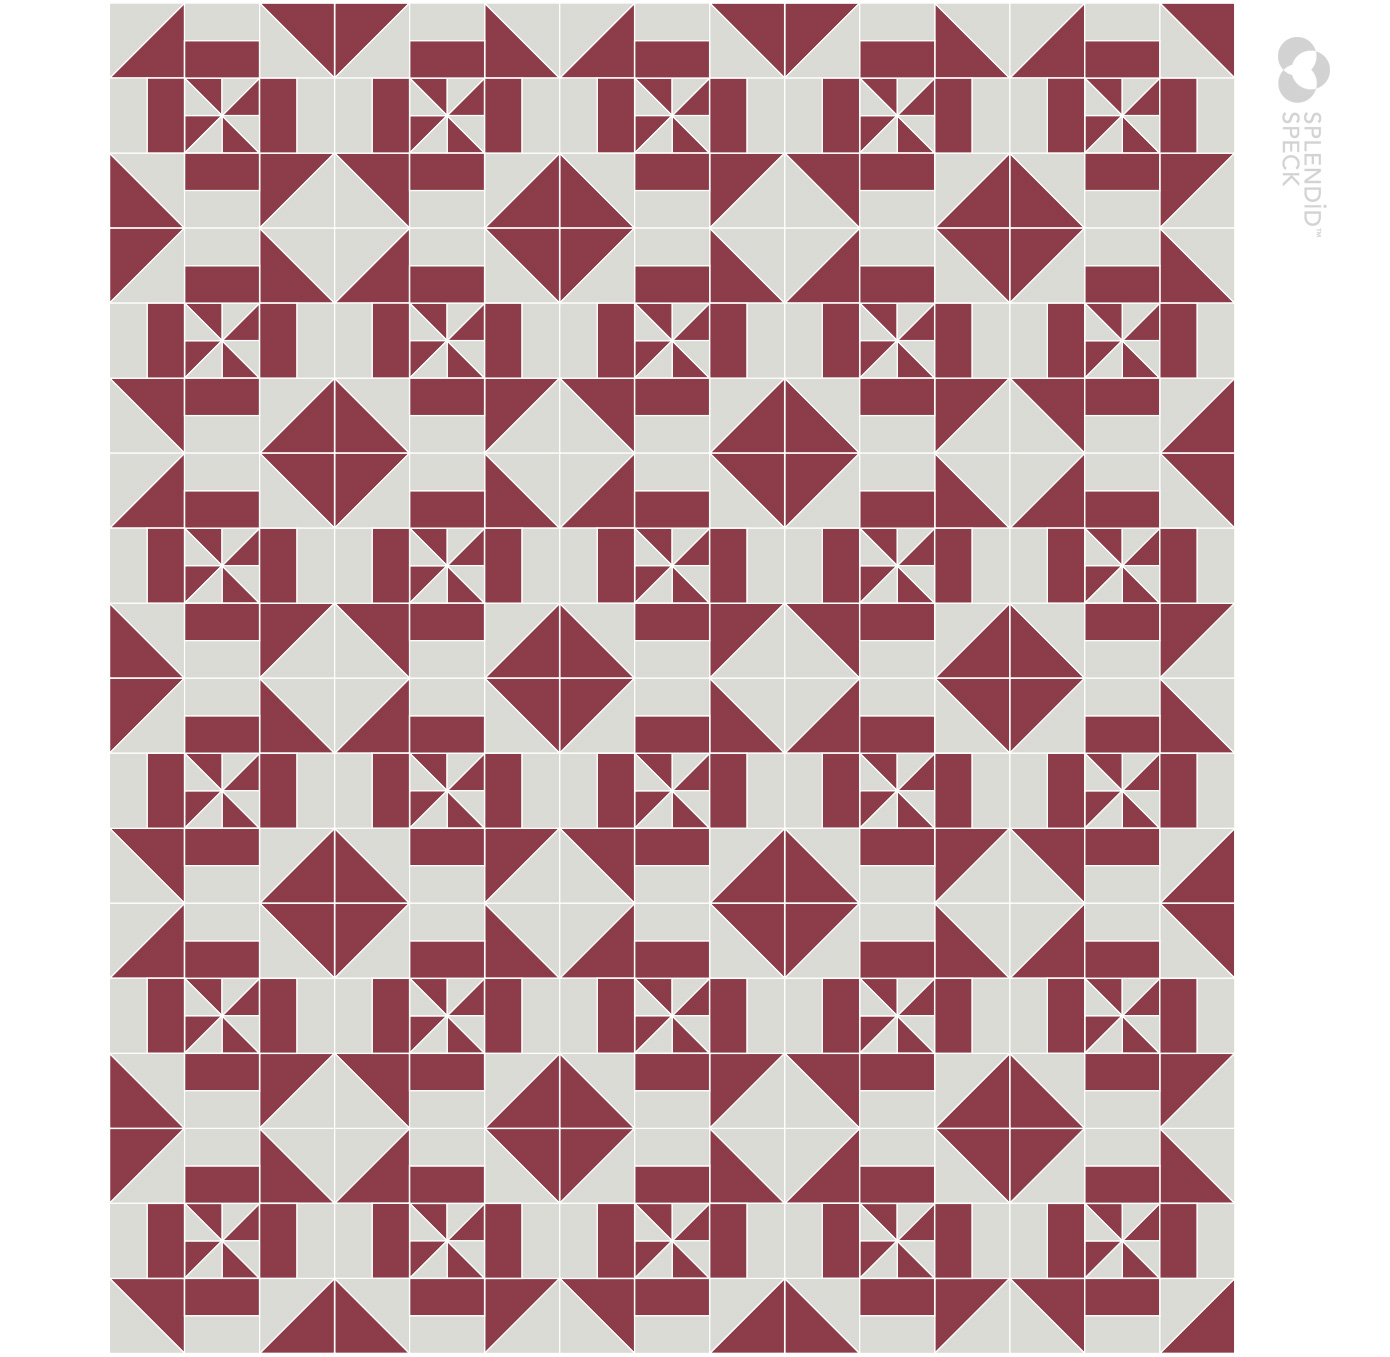
Who doesn't remember childhood and eating cellophane wrapped swirl candies? This Candy Swirl quilt hints back to the sweet swirly candy and consists of blocks with a pinwheel, 4 half square triangles, and 4 rectangle squares to create a 12" finished block. A set of 30 blocks creates a 60" x 72" quilt (Want to make something smaller? 4 blocks create a 24" pillow). This quilt is created using a matching layer cake and charm pack along with background and backing. A printer friendly version of the pattern may be downloaded here.
This quilt finishes at 60" x 72".
![]()
1 layer cake (30 prints -10” x 10”)
1 charm pack (30 prints - 5” x 5”)
**Same print as the layer cake
3 yards white fabric (background)
1/2 yard for binding
4 1/2 yards for backing
![]()
FABRIC CUTTING
Before cutting your blocks, match up the identical prints of the layer cake and the charm pack. You will need one 10-inch square and one 5-inch square of the same fabric for each block.
Take one ten-inch square. Cut it into (4) 5” x 5” inch squares. With one of the five inch squares cut (2) 2.5” x 5” rectangles. Take the identical charm pack square and cut (2) 2.5” x 5” rectangles. You should now have (3) 5” x 5” blocks and (4) 2.5” x 5” rectangles. Repeat with each of the additional layer cake and charm pack prints.
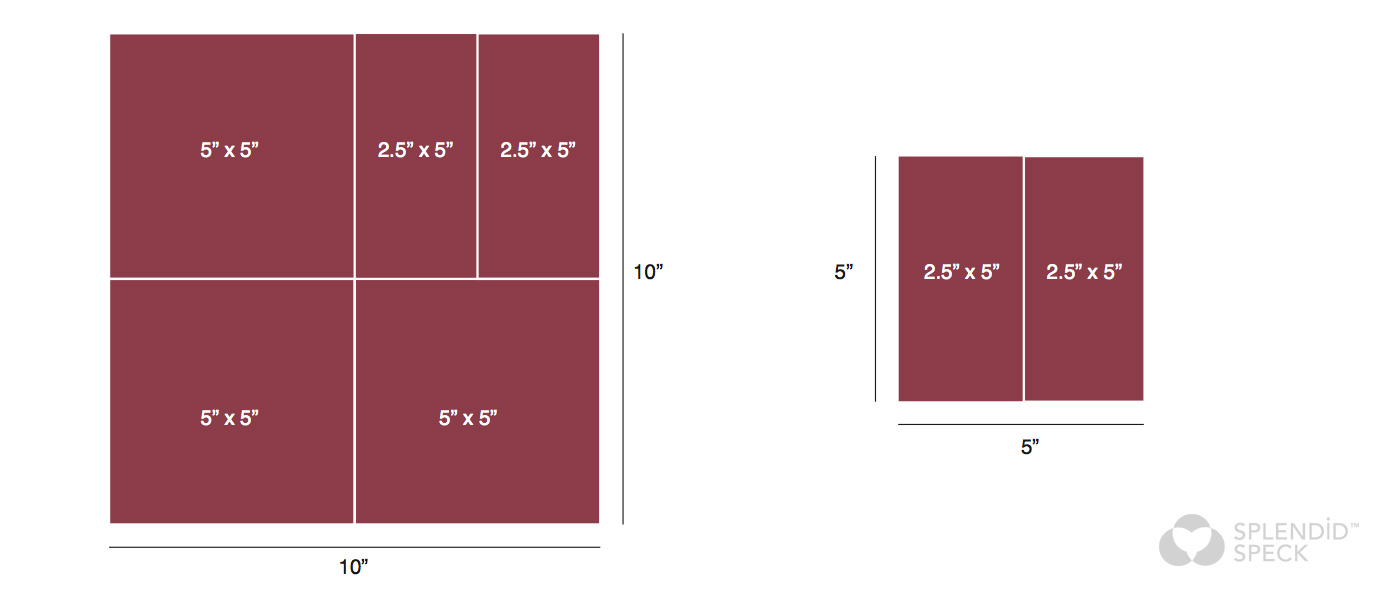
With the white fabric, cut (3) 5” x 5” squares and (4) 2.5” x 5” rectangles for each quilt square. You will need a total of (90) 5“ x 5” white squares and (120) 2.5” x 5” white rectangles.
GENERAL INSTRUCTIONS
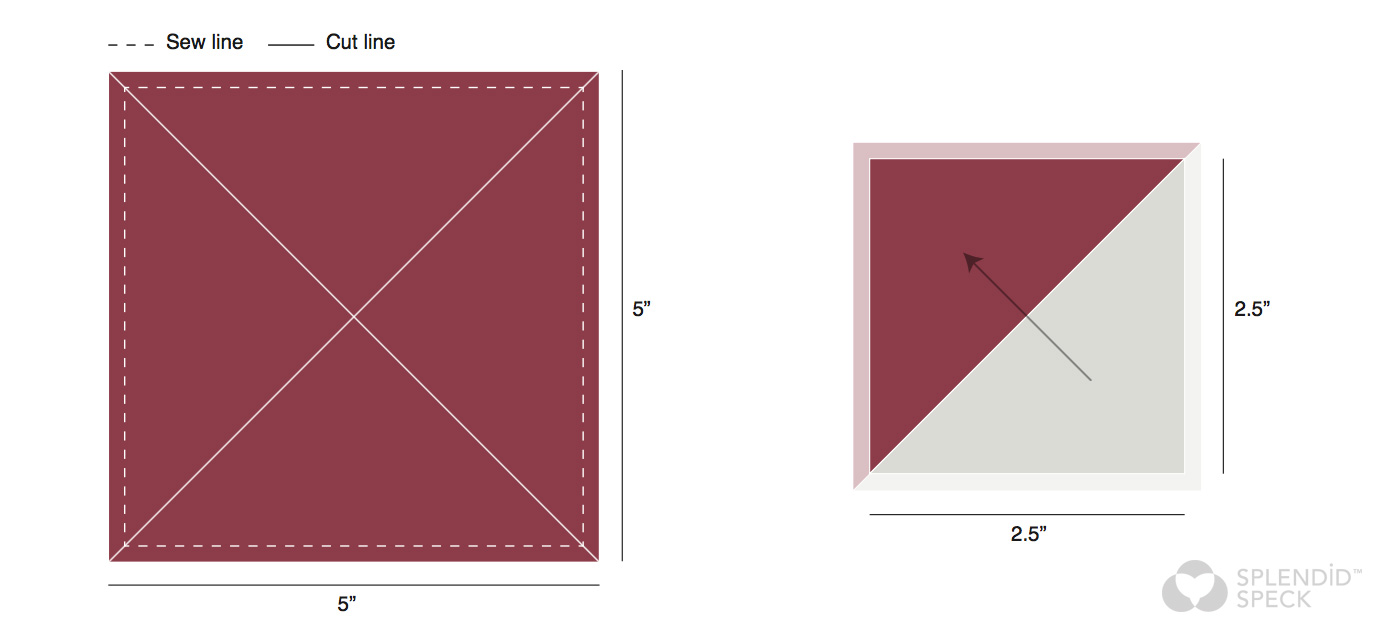
Use a 1/4” seam allowance, unless otherwise noted. HST = half-square triangle.
Press in the direction of the arrows.
HST ASSEMBLY
Take two (2) of the print 5” x 5” squares and two (2) of the white 5” x 5” squares. Draw a diagonal line on the wrong side of each of the white squares. Place one (1) print and one (1) white square right side together. Sew 1/4 inch on both sides of the line. Cut on the line. Press toward the print piece. Square up to 4.5 inches if not already square. Repeat with the second pair.

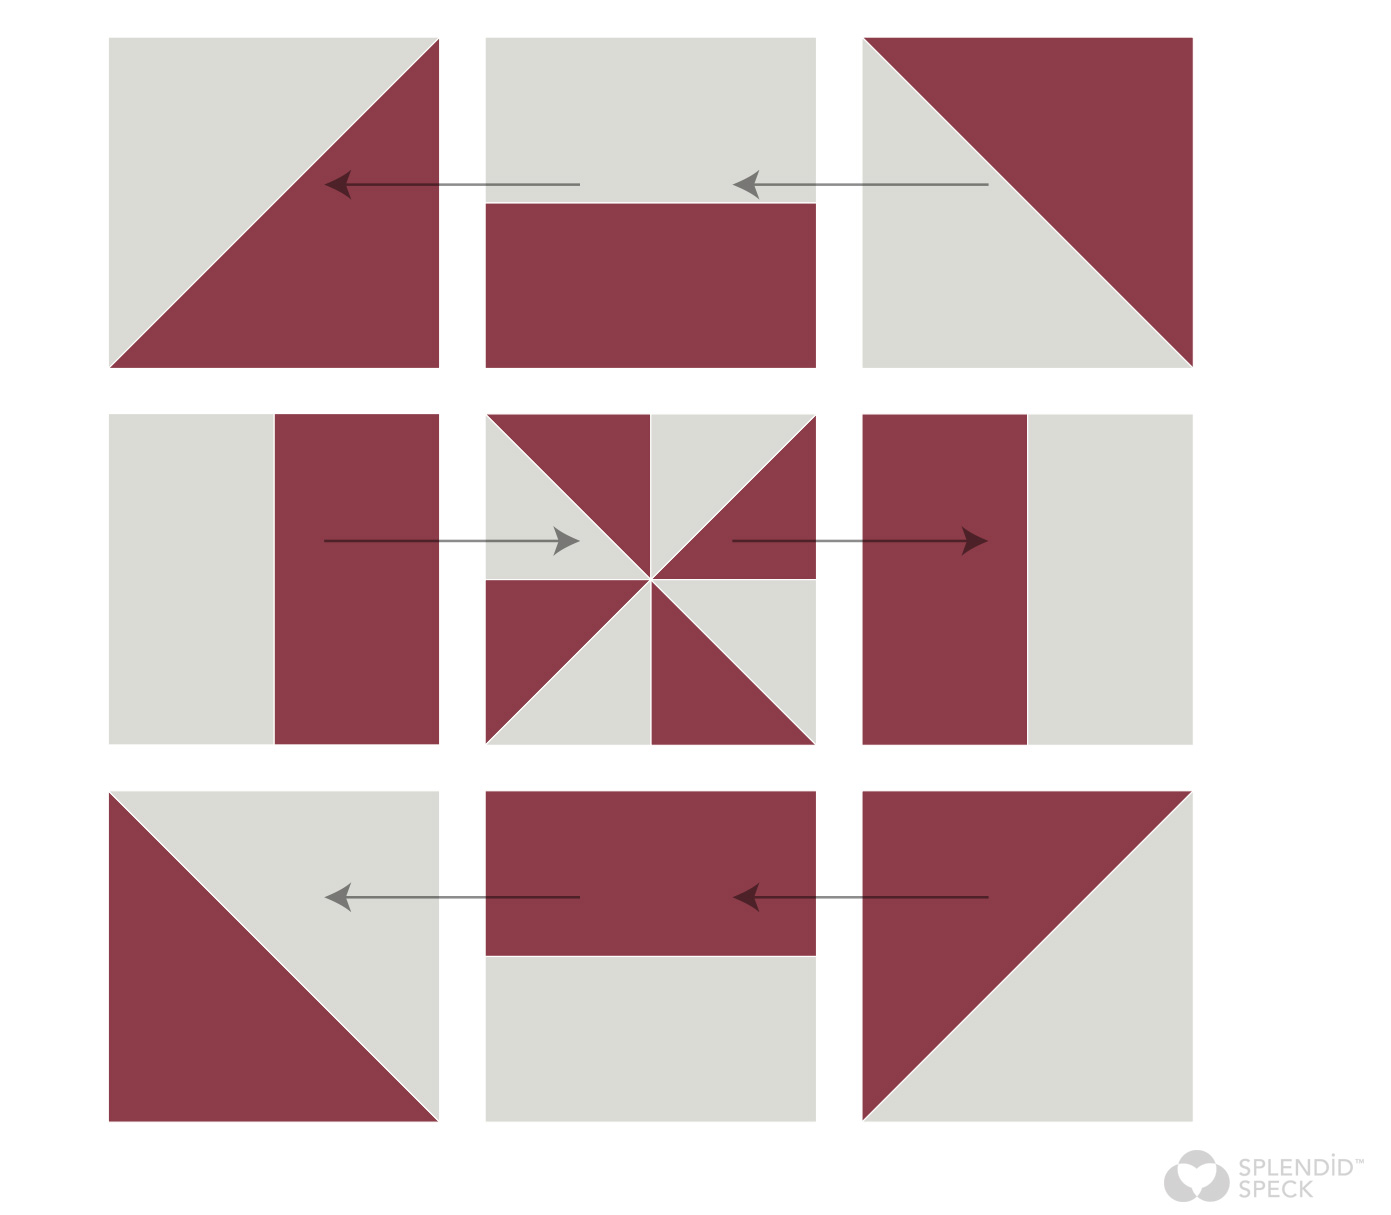
PINWHEEL ASSEMBLY
The pinwheel is assembled with the remaining print and white 5” x 5” inch squares. To do this, place right sides together and sew 1/4 inch around the entire block. (Start sewing in the middle of one side and sew all the way around until you meet up with the starting point.) Take the sewn around square and cut it diagonally twice. The result is four half square triangles. Square each HST to 2.5 inches. Press toward the print fabric.
Finalize the pinwheel by sewing the four (4) 2.5” HST together into a pinwheel pattern. The pinwheel should measure 4.5” x 4.5” when complete.

RECTANGLE ASSEMBLY
Start with four (4) print 2.5” x 5” rectangles and the four (4) white 2.5” x 5” rectangles. Sew one print and one white rectangle with right sides together. Press toward the print fabric. Cut 1/2” inch off one end so the resulting square measures 4.5” x 4.5”. Repeat with the remaining rectangles.


BLOCK ASSEMBLY
You are ready to lay out your quilt blocks. Assemble each block by following the layout below. The finished block size is 12” x 12”.
QUILT ASSEMBLY
When you complete all thirty quilt blocks, lay out and sew the quilt top. NOTE: Rotate every other block. This will create the secondary pattern in the middle.
![]()
This quilt finishes at 60" 72".
Want to see what I'm making now? Follow me on Instagram.
Suzanne Jackman
Etsy: Splendid Speck
Instagram: @splendidspeck
Email: [email protected]
Web: splendidspeck.com
![]()
Save
Posted in:
Comments