Welcome to Moda Fabrics!
Bake Shop Basics : Webbing (and Candy Sack Tutorial)
Bake Shop Basics : Webbing (and Candy Sack Tutorial)
Published:
Jul 27 2016 - 23:00
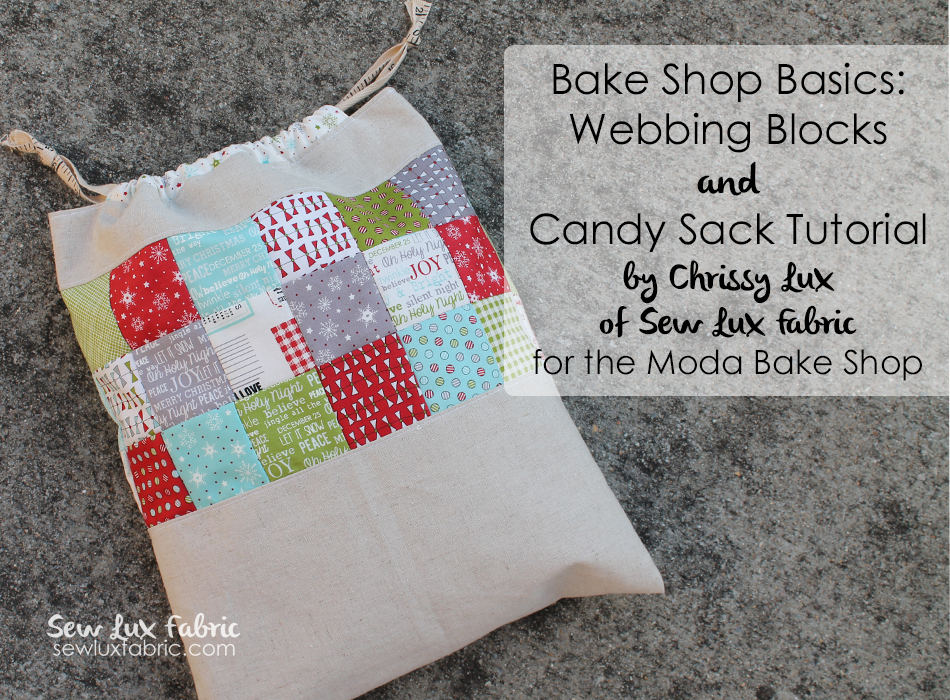

My name is Chrissy Lux and I run Sew Lux Fabric along with my mom Linda. My sewing time is often limited, so I love a technique that can help me get some sewing done a little faster while still allowing for accurate piecing. I also love working with Moda Candy, so I have a quick project for you to make while you practice webbing!
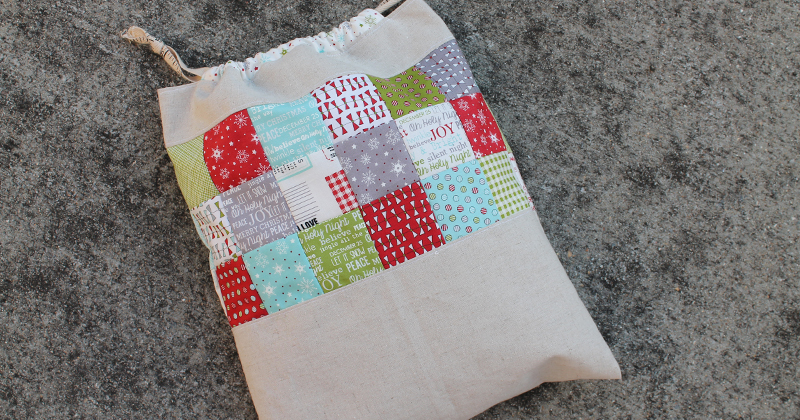
The bag we will make finishes at approximately 12" x 14".
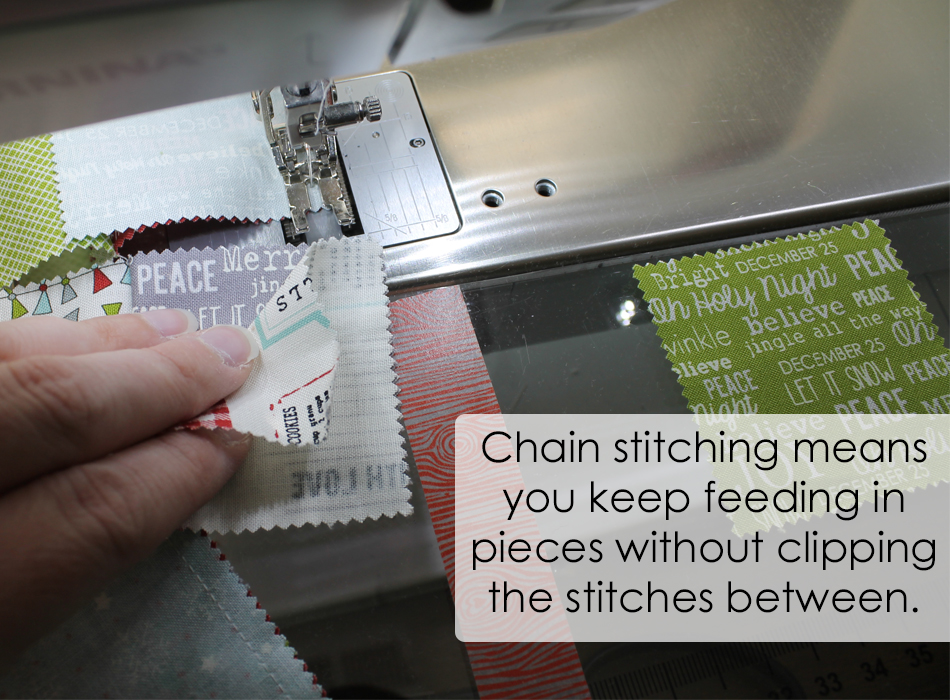
Webbing is not a new technique, but I have met quite a few quilters who didn't know about it. I first learned it from Linda at Flourishing Palms when I went on the hunt for a tutorial after seeing someone hold up a block that they had webbed! Webbing uses chain stitching/piecing as a quick way to join many units or blocks without a lot of stops and starts. The key to webbing is to lay it out, stack it up, and sew it in order. Sometimes I take a picture of the layout before I start, just in case I get confused later. :)
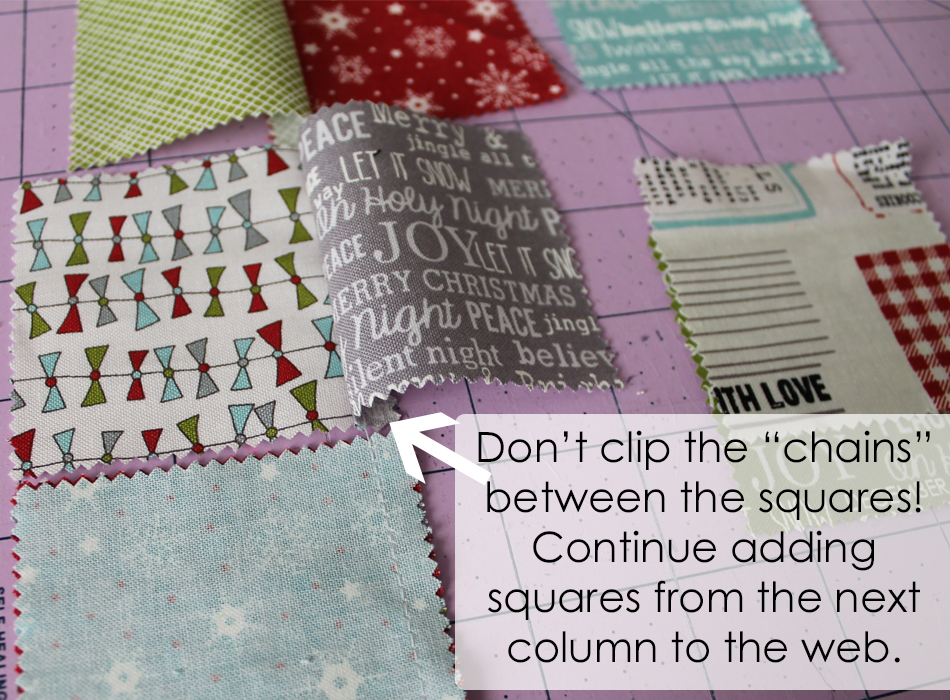
(Chain piecing means that when you get to the end of the fabric, stitch past the edge and then lift the presser foot and add in the next pair. This creates a little "chain" of thread between the pairs and holds them together. Don't clip those chains - this is the "web" that will hold everything together!)
![]()
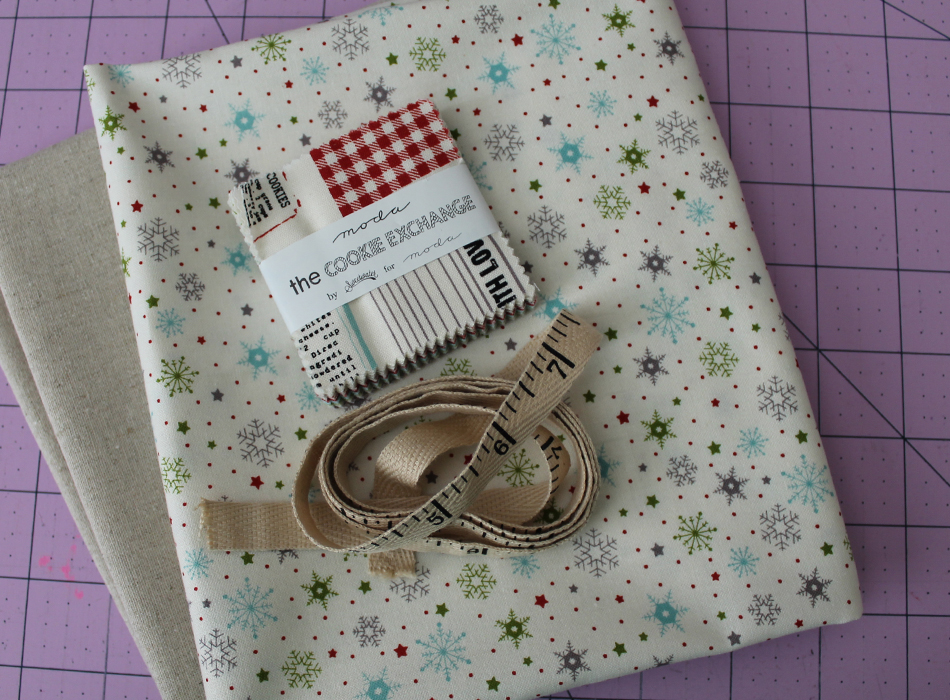
To make the bag, you'll need:
1 Moda Candy (Mini Charm Pack) or thirty-six (36) 2.5" square scraps
1 Fat Quarter Mochi Linen
1 Half Yard coordinating print or Bella Solid
2 yards ribbon or twill tape (cut into two one-yard pieces)
Need a kit? Find one here.
![]()
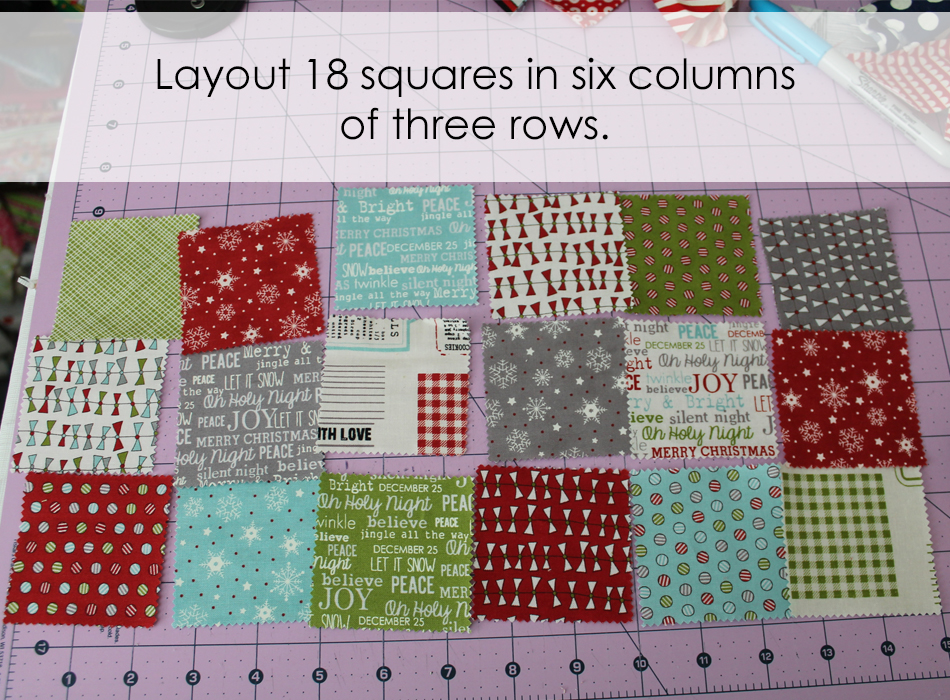
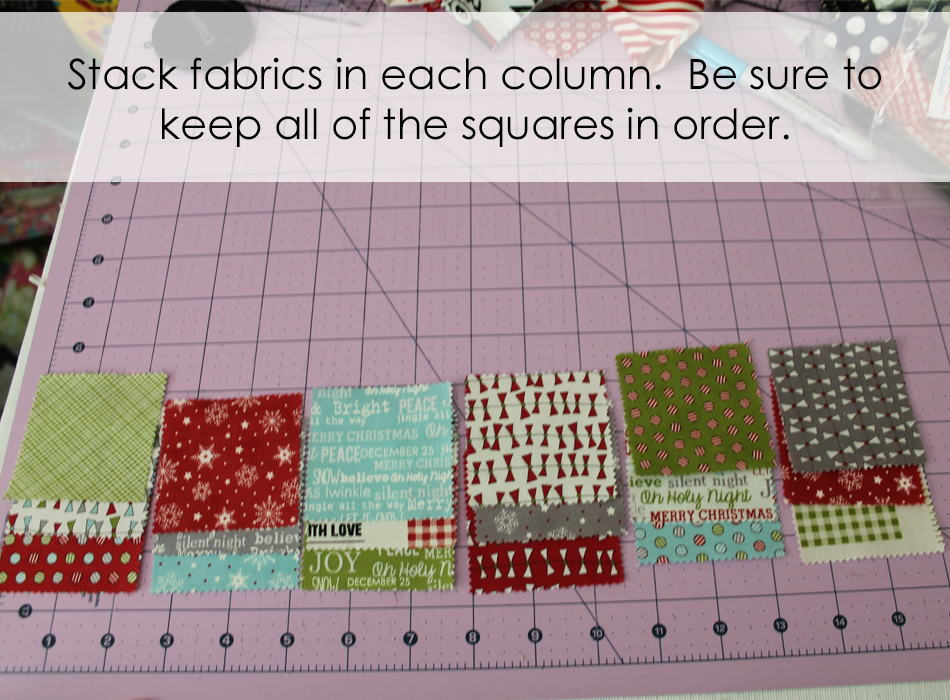
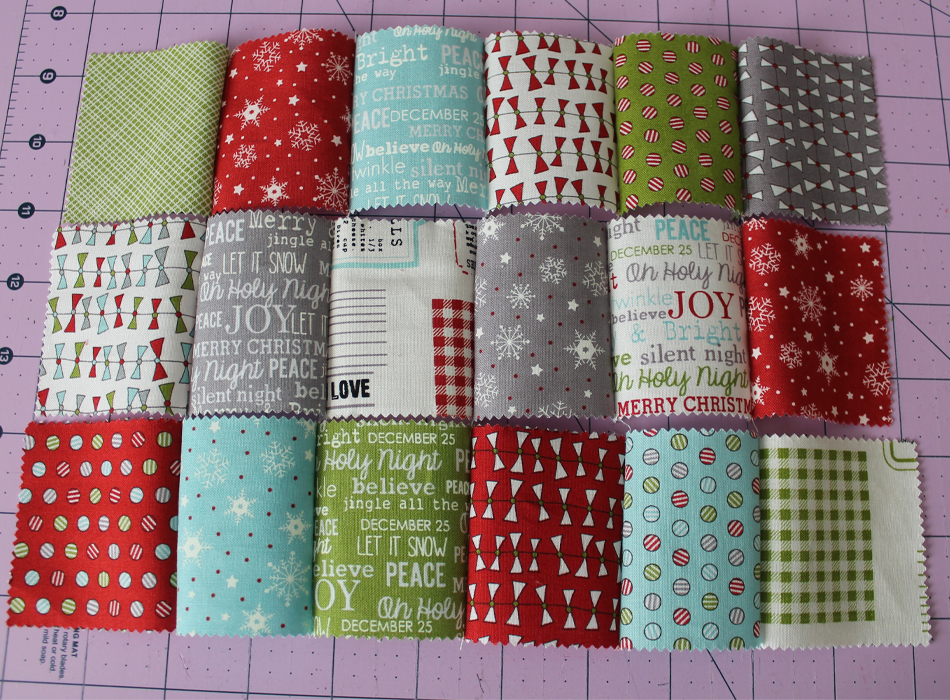
For this project, we will make a patchwork panel consisting of six columns of three rows. So you'll need 18 mini charm squares arranged in a 3 x 6 rectangle. If your fabrics are directional, be sure they are all facing the way you want them to be!
Next, you will stack each column of squares. Move the square from the top row on top of the square in the second row. Then move those two on top of the third square as shown in the photo. Repeat this stacking process, being careful not to rotate any squares that have directional fabrics. Keep columns in order.
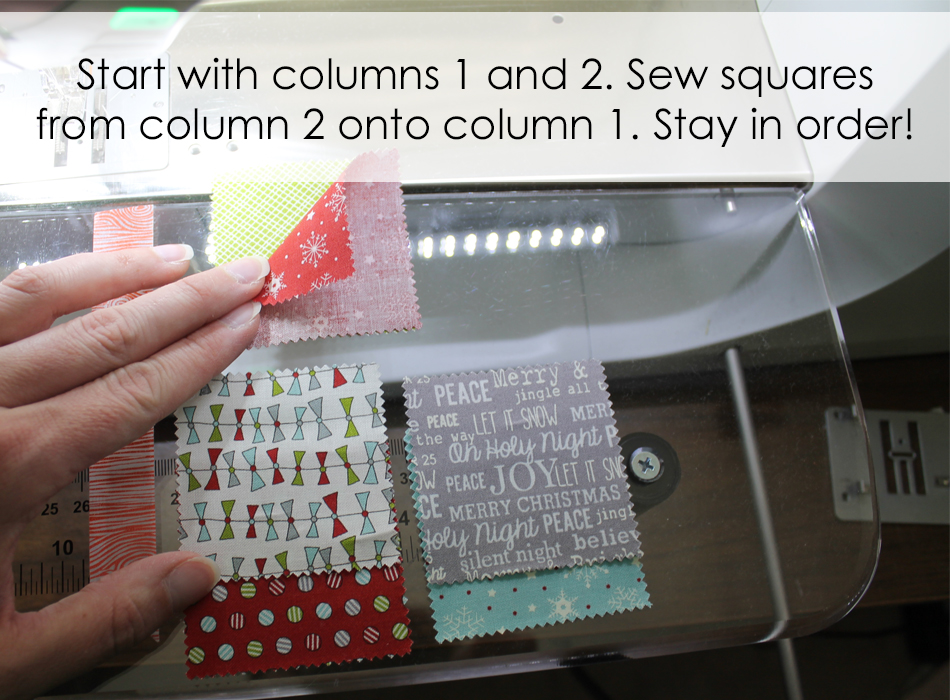
Now, carefully move the first two stacked columns to your machine. You'll place the fabrics from column two face down with right sides together on the fabric from column one. Sew each pair of squares together utilizing chain piecing.
Now that columns one and two are joined, we'll keep adding on. Place the squares from column three face down with right sides together on column two squares. Sew them on, continuing to chain piece.
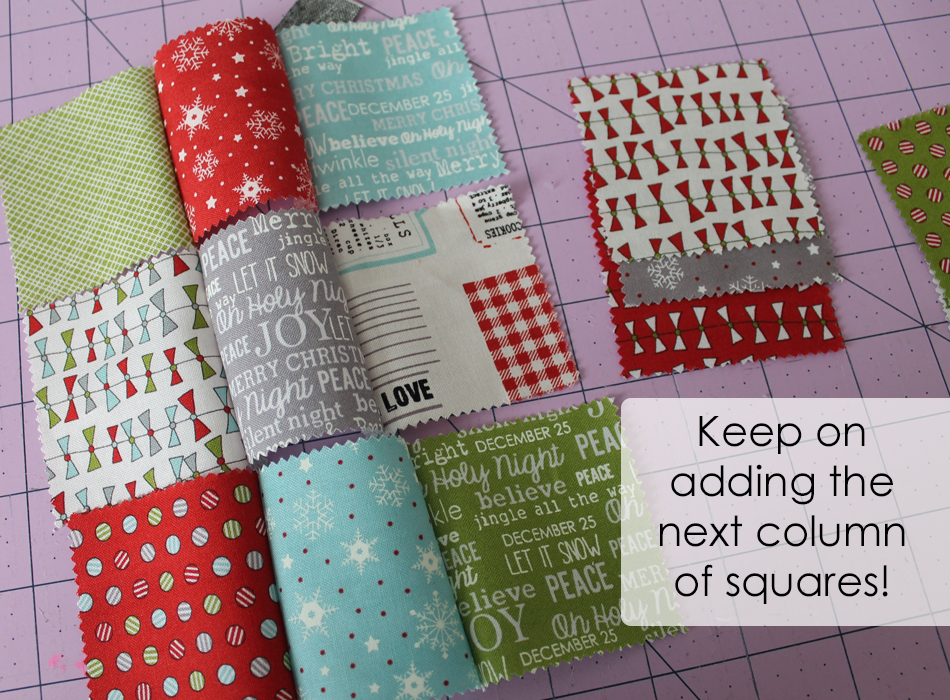
Keep on chain piecing each column onto the webbed patchwork until you have them all joined.
Then hold it up and marvel at the web you wove! ;)
Once you have added all the columns on, it will look like this...
Carefully press the seams. I press each row in opposite directions so that I can nest the seams when I join the rows. I usually start with the top row. Then carefully press the second row. I will often finger press first to help them get in place. Be gentle since you don't want to schmush the other rows while you press.
After you've pressed the seams in each row, pin the intersections and join the rows. Gently press (I pressed all my rows down.)
And that's webbing in a nutshell! Now let's make a bag!
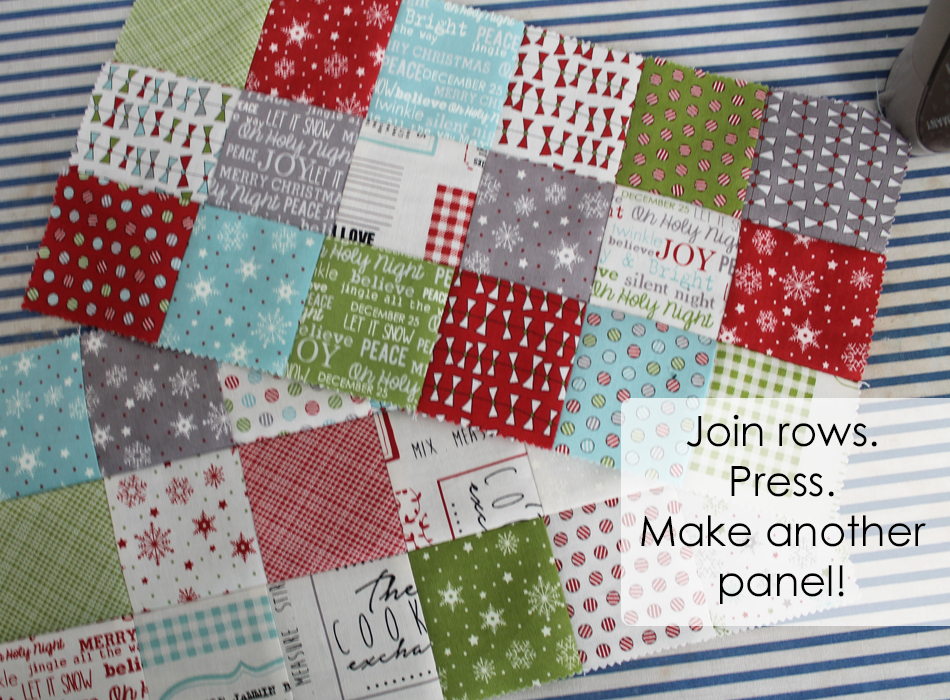
Make one more panel of 3 x 6 mini charms in the same manner as the first. (The only difference was I pressed the rows UP in this one after sewing all my webbed rows together.)
From the linen fat quarter, cut one 12.5" square and two 2.5" x 12.5" rectangles.
From the lining, cut two 4.5" x 9.5" rectangles and one 12.5" x 28.5" rectangle.
Make an outer panel by sewing a 2.5" x 12.5" linen rectangle to the TOP of each patchwork panel. Press away from the patchwork.
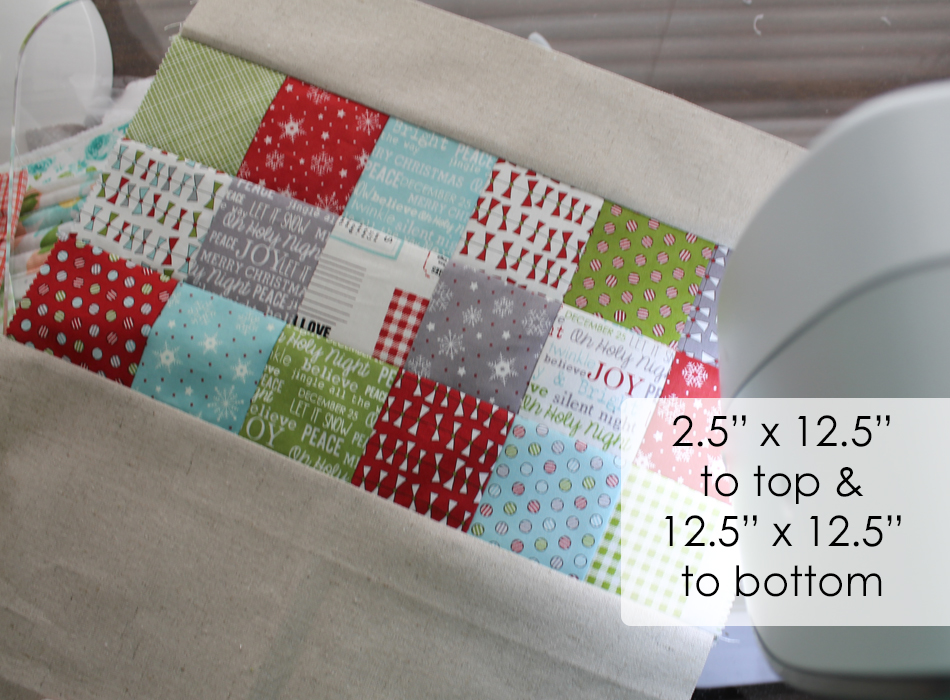
Sew the bottom of each patchwork panel to opposing sides of the 12.5" linen square. Again, press away from the patchwork. The completed outer panel will be 12.5" x 28.5".
I chose to add a little top stitching 1/8" from the seam above and below the patchwork panels. This is optional, but would also be cute with some perle cotton or embroidery thread.
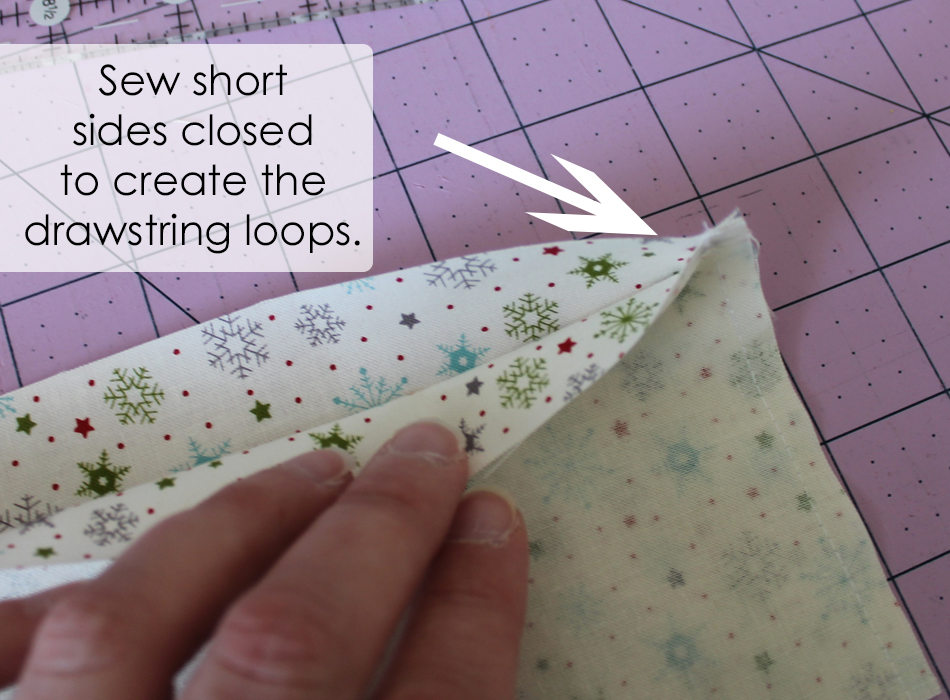
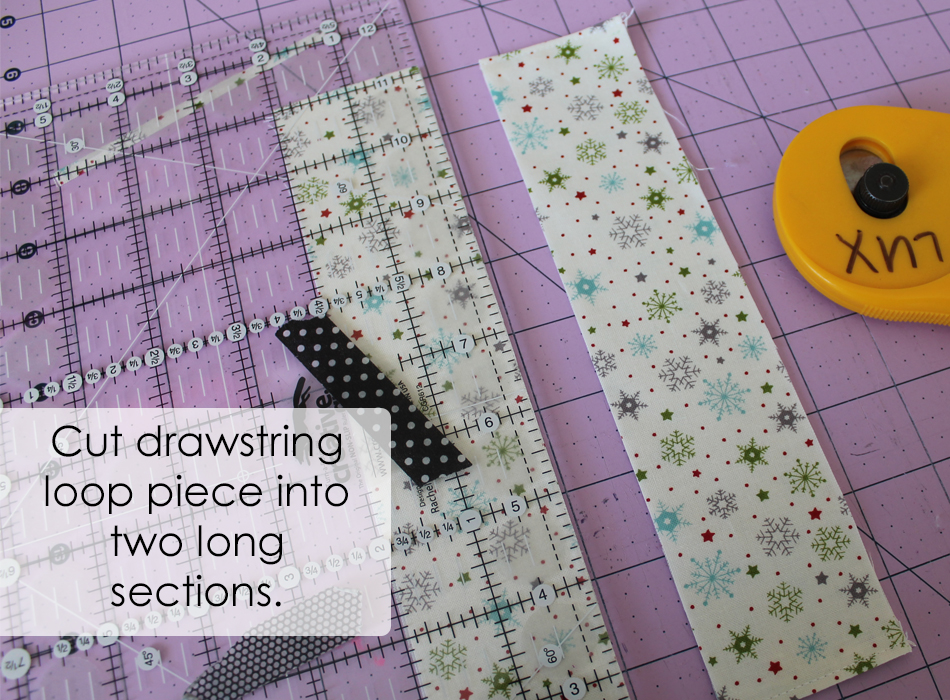
Next, let's make the drawstring tubes. Place two 4" x 9.5" lining rectangles right sides together. Stitch the short ends closed using a 1/4" seam allowance. Turn right sides out and press carefully. Top stitch 1/8" from the edge of the seam.
Next cut this in half lengthwise to make two 2" x 9.5" rectangles. Fold and press in half lengthwise.
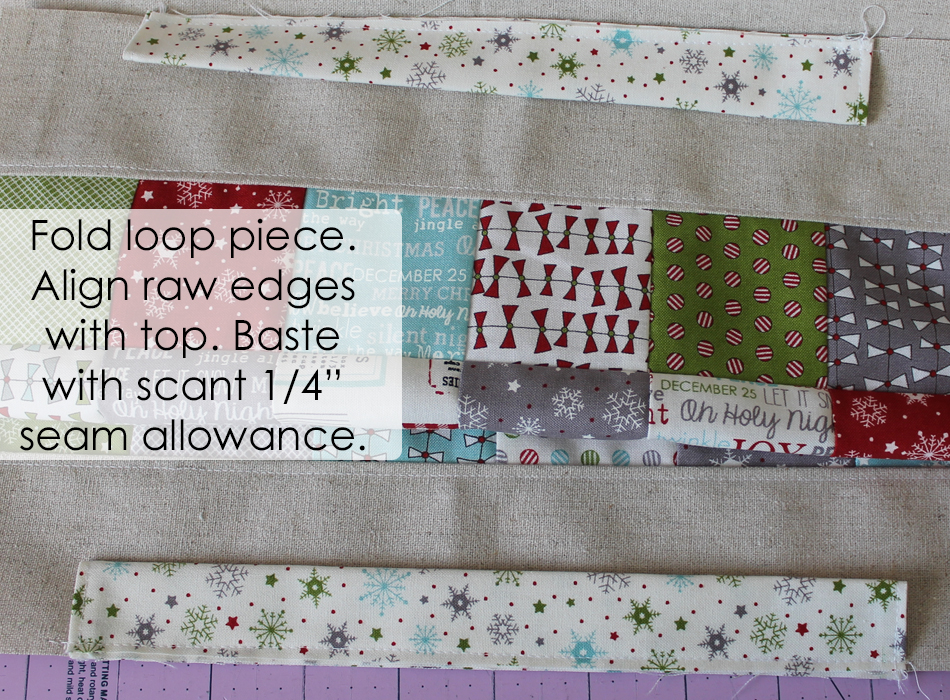
Pin the drawstring tubes to the linen above each patchwork panel. (Align the raw edges of the tube piece with the edge of the linen.) Sew a scant 1/4" seam to attach the tubes. This completes the exterior. (Note - the photo below shows both the top and the bottom with the middle portion of the bag folded on it self. This is to show you that we are adding a loop piece to both ends.)
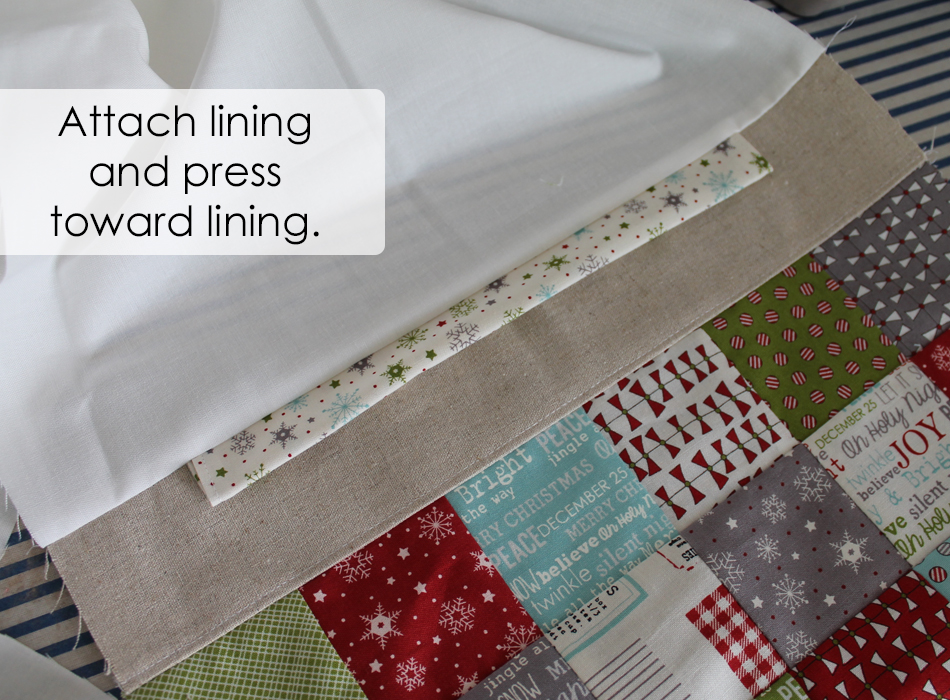
Next, lay the 12.5" x 28.5" lining piece on top of the exterior with right sides together. Pin the top and bottom seams. Sew 1/4" seam along the top and bottom. Press seams toward lining.
From here, it's like making a pouch ... with right sides together, line up the top seams we just sewed and pin. All the lining should be to one side and all of the exterior to the other. Pin down each side, matching the patchwork panels on the exterior, and leaving a 5" area on one side of the lining open so we can turn it later.
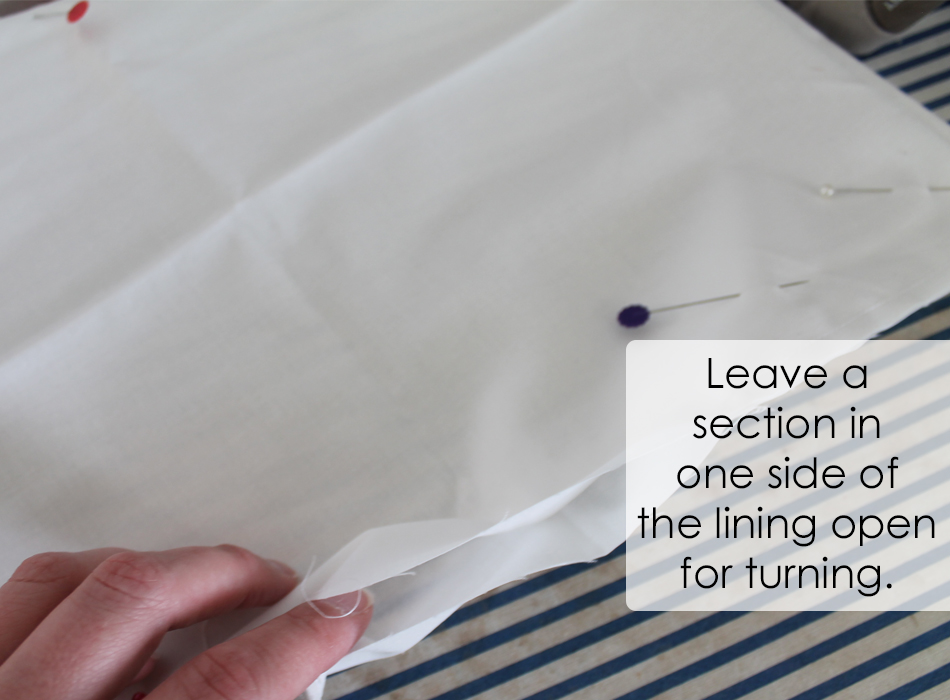
Sew a 1/4" seam down both sides, being sure to leave an opening on one side in the lining.
Turn right sides out and gently push out corners. Slip stitch the hole in the lining closed. Top stitch along top of bag to secure lining in place.
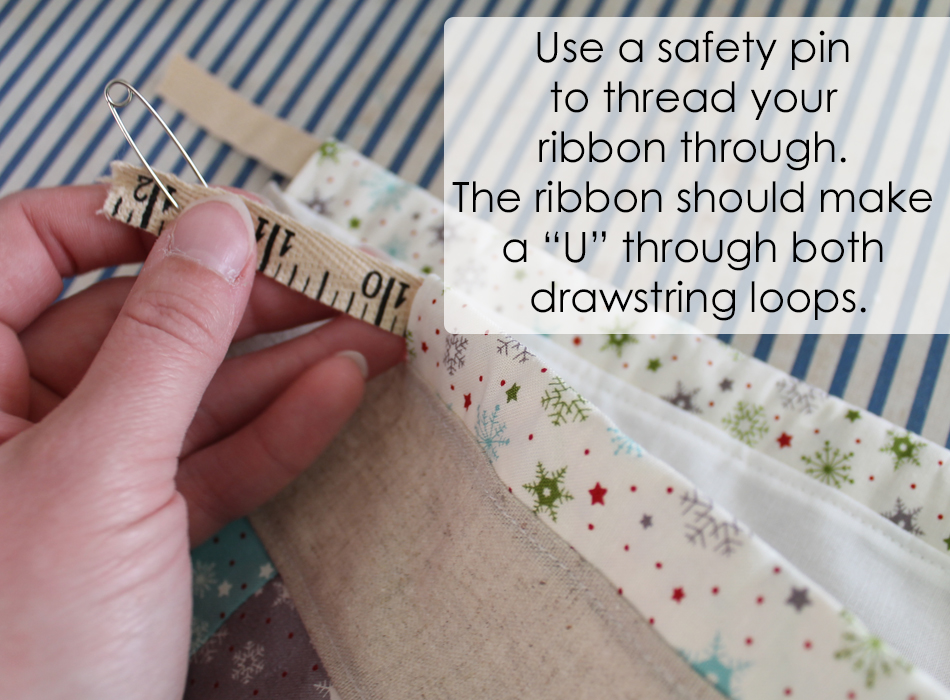
To insert the drawstring, use a safety pin to feed the ribbon or twill through the tube. Make a "U" through both tubes and tie off. Then feed the second ribbon through in the opposite direction, forming a U and tying off on the opposite side as the first ribbon. Trim ribbon as needed.
And you're done! :)
![]()
One cute little bag perfect for gifting, travel, and more!
I hope you will try out this fun technique! While I didn't invent it, I think it's a great technique! I find it is best to try it with a smaller project first, but I have even webbed blocks for a large lap quilt before. Visit our shop for easy Moda Candy kits and projects.
Chrissy Lux
{Sew Lux Fabric}
![]()