Welcome to Moda Fabrics!
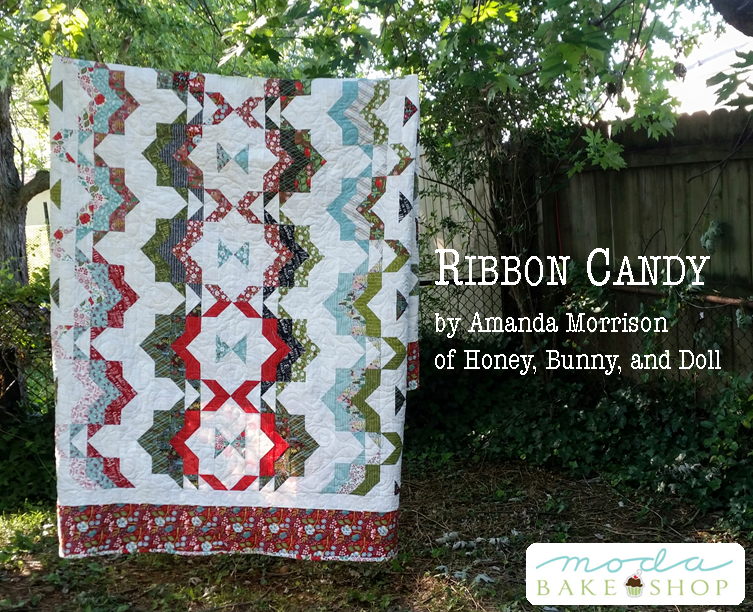
Ribbon Candy Jelly Roll Quilt
Ribbon Candy Jelly Roll Quilt
Published:
Jun 19 2016 - 23:00

Hey there! I’m Amanda Morrison, here to remind you it is the time of year to start thinking about Christmas quilts! If you are anything like me, you start dreaming up your Christmas and winter themed projects halfway through December.
Whoops.
This year, you could have Ribbon Candy finished in time for Christmas! It's a beauty that finishes at 86" x 100" with a unique block design and uses two Jelly Rolls. Let's get started!
![]()
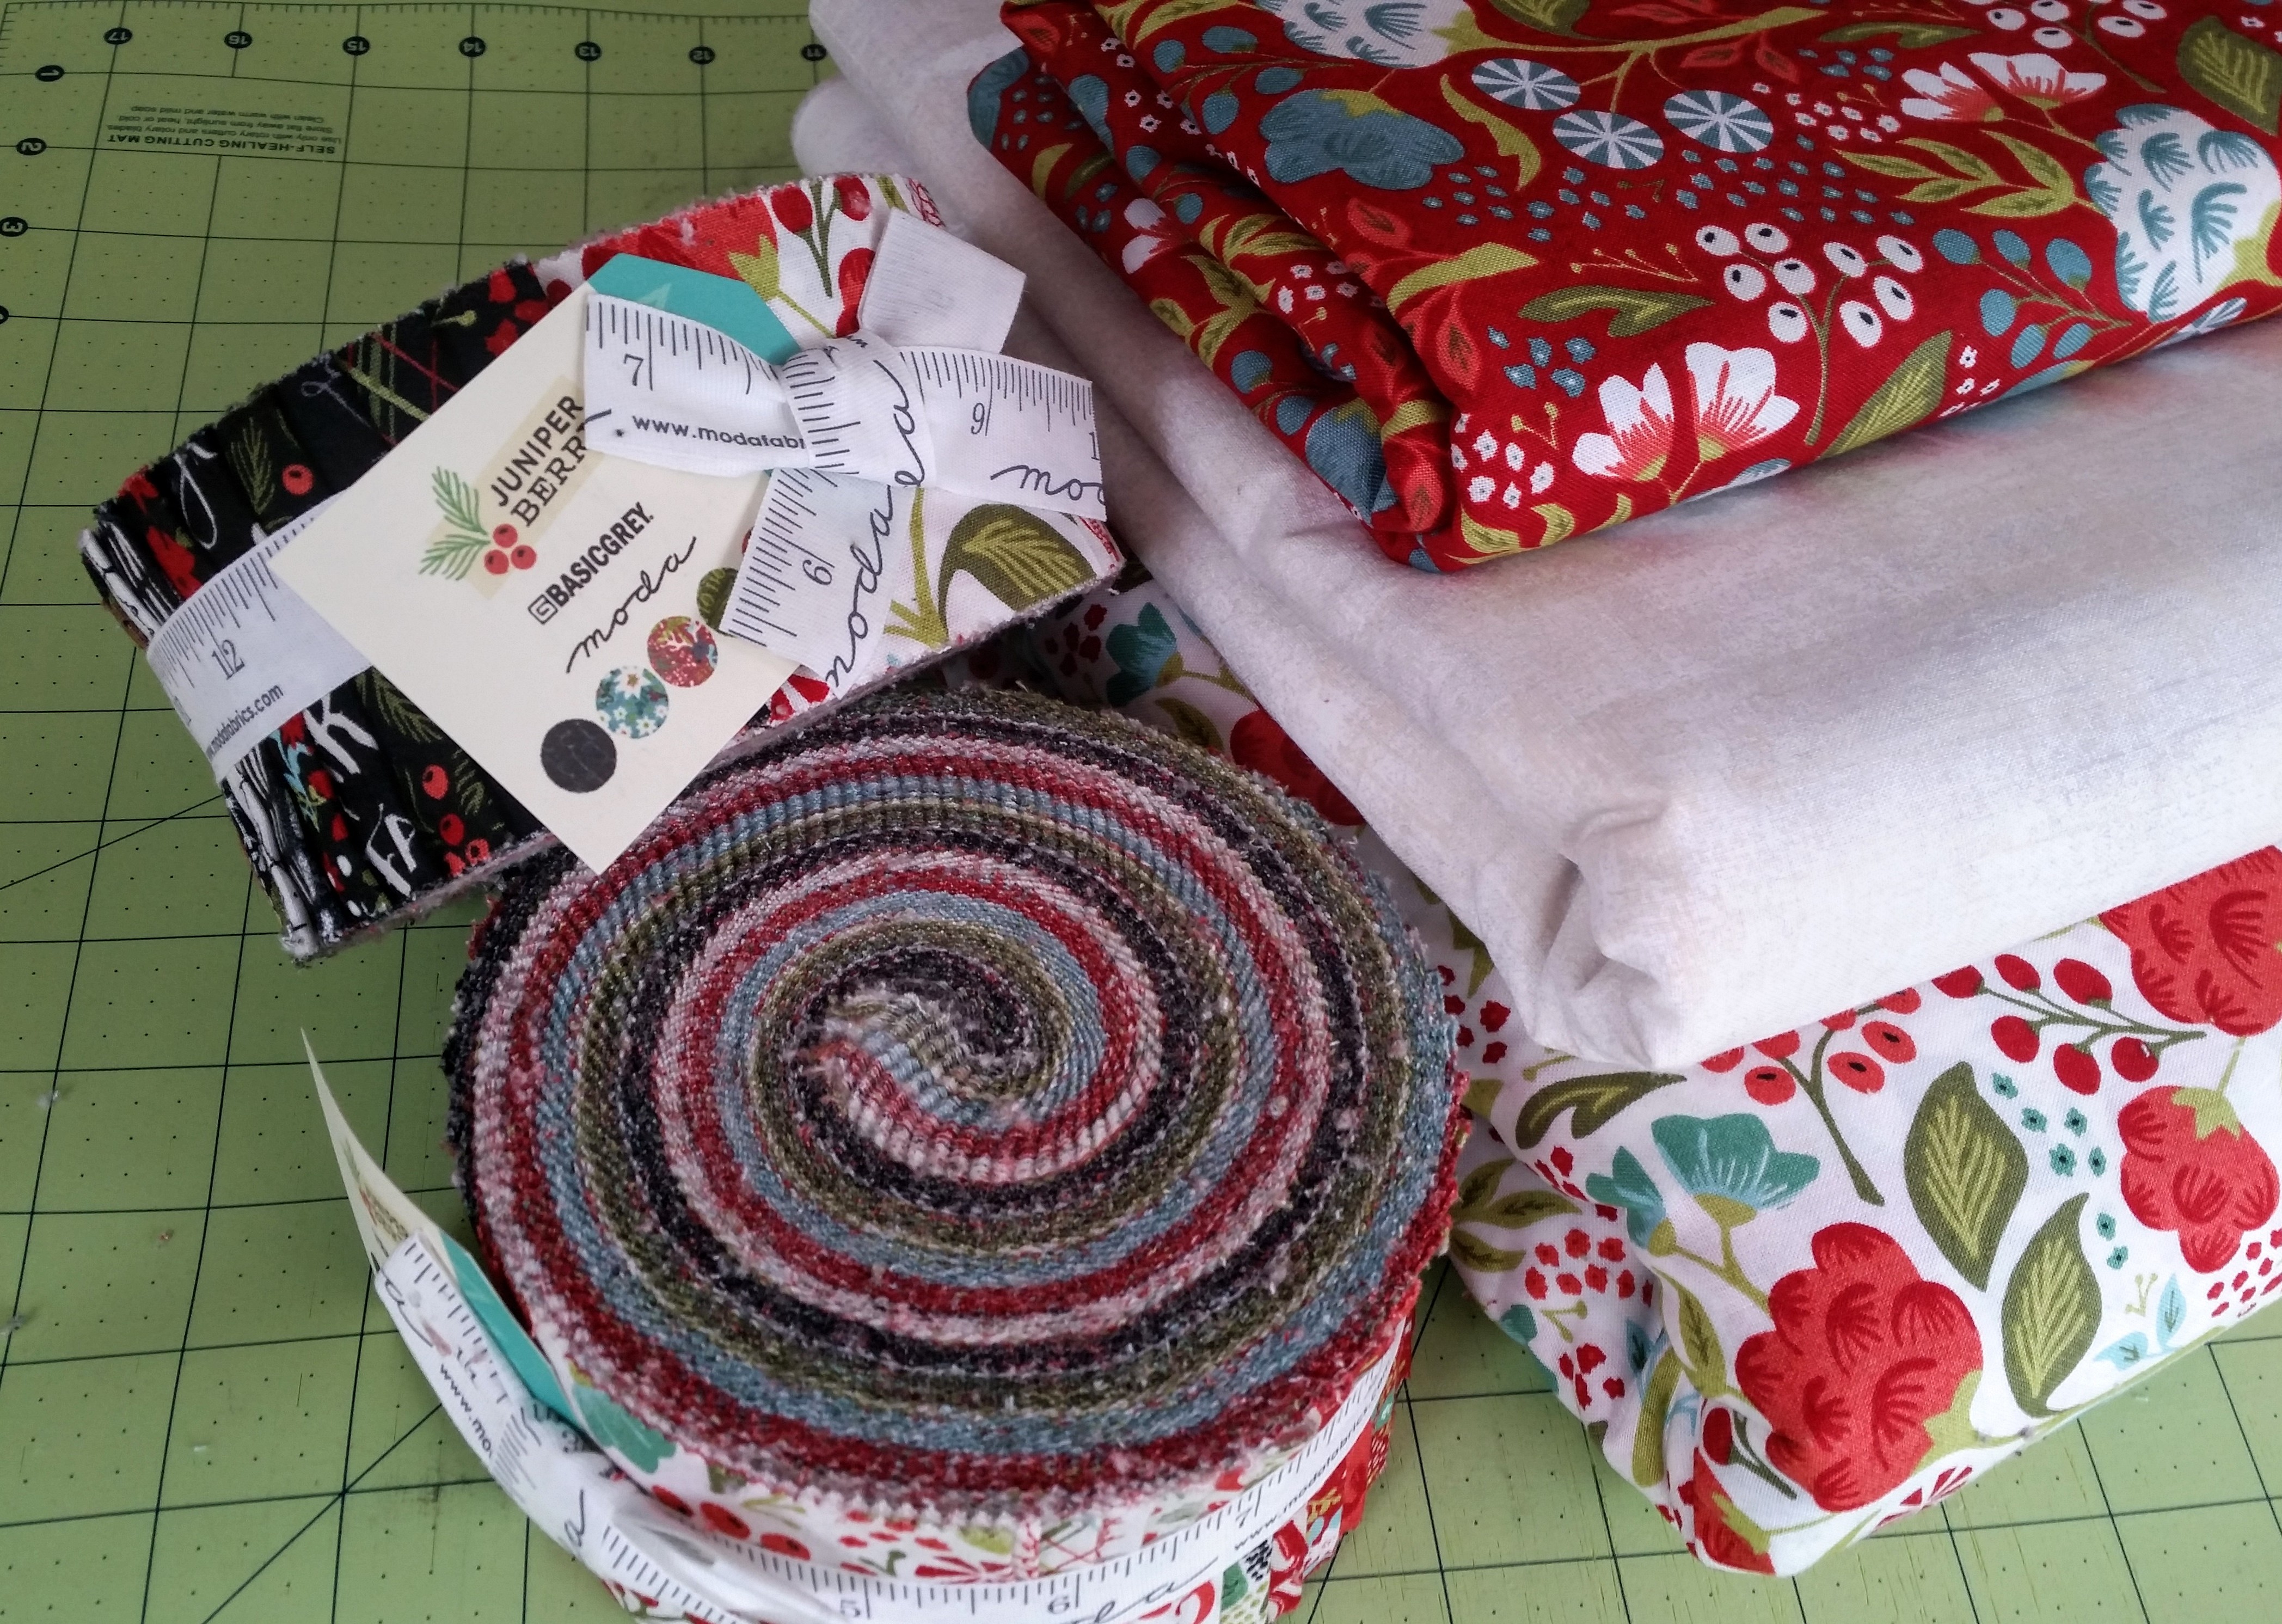
2 Juniper Berry Jelly Rolls
5 yards Grunge Basics Vanilla for background
2 yards Holly Jolly Red for border
8 yards Holly Jolly White for backing
You should have enough Jelly Strips left over to do your binding (~10 strips), but 8 yards of the backing fabric allows you enough fabric for binding, too.
![]()
From your background fabric cut the following:
(38) 2.5" x 8.5" rectangles
(84) 2.5" x 6.5" rectangles
(214) 2.5" x 4.5" rectangles
(260) 2.5" squares
(4) 2.5" x WOF strips
Before cutting the foreground fabric, I highly recommend planning out the colorways of each of your ribbons. For each ribbon you will choose an Outer, Middle, and Inner fabric color (and an Accent fabric, but cut those last!). Because I wanted each of my ribbons to be the same from top to bottom, I carefully planned which colors/fabrics to use from my Jelly Rolls. I needed between 7 and 8 Jelly Roll strips of each color for one ribbon.
For the Right ribbon and Left ribbon, you will need 12 whole blocks and 4 half blocks (two left halves and two right halves).
For the Center ribbon, you will need 14 whole blocks.
For each whole block, cut the following:
Outer color: (3) 2.5" x 4.5" rectangles and (2) 2.5" squares
Middle color: (3) 2.5" x 4.5" rectangles and (2) 2.5" squares
Inner color: (5) 2.5" x 4.5" rectangles
Accent color: (1) 2.5" x 4.5" rectangle
You will also need the following background pieces for each whole block: (6) 2.5" squares, (5) 2.5" x 4.5" rectangles, (2) 2.5" x 6.5" rectangles, (1) 2.5" x 8.5" rectangle
For each half block, cut the following:
Outer color: (1) 2.5" x 4.5" rectangles and (2) 2.5" squares
Middle color: (1) 2.5" x 4.5" rectangles and (2) 2.5" squares
Inner color: (2) 2.5" x 4.5" rectangles and (1) 2.5" squares
Accent color: (1) 2.5" square
You will also need the following background pieces for each half block: (4) 2.5" squares, (3) 2.5" x 4.5" rectangles, (1) 2.5" x 6.5" rectangle)
To construct these blocks, you'll use the Stitch-n-Flip method to sew squares to squares or squares to rectangles. Draw a diagonal line on the wrong side of a square and position it on top of another square or rectangle as appropriate. Sew along the drawn line, and check that you've placed your diagonal correctly before trimming excess fabric 1/4" from the seam!


You will also use the Strip-n-Flip method to sew rectangles to rectangles. Position two rectangles at a right angle, right sides together, as pictured below. Measure and mark 2.5" (the width of our rectangles for this project) from the top of upper rectangle and draw a diagonal line from your mark to the opposite corner. Sew along the drawn line, and check that your pieces are arranged correctly before trimming excess fabric 1/4" from the seam. For our Ribbon Candy blocks, we will repeat this process on the opposite side of all of our Strip-n-Flip units which will make extended Flying Geese units--there is a lot of "sky" behind the geese!


To make a whole block, lay out all of your block pieces as pictured below. In this example the Outer color is blue, Middle is white, Inner is green, and the Accent is black.
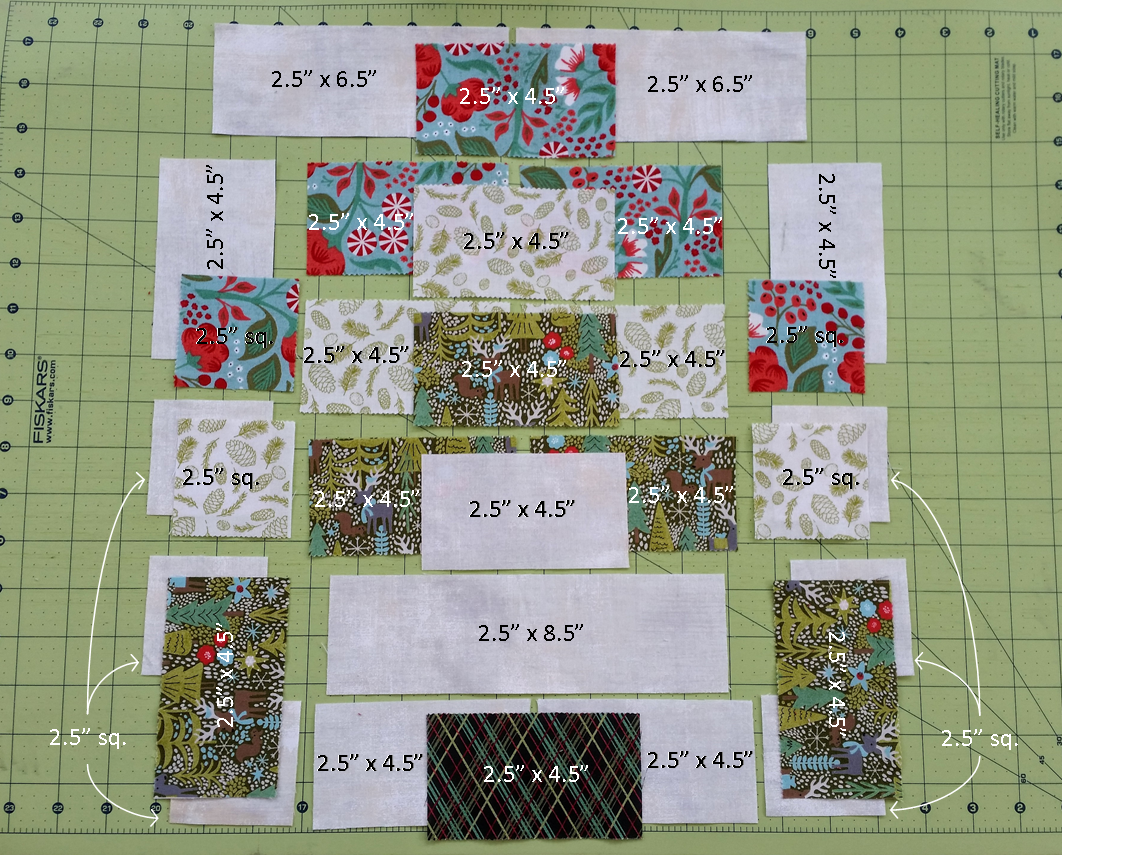
Use the following pieces and the Stitch-n-Flip method to make units 1, 1r, 2, 3, and 3r:
1 and 1r. 2.5" Outer square and 2.5" x 4.5" background rectangle
2. 2.5" Middle square and 2.5" background square (you will make two 2's!)
3 and 3r. 2.5" x 4.5" Inner rectangle and (2) 2.5" background squares
Use the following pieces and the Strip-n-Flip method to make extended Flying Geese units A-E. Note that A-D point North and E will point South.
A. (2) 2.5" x 6.5" background rectangles and a 2.5" x 4.5" Outer rectangle
B. (2) 2.5" x 4.5" Outer rectangles and a 2.5" x 4.5" Middle rectangle
C. (2) 2.5" x 4.5" Middle rectangles and a 2.5" x 4.5" Inner rectangle
D. (2) 2.5" x 4.5" Inner rectangles and a 2.5" x 4.5" background rectangle
E. (2) 2.5" x 4.5" background rectangles and a 2.5" x 4.5" Accent rectangle

After your units are finished, sew together 1 + 2 + 3, 1r + 2 + 3r, and B + C + D + background rectangle + E. Then sew the side units to either side of the center section before sewing A on top.

To make a half block, lay out your pieces as pictured below. The layout for left and right half blocks are both shown.
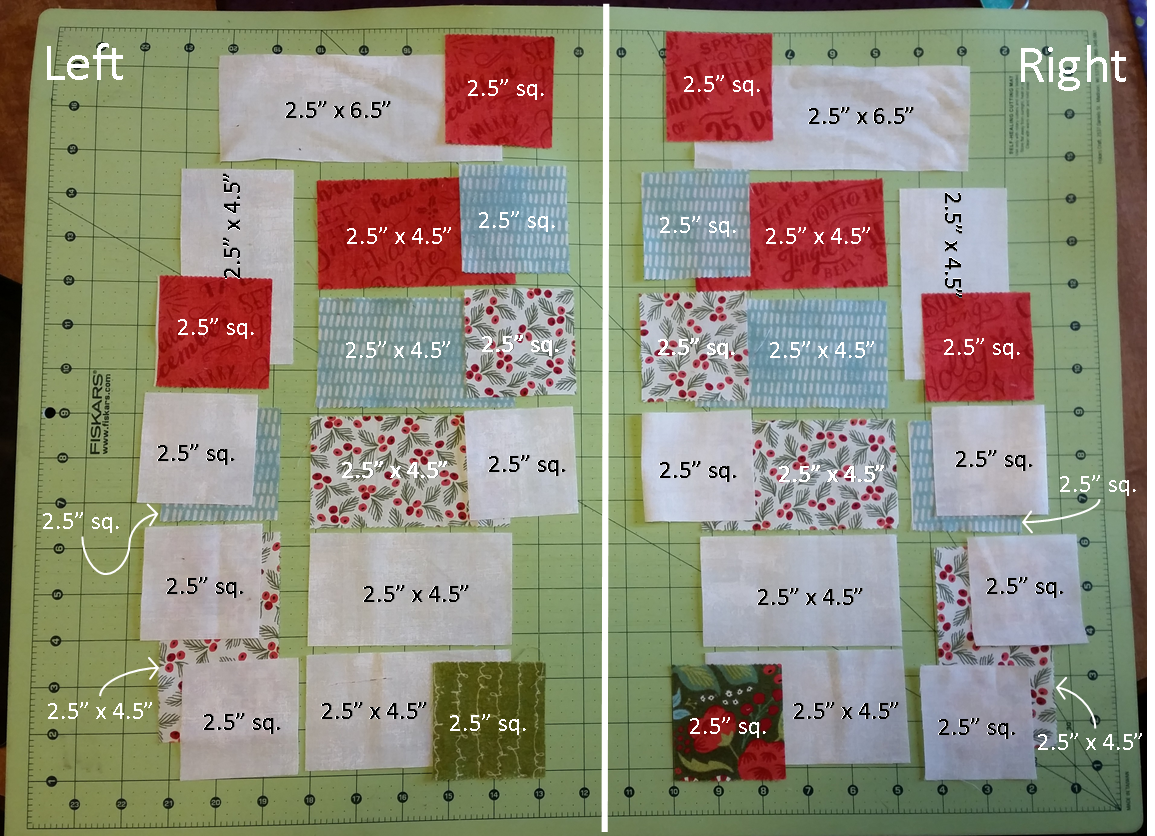
Use the following pieces and the Stitch-n-Flip method to make all units for one half block. The picture below shows placement for the Stitch-n-Flip angles in a left half block and a right half block.
1. 2.5" Outer square and 2.5" x 4.5" background rectangle
2. 2.5" Middle square and 2.5" background square
3. 2.5" x 4.5" Inner rectangle and (2) 2.5" background squares
A. 2.5" x 6.5" background rectangle and 2.5" Outer square
B. 2.5" x 4.5" Outer rectangle and a 2.5" Middle square
C. 2.5" x 4.5" Middle rectangle and a 2.5" x 4.5" Inner rectangle
D. 2.5" x 4.5" Inner rectangle and a 2.5" x 4.5" background rectangle
E. 2.5" x 4.5" background rectangle and a 2.5" Accent square

After your units are finished, sew together 1 + 2 + 3 and B + C + D + background rectangle + E. Then sew together these sections before sewing A on top.

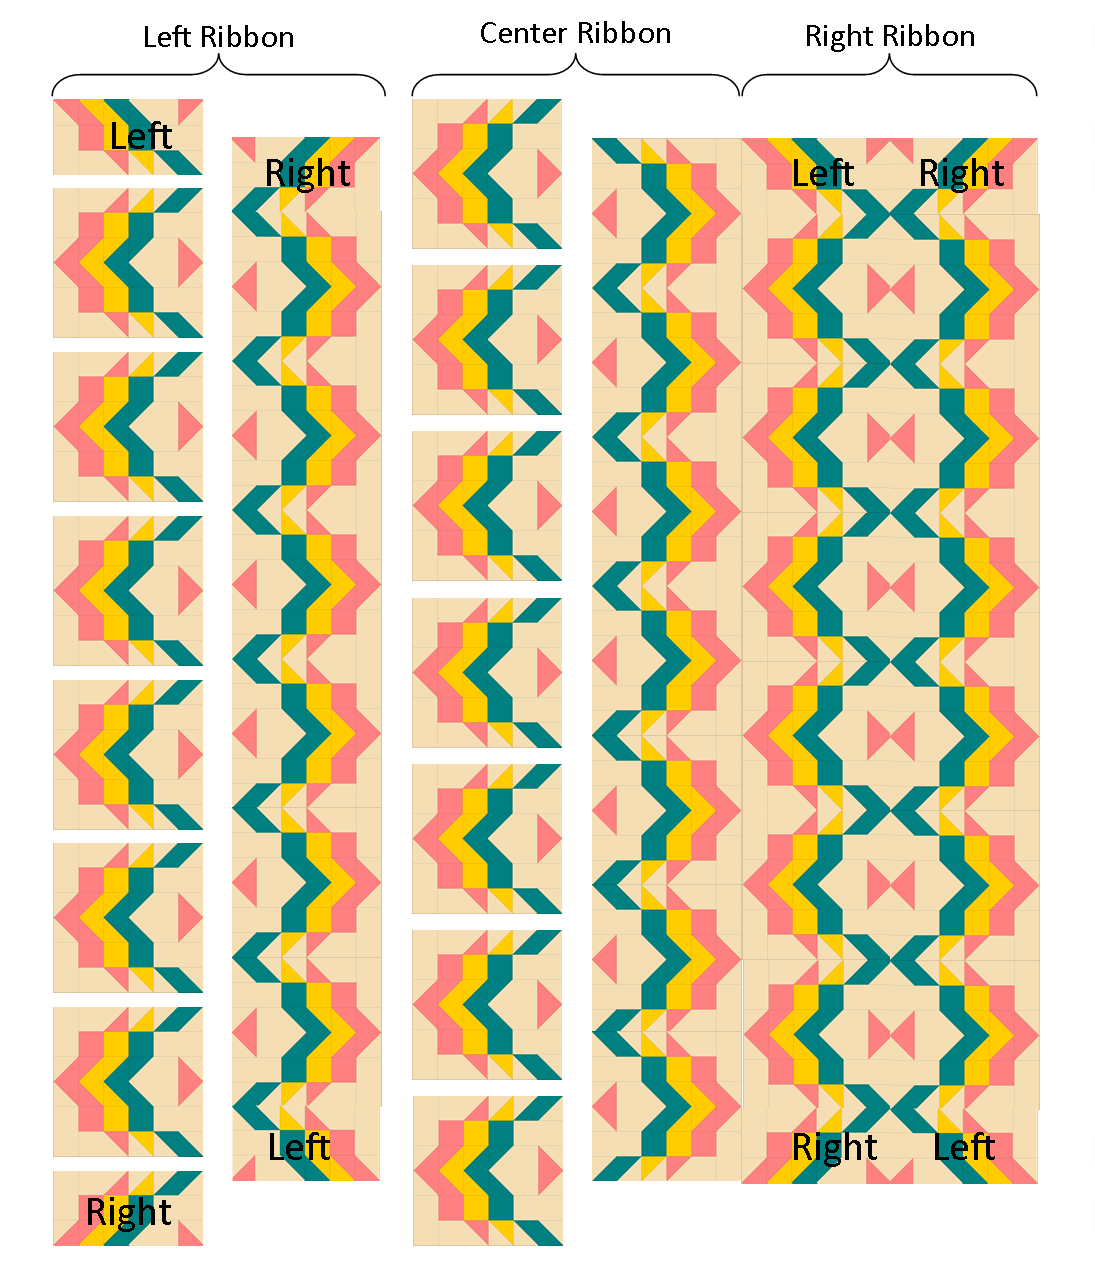
Once finished sewing your blocks, lay them out as pictured below. Sew the ribbons together in vertical columns instead of rows. Then sew your columns together.
Now, you will sew your (4) 2.5" x WOF background strips end to end using straight or diagonal seams as desired. Measure the width of your quilt top (mine was ~73") and cut (2) background strips matching this measurement to sew to the top and bottom of your quilt.
Then cut (8) 6.5" x WOF strips from your border fabric and sew the strips end to end using straight or diagonal seams as desired. Measure your quilt top length and cut (2) border strips matching the measurement to sew to either side of the quilt. Repeat this process measuring the quilt's width to sew border strips to the top and bottom of the quilt.
![]()
This version of Ribbon Candy finishes at 86" x 100" which is perfect for a queen size bed. Adding a fourth ribbon would be an easy way to make a king size quilt!
I do love this fabric line and the addition of blue and black to the traditional Christmas colors. Using Jelly Rolls gives this pattern a more scrappy look and it would be awesome to see someone make a version with a limited number of fabrics. Maybe some Bella Solid ribbons? Or ombre ribbons? I would love to hear your ideas!

Can you find the happy little reindeer hiding below?

I can't wait to use this quilt next December and I hope you start thinking about your next Christmas quilt soon!
Happy quilting!
Amanda Morrison
{Honey, Bunny, and Doll}
![]()
Posted in: