Welcome to Moda Fabrics!
QAL - Cowboy Boot Block
QAL - Cowboy Boot Block
Published:
May 25 2016 - 23:00


Yee Haw! I’ve been having such fun celebrating MBS’ 7th birthday, have you? When I thought about how to commemorate this site’s 7th year, I thought about how fun and welcoming this site is for quilters and what a BIG Texas heart Moda has for fabric and quilters. I also thought about the contact I’ve had with ‘Moda Lissa’ and other representatives of Moda - they all just exude southern warmth, hospitality and charm! So, I thought a “Howdy Ya’ll” welcome banner would be perfect, and besides, I was wanting to make something quilty to hang on my fence to welcome family and friends to the farm;
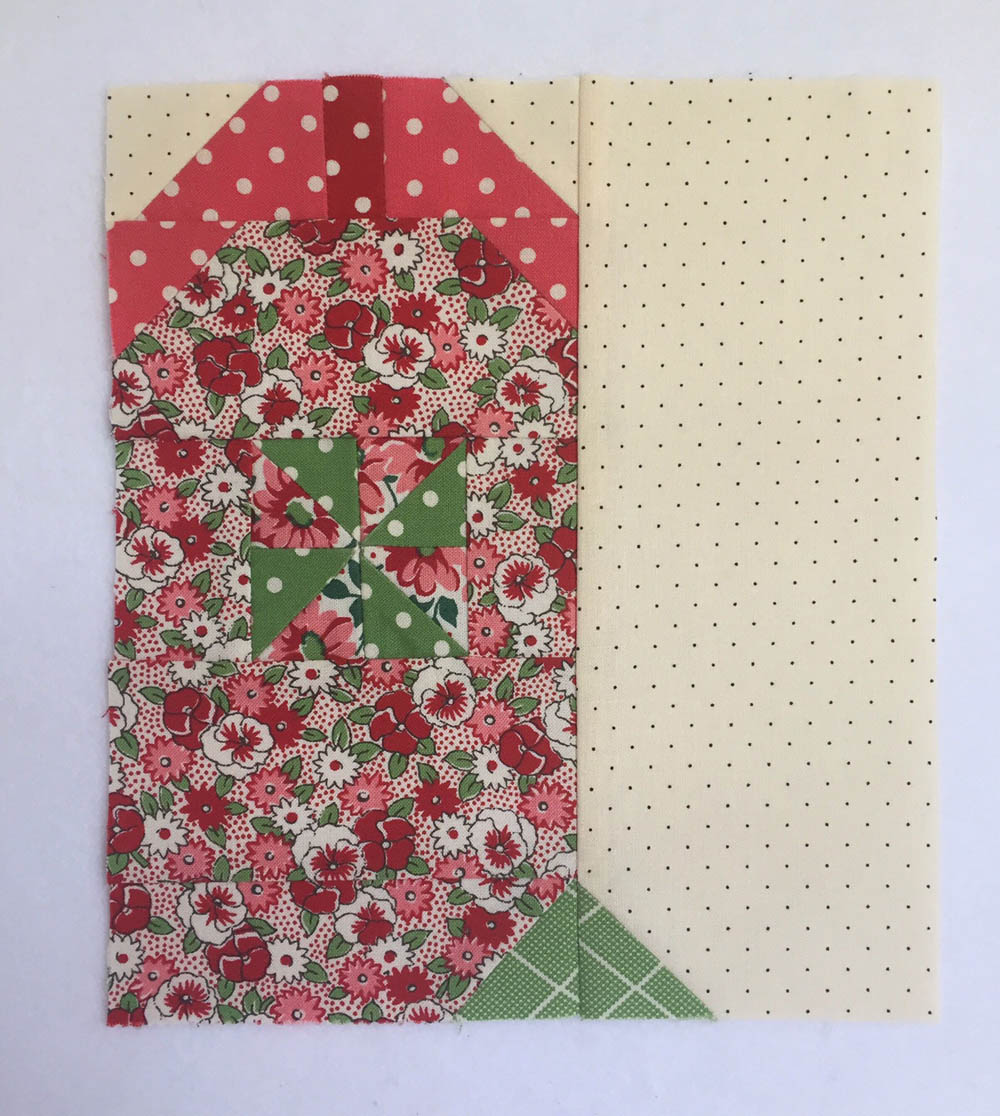
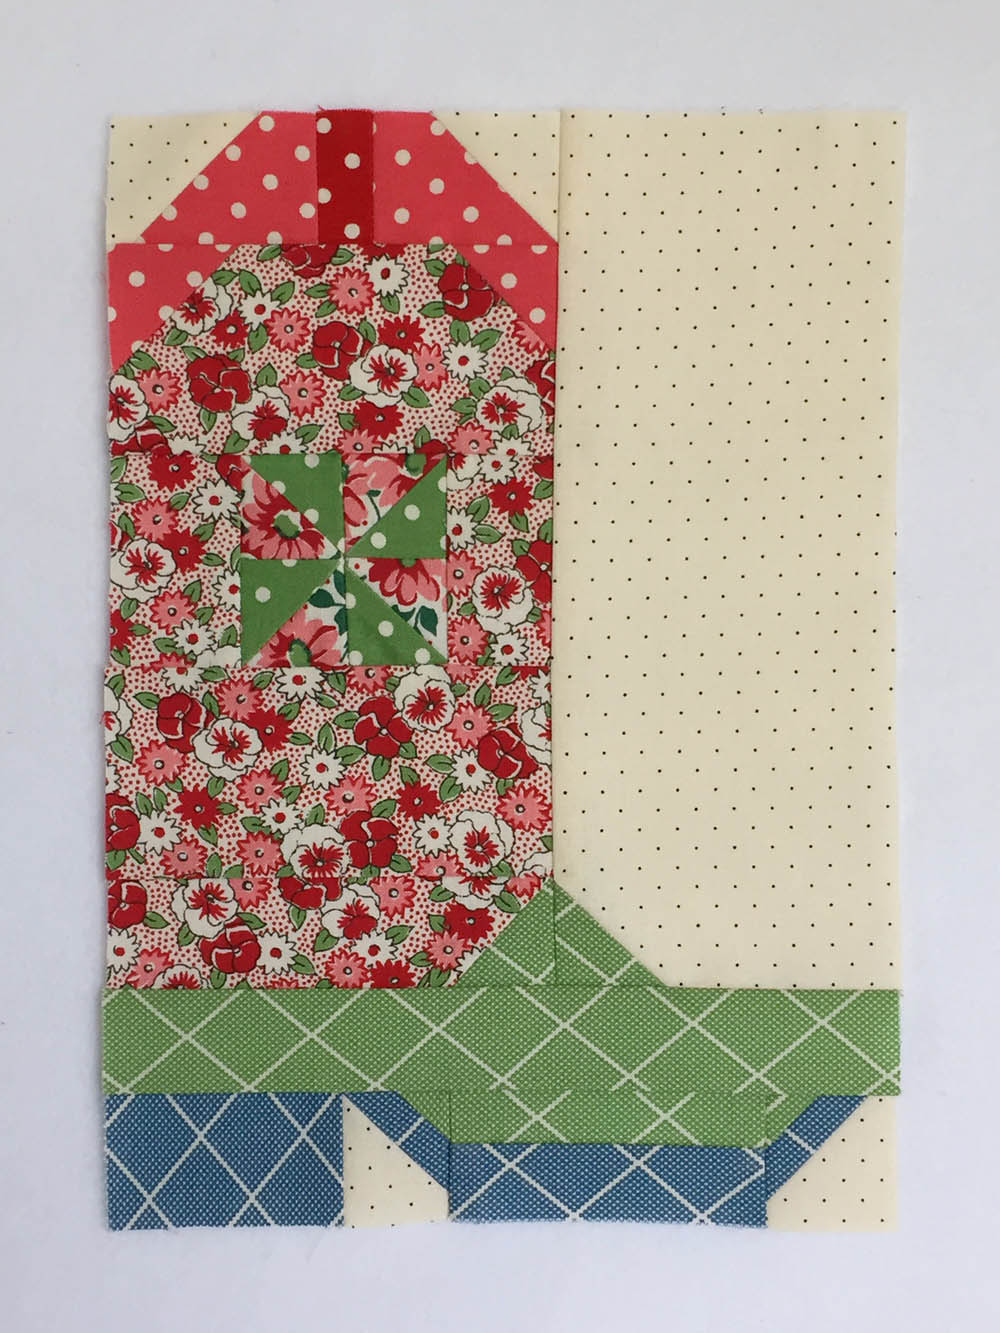
Today, I’m going to share how to make my Cowboy Boot block. So let’s get our Boot Scootin’ Quiltin’ Boogie on!
![]()

I’m using a jelly roll of American Jane’s Bread ‘n Butter (because I just love its country girl charm) and one of American Jane’s Basics called Lorraine in Ivory (because I love pin dots!).
For one cowboy boot, cut:
Fabric 1 – Boot Top
(A) 2 – 1 ½” x 2 ¼” rectangles
(B) 2 – 1 ½” squares
Fabric 2 – Tab
(C) 1 – 1” x 1 ½” rectangle
Fabric 3 – Pinwheel Background
(D) 4 – 1 ½” squares
Fabric 4 – Pinwheel
(E) 4 – 1 ½” squares
Fabric 5 – Boot Leg
(F) 1 – 2 ½” x 4 ½” rectangle
(G) 2 – 1 ½” x 2 ½” rectangles
(H) 1 – 2 ½” x 4 ½” rectangle
(I) 1 – 1 ½” x 4 ½” rectangle
Fabric 6 – Foot
(J) 2 – 1 ½” squares
(K) 1 – 1 ½” x 7 ½” rectangle
(L) 1 – 1” x 3 ½” rectangle
(M) 2 – 1” squares
Fabric 7 – Heel & Sole
(N) 1 – 1 ½” x 2 ½” rectangle
(O) 2 – 1 ½” squares
(P) 1 – 1” x 3 ½” rectangle
Fabric 8 – Background
(Q) 2 – 1 ½” squares
(R) 1 – 3 ½” x 8 ½” rectangle
(S) 2 – 1 ½” squares
(T) 1 – 1 ½” x 10 ½” rectangle
![]()
Note: Instructions are for a right facing boot. Items in (parenthesis) are for a left facing boot. All seams are ¼” unless otherwise indicated.
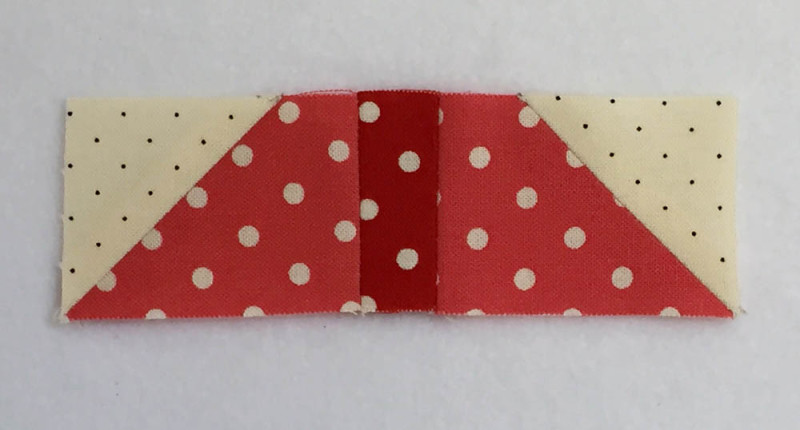
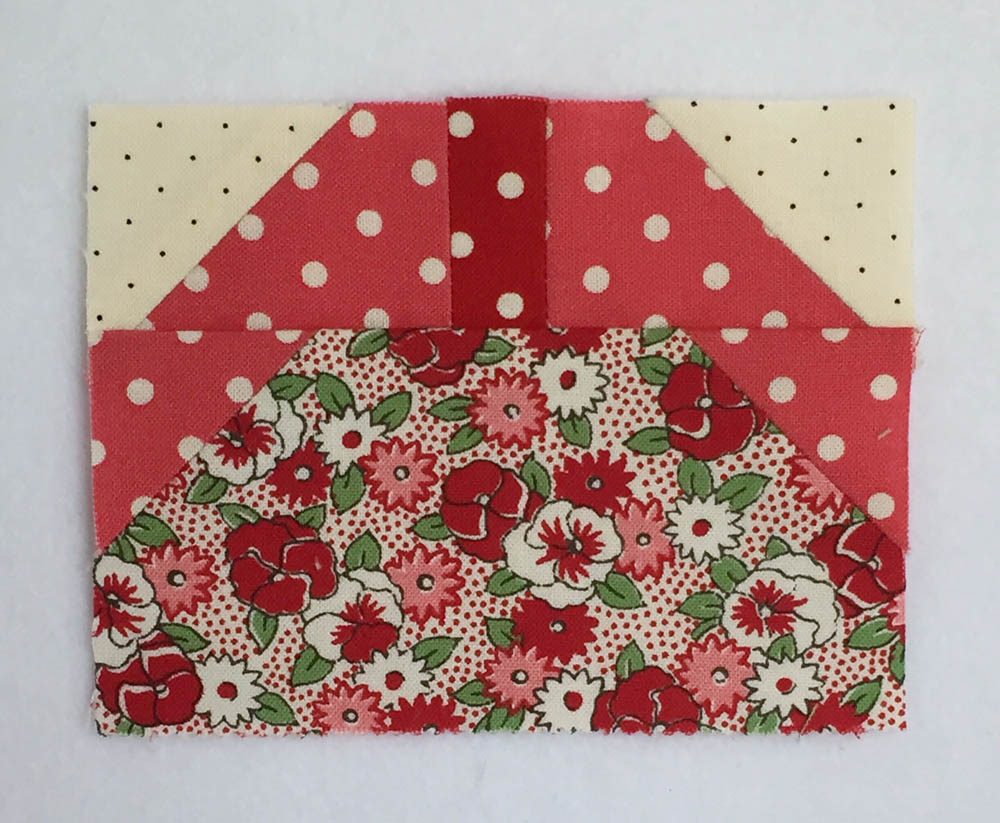
Boot Top:

Draw a diagonal line from corner to corner on the wrong side of the Fabric Q background squares. Layer one Fabric Q square on the left and one on the right of the Fabric A rectangles as shown below. Sew on the line. Trim and press seams open.
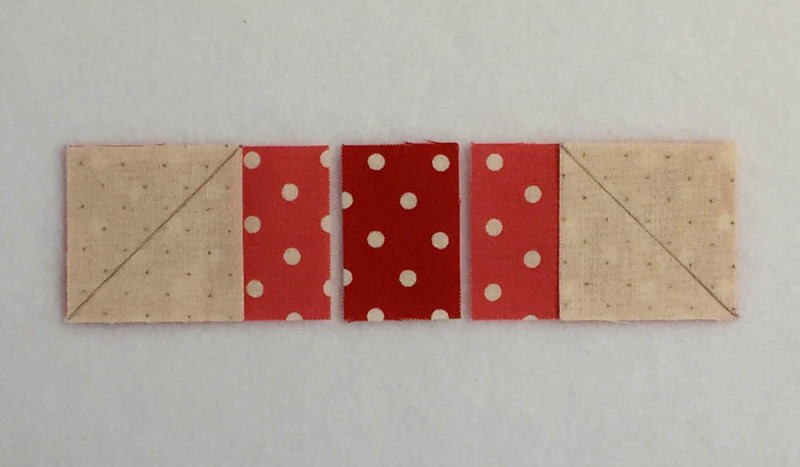
Sew the Fabric A rectangles to either side of the Fabric C rectangle. Press to Fabric C.
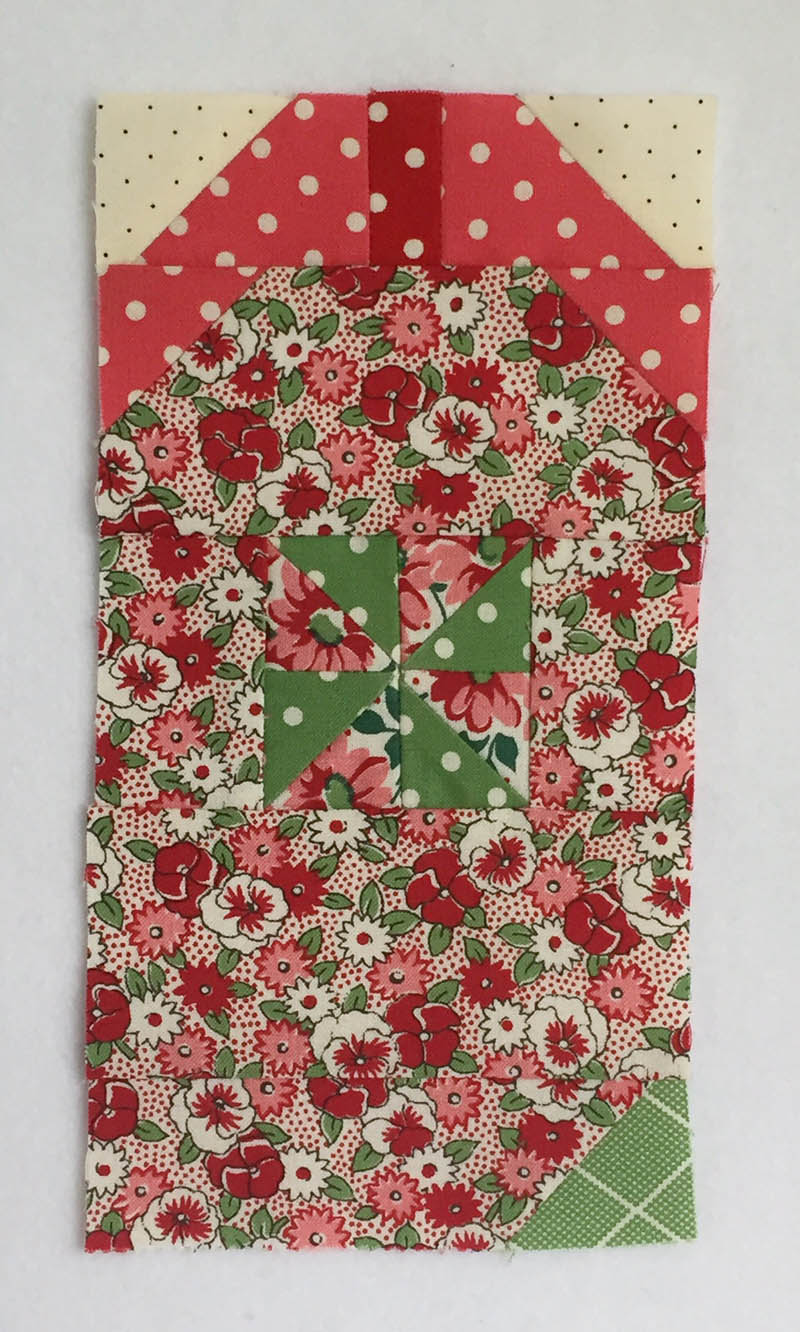
Pinwheel:

Draw a diagonal line from corner to corner on the wrong side of the Fabric D squares. Layer a Fabric D square to a Fabric E square. Sew on the line. Trim and press to the Fabric E square. Repeat for the remaining 3 Fabric D and Fabric E squares.

Sew two half-square triangles (HST) together. Repeat for the other two HST. Press seams open.
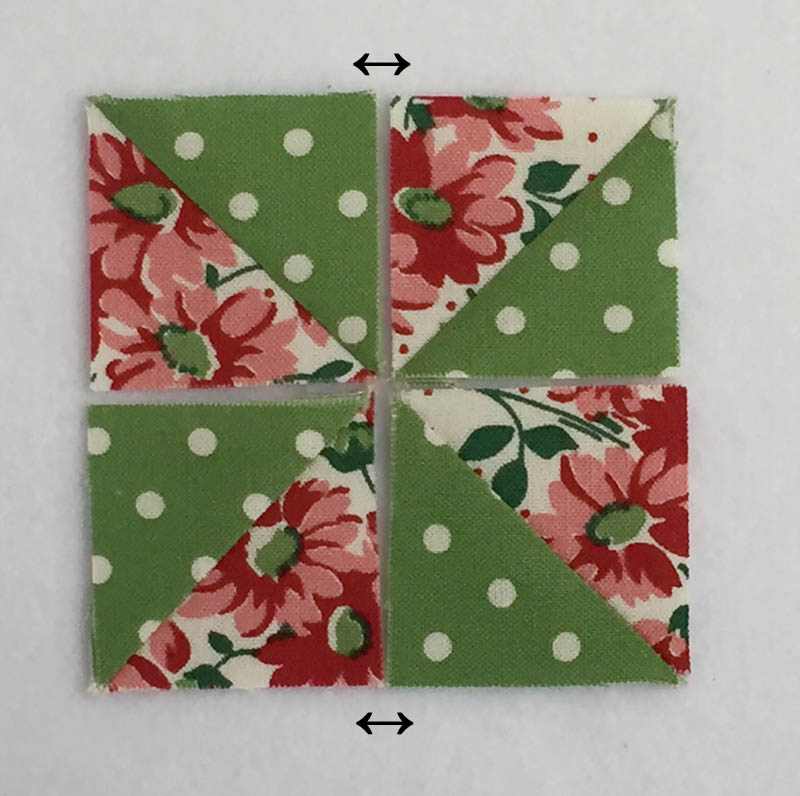
Sew the two HST sets together to form a pinwheel. Press seam open.

Boot Leg:

Draw a diagonal line from corner to corner on the wrong side of the Fabric B squares. Layer the Fabric B squares on the left and right top corners of the Fabric F rectangle. Sew on the lines. Trim and press seams open.
Sew the boot top to the Fabric F rectangle. Press to the Fabric F rectangle.
Sew a Fabric G rectangle to the right and left side of the pinwheel. Press seams to Fabric G.

Sew the pinwheel section to the boot top section. Press to the boot top. Sew the Fabric H rectangle to the bottom of the boot leg unit. Press to the Fabric H rectangle.

Draw a diagonal line on the wrong side of a Fabric J square. Layer the Fabric J square on the lower right (left) corner of the Fabric I rectangle. Trim and press to the Fabric I rectangle.

Sew the Fabric I unit to the bottom of the boot leg unit. Press to Fabric H.
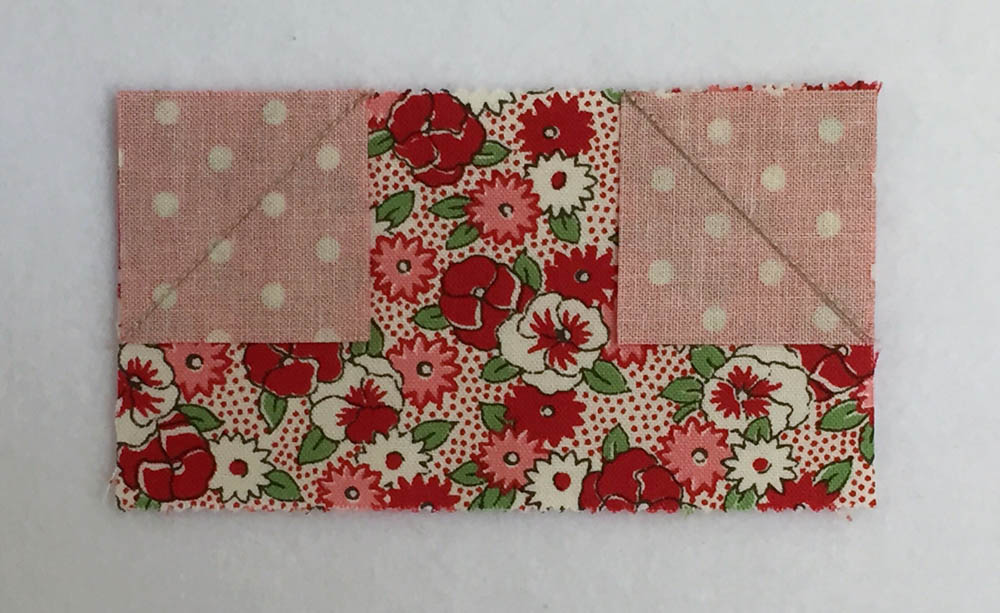
Background – Right (Left):
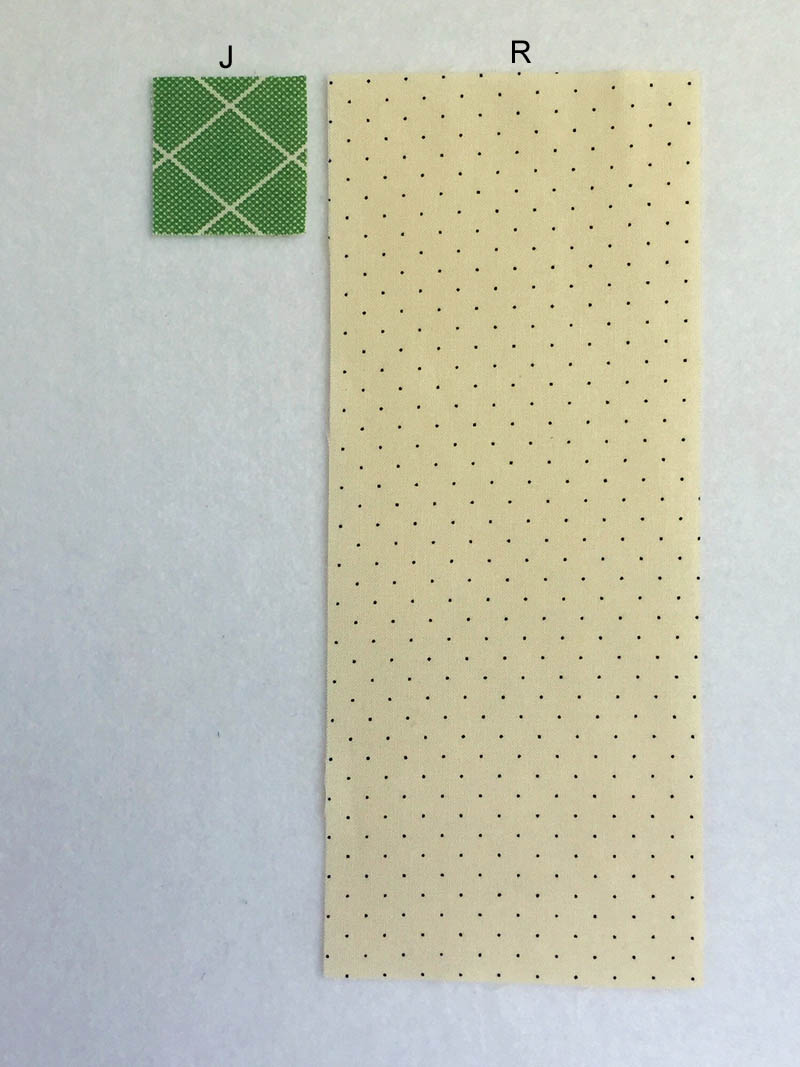
Draw a diagonal line from corner to corner on the wrong side of a Fabric J square. Layer the Fabric J square on the lower left (right) corner of the Fabric R rectangle. Sew on the line. Trim and press to Fabric J.
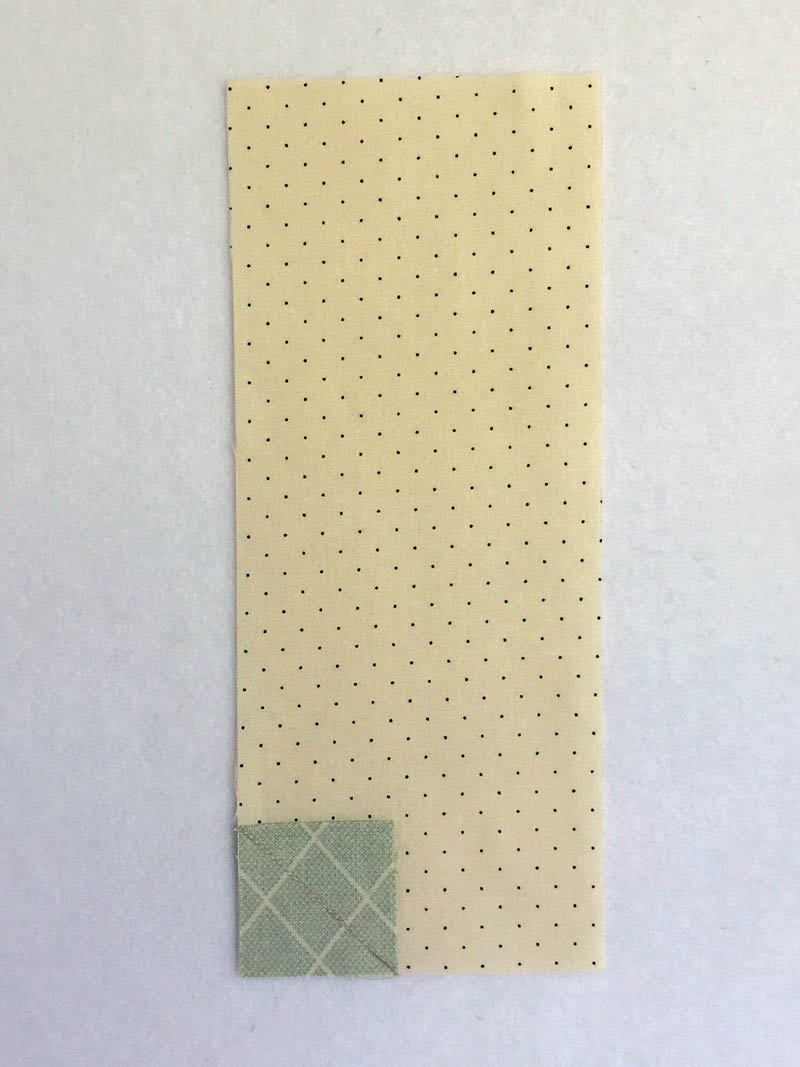
Sew the Fabric R unit to the right (left) side of the boot leg unit.
Boot Foot, Heel & Sole:

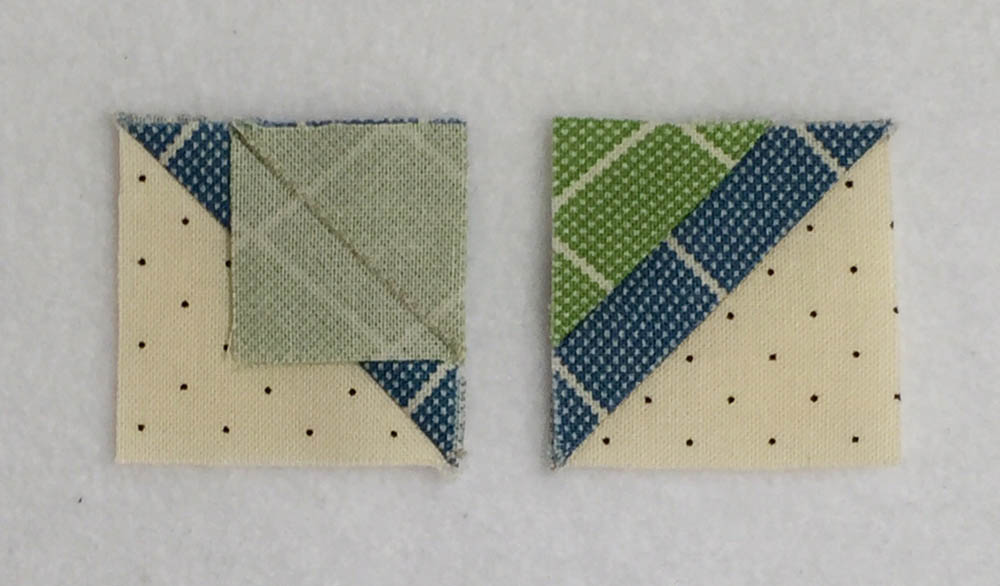
Draw a diagonal line from corner to corner on the wrong side of the Fabric S squares. Layer a Fabric S square on a Fabric O square. Sew on the line. Trim and press to Fabric O. Make two.

Draw a diagonal line from corner to corner on the wrong side of the Fabric M squares. Layer on the Fabric O corner of the HST. Sew on the line. Trim and press to Fabric M. Make two.
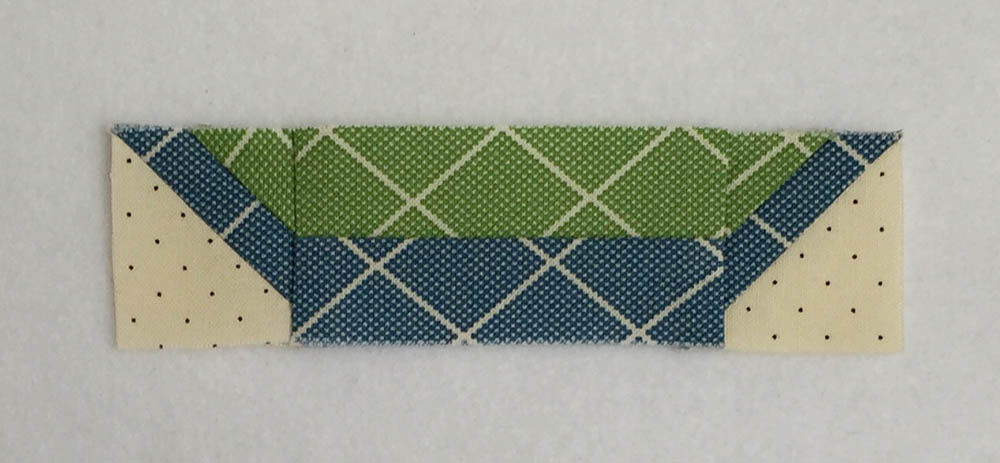
Sew the Fabric P rectangle to the Fabric L rectangle along the long side. Press to Fabric P.
Sew the HST units to the right and left side of the Fabric L/P rectangle. Press to the rectangle.
Sew the Fabric N rectangle to the left (right) side of the sole unit. Press to Fabric N.

Sew the heel/sole unit to the Fabric K rectangle. Press to Fabric K.

Sew the foot unit to the leg unit. Press to the foot unit.
Background – Left (Right):
Sew the Fabric T rectangle to the left (right) side of the boot.

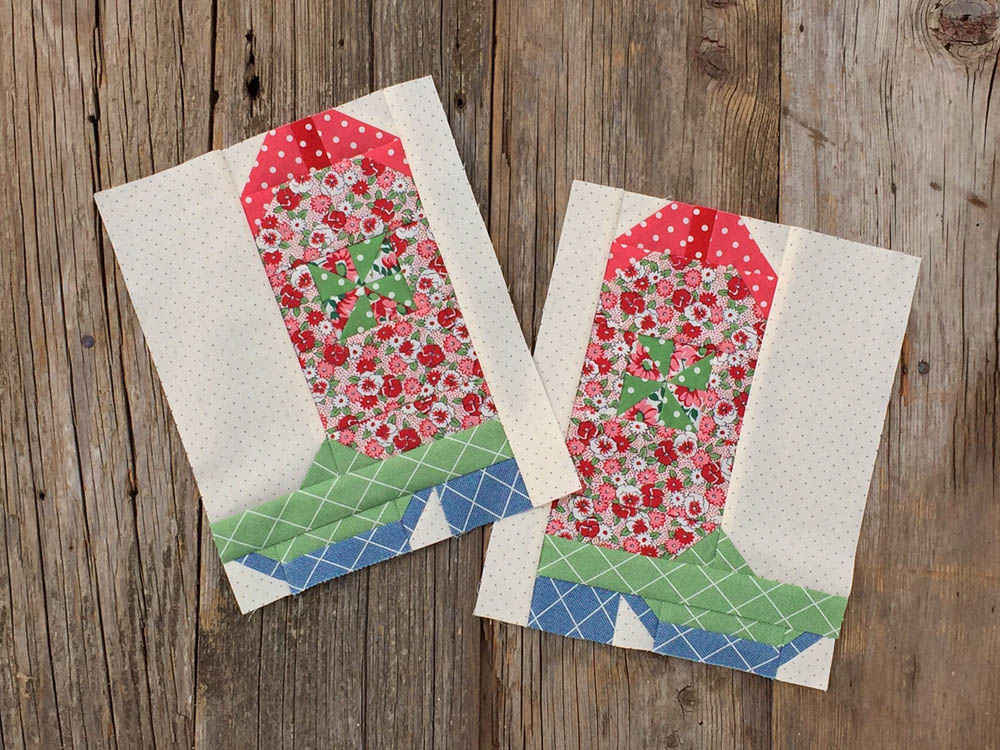
We’re done! Let’s kick up our heels! I had so much fun designing and making this block. I hope you enjoy it too!
![]()
This block measures 8½” x 10½” (8" x 10" finished).
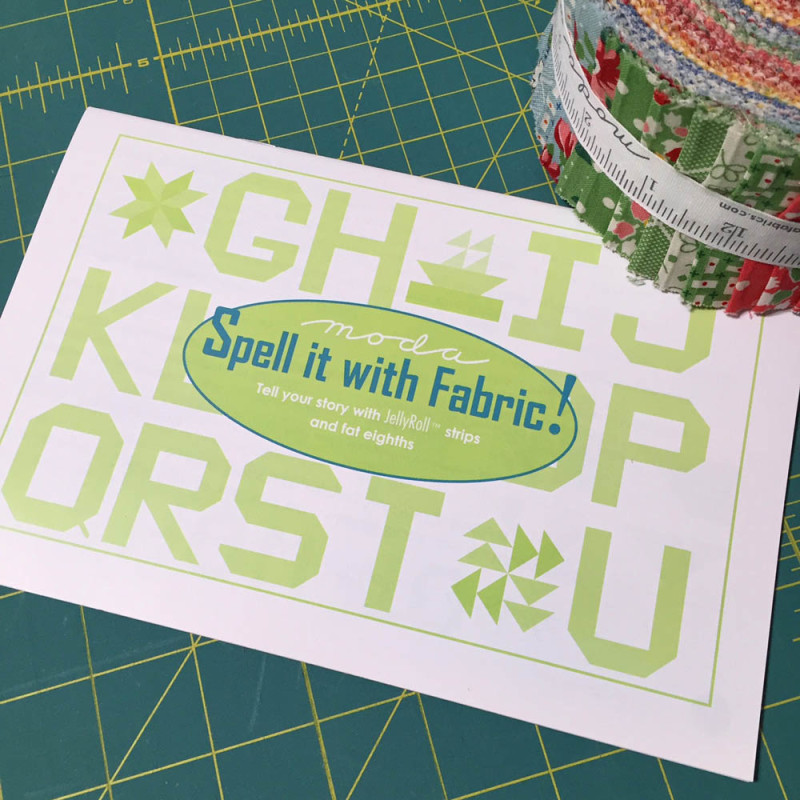
If you'd like to join in the MBS Birthday QAL fun, you can pick up a "Spell It With Fabric" pattern book at your local quilt shop or visit Moda Fabrics "Spell It With Fabric" Pinterest Page for the letter block patterns.
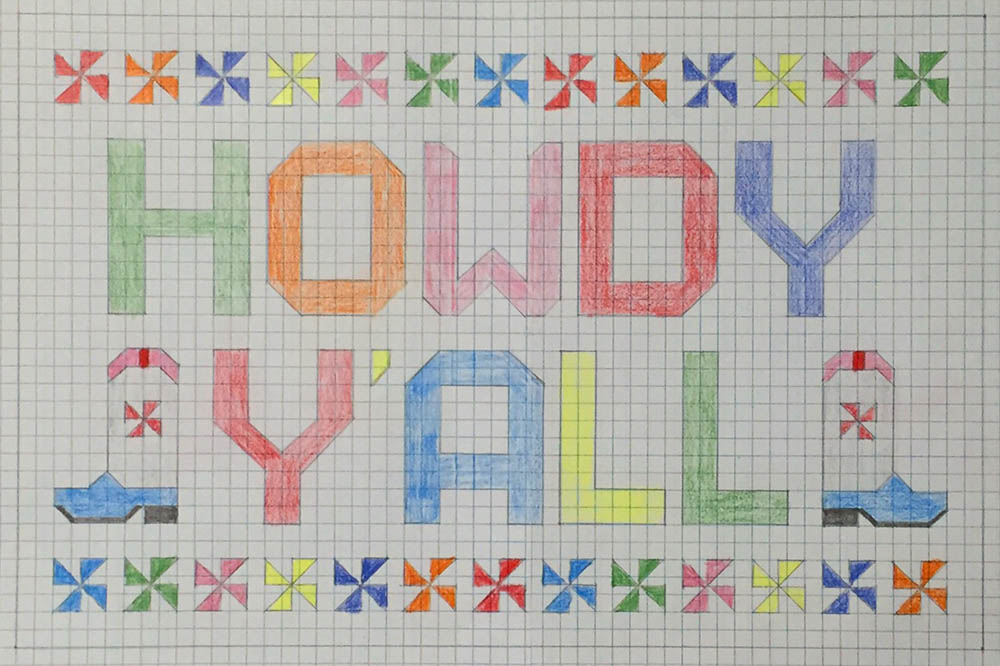
To make my "Howdy Y'all" quilt, you will make the letters but do not sew on the borders indicated in the pattern. Make 26 - 3 1/2" pinwheels. I used 2 1/2" squares, drawing a diagonal line from corner to corner on the background square, layering on top of a 2 1/2" print square, then sewing 1/4" on either side of the line and cutting apart to create my half square triangles. Then I sewed the HSTs together to make a pinwheel, trimming them to 3 1/2". To make the comma, draw a diagonal line from corner to corner on a 1 1/2" background square, layer on one end of a 1 1/2" x 2 1/2" print rectangle, sew on line, trim and press. Use the following diagram and cutting chart to complete the quilt.
Cutting Chart for Background Fabric:
1 - 3 1/2" x 8 1/2" rectangle (Under Comma)
2 - 1 1/2" x 2 1/2" rectangles (Right & Left of Comma)
1 - 3 1/2" x 10 1/2" rectangle (Left of Letter H)
1 - 4 1/2" x 10 1/2" rectangle (Right of Letter Y)
8 - 1 1/2" x 10 1/2" rectangles (Sashings between Letters, Boots)
24 - 1 1/2" x 3 1/2" rectangles (Sashings between Pinwheels)
3 - 2 1/2" x 51 1/2" strips (Horizontal Sashings between Rows of Pinwheels & Letters)
2 - 2 1/2" x 32 1/2" strips (Side Borders - sew first)
2 - 2 1/2" x 55 1/2 strips (Top & Bottom Borders - sew last)Finished Quilt: 55" x 36"
I’ve been making other Spell It With Fabric projects for Moda Bake Shop's Birthday QAL– including a Monogram Pillow Tutorial - and I'm sharing them on my blog, Thistle Thicket Studio. You can also follow my progress on Instagram, Ello, and Facebook @thistlethicketstudio & Twitter @StudioThicket. If you make a project using my Cowboy Boot block or make my "Howdy Y'all" quilt, I would love to hear about it!
Sharla Krenzel
{www.thistlethicketstudio.com}
![]()
Posted in: