Welcome to Moda Fabrics!
There's some sewing going on...
There's some sewing going on...
Published:
Sep 15 2015 - 04:00
It is National Sewing Month. So I'm allowed - and required.
There's a whole bunch to share today so let me get to it! First up are pillowcases - the APQ - 1 Million Pillowcase Challenge is having a Sew-A-Thon on Friday and Saturday.
If you're in Des Moines, the American Patchwork offices at the Meredith Corporation are hosting a 24-hour pillowcaseapalooza sew-a-thon event. It looks like they had a lot of fun last year.

If you're not in Des Moines and you'd still like to find a sew-a-thon, there's a long list of shops on AllPeopleQuilt.com. If you don't see a shop in your area, keep checking back as the list is being updated daily.
[If you're a shop that would like to host an event, that's easily done. You can fill out this form and APQ quillt send you some information to help you promote your event, and I think I heard something about a "goodie bag". There are no rules - you set the hours that work for you and do everything the way that works best for you.]
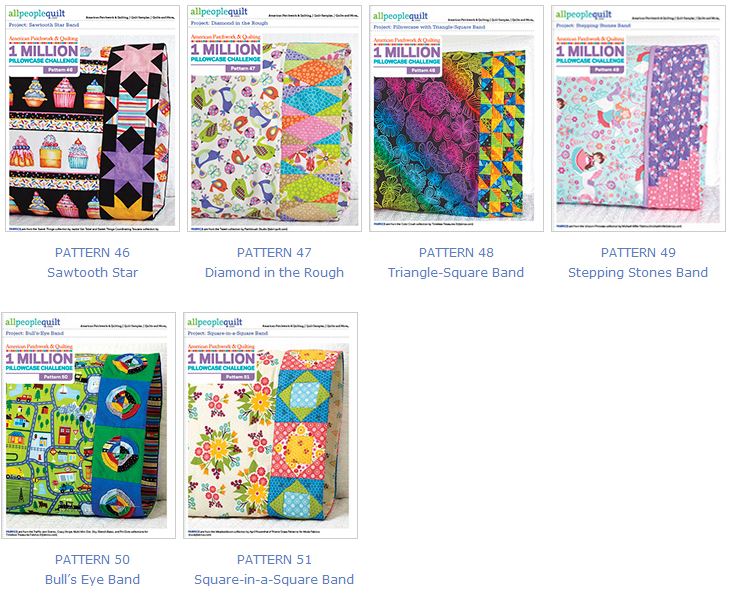
And patterns? The folks at APQ have created at least 51 different pillowcase patterns that are free - and free for you to use.
Me? I'm making the Basic Pattern. It means I can make more than one.
Item No. 2 - We're still having a lot of fun with the Moda Toweling. We've had some new toweling arriving - solid colors and Barkcloth are the two notable introductions. My favorite is the Barkcloth because it's thick and very, very soft. One thing to know though - if you're going to wash it, it does shrink a bit more than "regular" toweling so take that into consideration if you want whatever it is you make to be a certain size after washing.
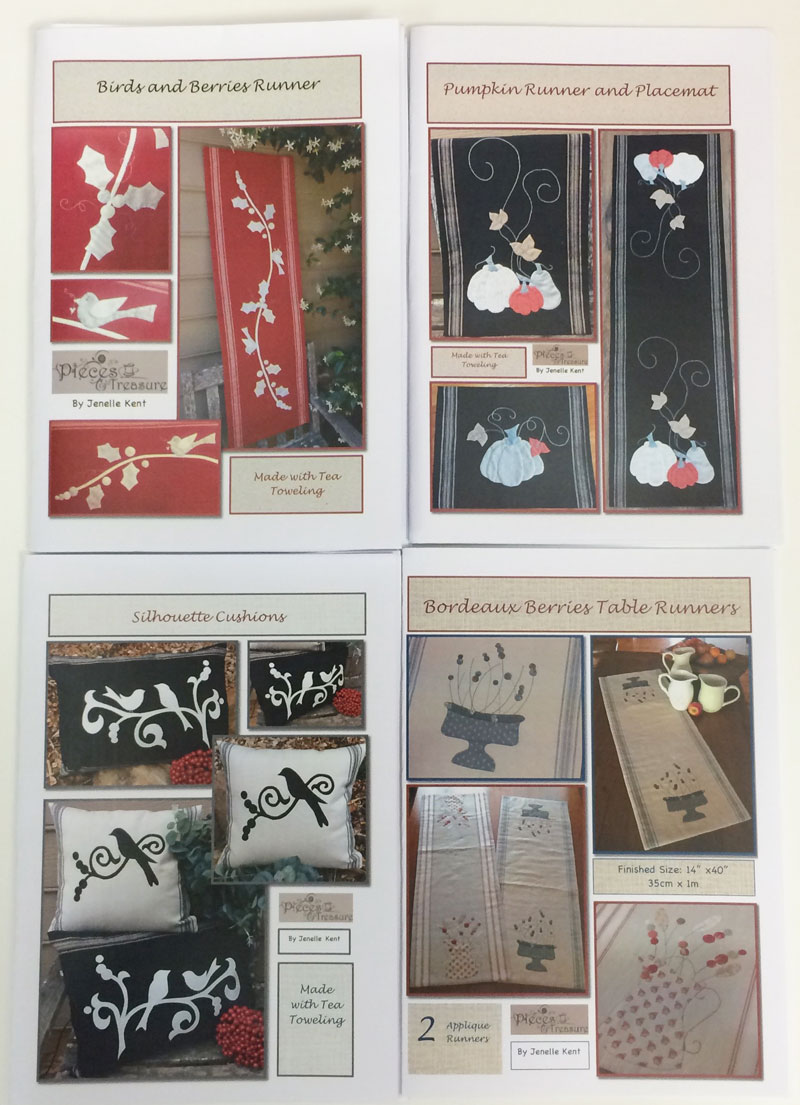
Have you seen the patterns by Jenelle Kent of Pieces to Treasure?
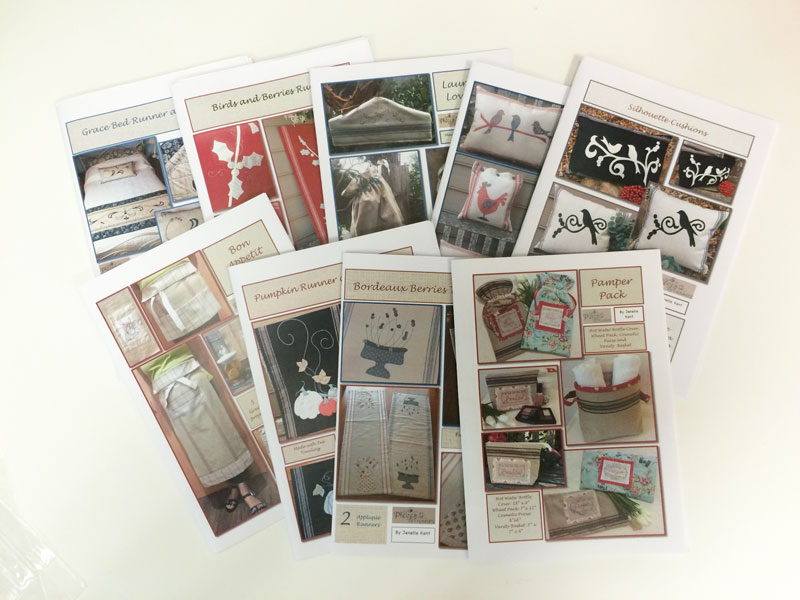
Jenelle is from Australia and she does the most beautiful patterns with Moda toweling.
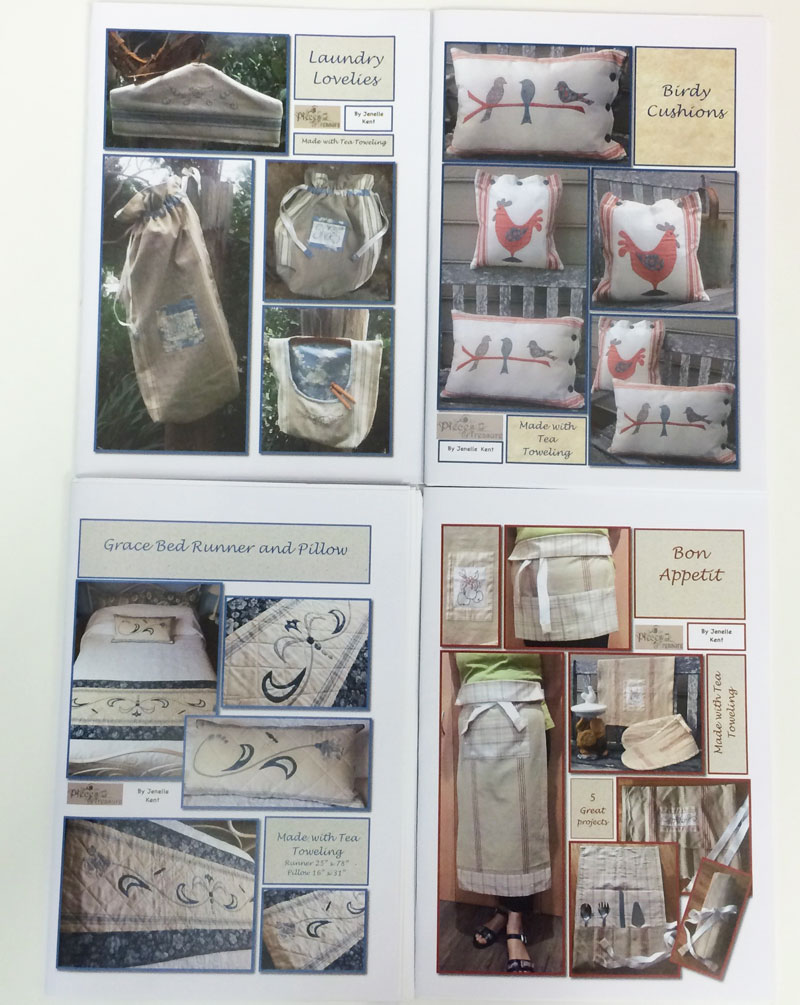
I chose one of the bags from the Pamper Pack pattern and... well, I ran out of time before I got the label embroidered.
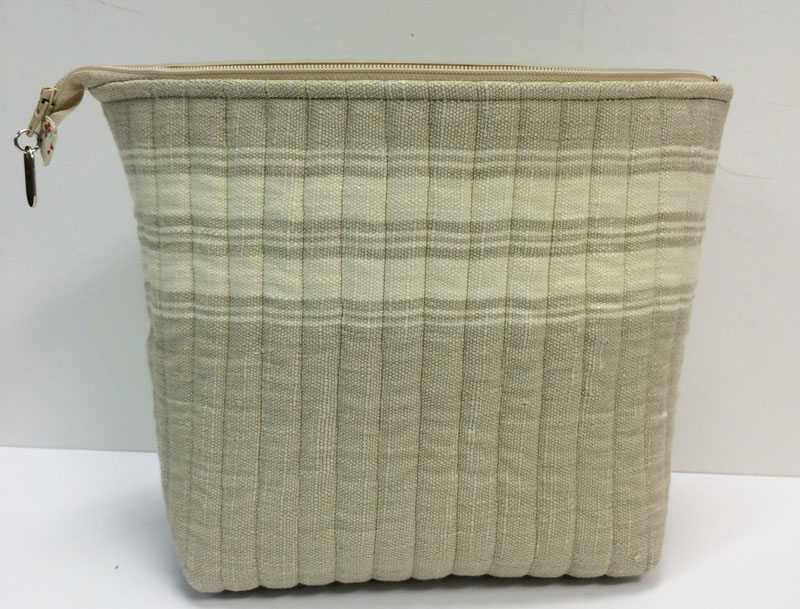
It's probably because I decided to quilt the bag. (I used Soft & Stable and I love how it stands nicely.)
Yes. I'm on a "bag bender" right now. I'm going through zippers and Soft & Stable at an alarming rate - and I just. can't. stop.
I'm even using leftover pieces from quilts to make a bag... actually, a pouch.

I'll have more specific information on the fabrics I used next week - for now, let it suffice to say a really eclectic mix of fabrics from Gardenvale, Meadowbloom, Nomad, Farmhouse, First Crush, Modern Background Ink, Mon Ami, Varsity, Purebred, Holly's Tree Farm and Bright Sun... just to start. The background print - the Bisque Dusk polka dot from Bright Sun is perfect for the wide variety of fabrics and colors in this Halloween-y mix.
Two things about this mix - I'll have a list and pictures next week. As for the quilt I made using these fabrics, a picture of that will have to wait until next year because it's going in a book. Big hint - it has diamonds.
What I can share now is how I made this little bag - the basic pattern is the Open-Wide Zippered Pouch by Anna Graham - Noodlehead. It can be made in several different sizes - that'll be helpful because part of this is a "make it work" sort of proposition.
I used leftover pieces for the first bag but for this little demo/tutorial, I used strips that were cut at the same width. (Actually, these are some of the leftover pieces from my Swap Log Cabin quilt, the one I hope to finish in my lifetime.)
Using strips - or leftover strips - cut at 2" wide, join two strips together with a scant 1/4" seam allowance. Off-set the start by approximately 3/4" - more or less is fine. Press the seam open. Yes - open open open.
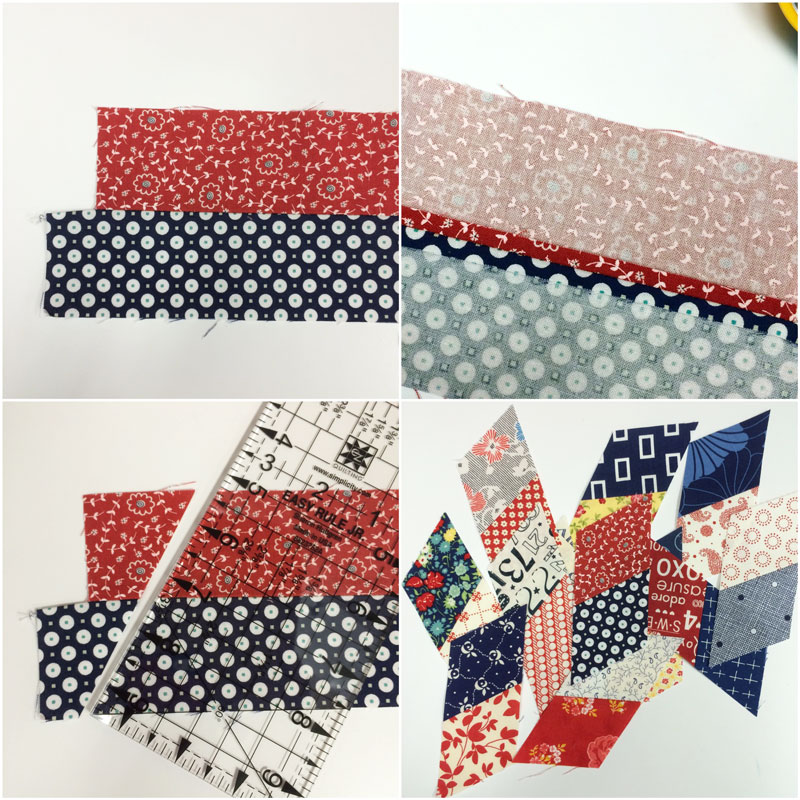
Using a ruler with a 60-degree line, trim the end of the strip. It can - and should - be trimmed much closer to the end than this but oops. Align the cut edge of the strip on the 2" line of the ruler and cut a whole bunch of segments - 2" wide.
Note: These can be made in fours instead of pairs but I was working with some little pieces so I preferred the pairs - two-sies.
Join a pair of pairs to make a strip of four diamonds - press the seam open. Scant 1/4' seam allowance - your seam should be right smack in the middle of that "v" at the beginning and end of the seam.
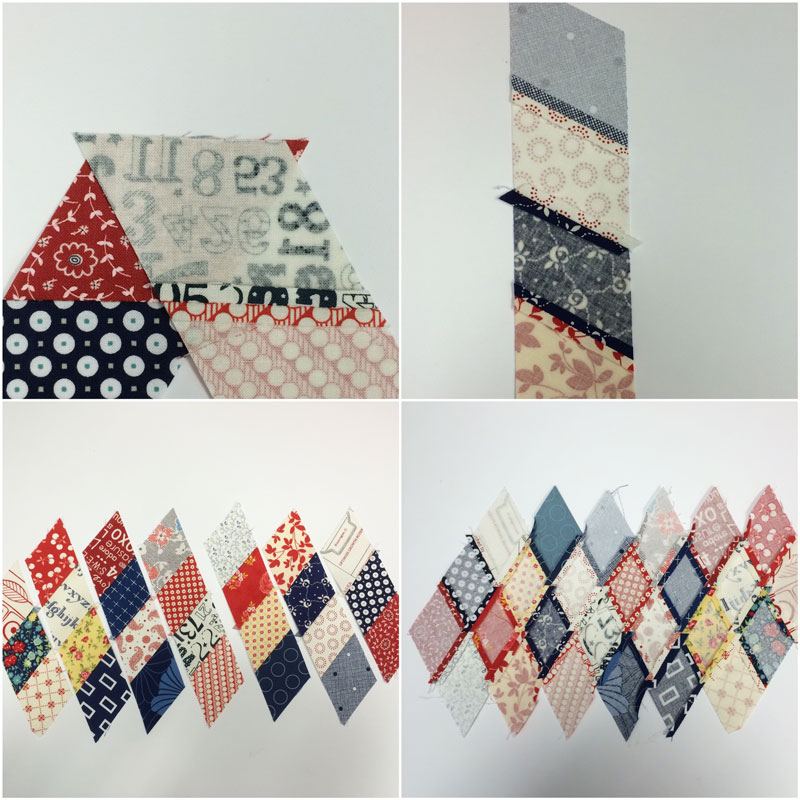
For the size pouch I wanted with the original, I pieced five four-diamond strips and two three-diamond strips. I knew I'd wind up trimming off a diamond or two but it was easier to trim down than add one more diamond because I was missing a "chunk" on one side. It's a very scientific process, agreed?
The strips are laid out and off-set at the top and bottom so that I could cut a rectangle with the diamonds set on point. They could be sewn together so that the top and bottom edges stayed straight, that would put the strips on the diagonal and only the two sides would have to be trimmed.
Join the pieced-strips with a scant 1/4" seam allowance and yes, press the seams open.
On the right side, align the 1/4" line of a ruler along the stitched points and trim the edge straight.
Turn the pieced panel around and repeat on the other side.
Note: The width of the strip will depend on your seam allowance, pressing and good karma. My strip measured 5 1/4" wide - a little bit wider than the first one I made. Different sewing machine and a different thread can make a big difference.
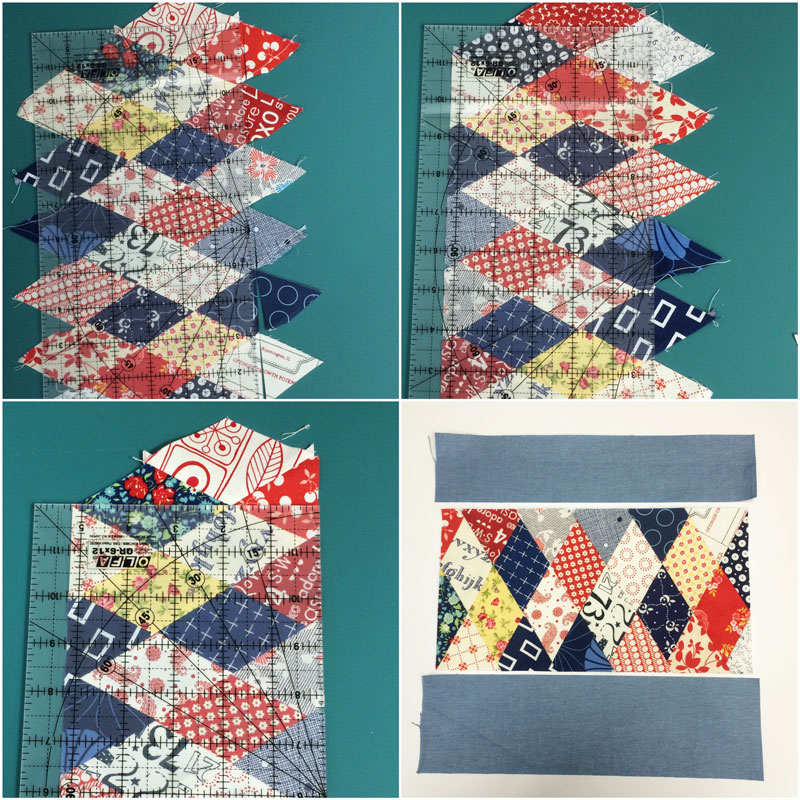
Trim the two edges straight. If desired, stitch a 1/8" seam around the outside edge of the pieced diamond panel to stabilize the bias edges.
Select a "finishing" fabric - in this case, I'm using a Moda Crossweave. (You know I love those, right?)
I cut the strip for the "top" at 2" x the width of my panel. The bottom strip is cut at 3" x the width of the panel. The strips are attached to the panel with a scant 1/4" seam allowance and this seam is pressed toward the cross weave strip.
I purposely cut the strips a little bit wider than I would need so that I could trim the edges straight after the panel is quilted - which may or may not happen tonight.
The most important thing I need to add to this is that I use Anna's bag sizes as a "guideline", I don't strictly adhere to the dimensions. My lining pieces are cut to the same size as the finished/quilted panels - though I am cutting the lining a 1/2" less in "height" so there isn't so much lining within the bag. If you've made her Open-Wide Pouch a couple of times, you'll see what I mean by being able to "wing it" a bit with the sizes. The benefit of using Anna's sizes is that a dozen wide-open pouches will all come out the same size... as opposed to my having a dozen different sizes.
(Are you appalled to find out that I have such a hard time following directions?)
One last thing to share...
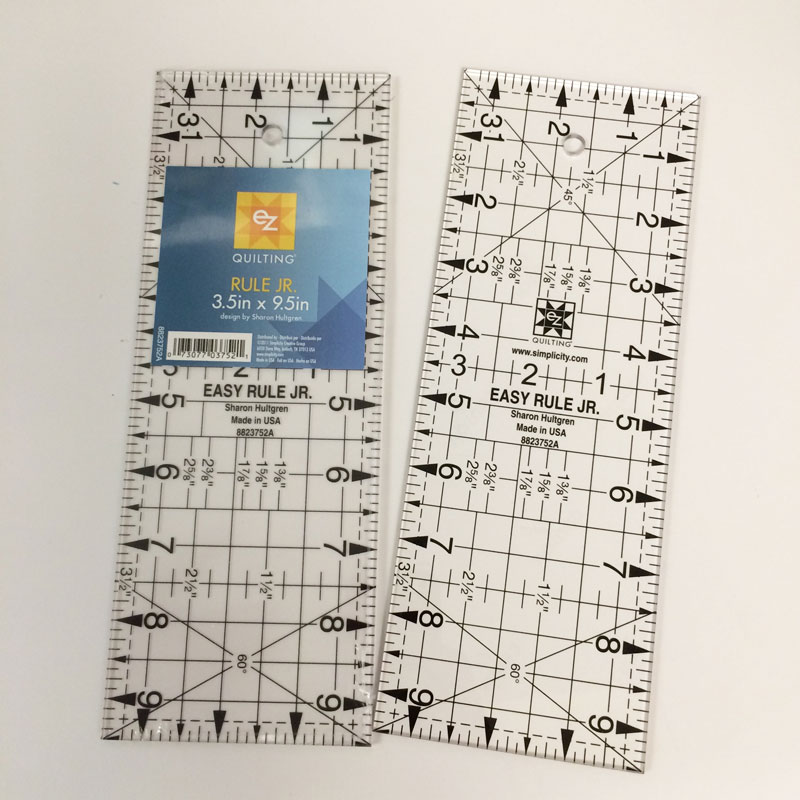
While looking for something else in the warehouse, I stumbled upon this ruler - the EZ Quilting Easy Rule Jr. . This just might be a "Goldilocks" moment - ruler. It's perfect for small cutting when a 6" x 12" is too big but a 4 1/2" or 6" square isn't quite right either. I love the Itty Bitty rectangle by Lisa Bongean but I think the extra 1 1/2" in length makes this one perfect for me. I also love that it has the 45 and 60 degree lines marked.
That's it for today - I'm off to sew something. With that Market-thing looming, there's plenty of that to do.
Happy Tuesday!
Posted in:
Comments