Welcome to Moda Fabrics!
A Sweet Life Wall Hanging
A Sweet Life Wall Hanging
Published:
Sep 1 2015 - 23:00
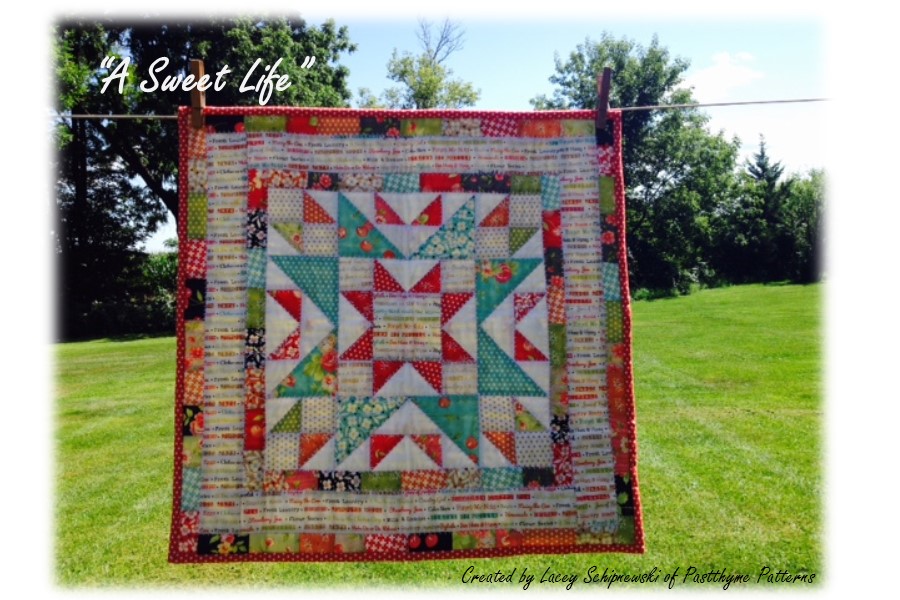

This mini quilt finishes at 22" square.

![]()
(1) Farmhouse by Fig Tree Charm Pack
1/6 yard White Paper Grunge (Background)
1/4 yard Farmhouse word fabric (Middle Border)
1/4 yard Farmhouse pink dot (Binding)
3/4 yard Farmhouse word fabric (Backing)
![]()


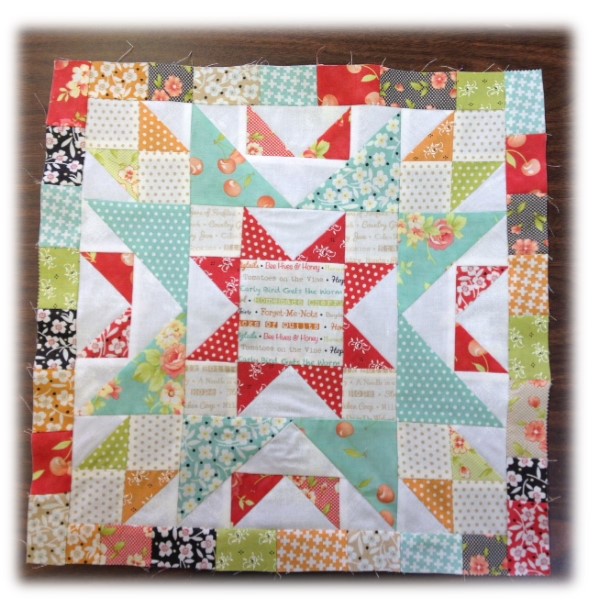
First let's start with the cutting. . .
Choose (1) light square to be your center/focal square--trim to 4" x 4"
Choose (3) light squares and cut a total of (12) 2 1/4" x 2 1/4" squares
Choose (8) "dark" squares and cut (8) 2 5/8" squares, then cut in half diagonally once to yield a total of (16) 2 5/8" triangles (these are shown above in pink for your center geese and echoed geese units)
Choose (4) "medium" squares and cut (4) 2 5/8" squares, then cut in half diagonally once to yield a total of (8) 2 5/8" triangles (these are shown above in green and orange for your outer corner HST units)
Choose (4) "medium" squares and cut (4) 4 3/8" squares, then cut in half diagonally once to yield a total of (8) 4 3/8" triangles (these are shown above in blue for your echoed geese units)
Background fabric: Cut (1) 4 3/4" strip of fabric
-Sub-cut: (3) 4 3/4" x 4 3/4" squares, then cut in half diagonally twice to yield (12) 4 3/4" triangles
-Sub-cut: (8) 2 5/8" x 2 5/8" squares, then cut in half diagonally once to yield (16) 2 5/8" triangles
Inner/Outer Border: From the remaining charm squares cut a total of (10) 1 1/2" x 2" rectangles, (24) 1 1/2" x 3 1/2" rectangles, (48) 1 1/2" x 2 1/2" rectangles in assorted colors
Middle Border: Cut (2) 2 1/2" strips of word fabric
Now that we've measured twice and cut once it's time to start the sewing machine! Begin with creating some flying geese units. . .

Select (1) 4 3/4" background triangle and (2) dark 2 5/8" triangle. Place one 2 5/8" dark triangle right sides together on the light triangle and sew along the long edge. (Refer to #1 in photo). Press seam toward the dark fabric.
Repeat on the opposite side by placing the second 2 5/8" dark triangle right sides together on the light triangle and sew along the long edge. (Refer to #2 in photo) Again press seam toward the dark fabric.
Repeat this step with (7) 4 3/4" background triangles and (14) 2 5/8" dark triangles.You should have a total of EIGHT flying geese units upon completion. (Refer to finished unit #3 in photo)
Create the quilt top center unit. . .

Select (4) 2 1/4" light squares, (1) 4" center focal square and (4) flying geese units created the step above to create the center unit. Lay out pieces as shown in the photo above and sew center unit together. Set aside and continue on!
Create the corner units. . .

Select (1) 2 5/8" background triangle and (1) 2 5/8" medium triangle. Place the medium triangle right sides together with the background triangle and stitch along the long edge. (Refer to #1 in photo above) Press seam toward medium triangle. Square up your half-square triangle unit to measure 2 1/4" x 2 1/4" in size.
Repeat the step above with the remaining (7) 2 5/8" medium triangles and (7) 2 5/8" background triangles. Upon completion you should have created a total of EIGHT half-square triangle units. (Refer to #2 in photo above)
Finish the corner units by selecting (2) 2 1/4" light squares and (2) newly finished half-square triangle units. Lay out units as shown in #3 in the photo above and sew together.
Upon completion you should have created a total of FOUR corner units. Set aside and continue on!
Create the echoed flying geese. . .

Select (1) flying goose unit created in the very first step of this project and (2) 2 5/8" background triangles. Place one 2 5/8" background triangle right sides together on the flying goose unit (Refer to #1 in above photo) and sew along the short edge. Press seam towards the background triangle. Repeat on opposite side with the remaining background triangle.
Next we are going to add (1) 4 3/4" background triangle to the top of the unit you just created. Place the background triangle right sides together with the flying goose unit (Refer to #2 in above photo) making sure the long edge of the background triangle is lined up with colored edge of the flying geese and sew. Press seam toward background triangle.
Referring to lower left unnumbered photo lay your newly created center goose unit out with (2) 4 3/8" medium triangles lined up on both sides. Finish by sewing one 4 3/8" medium triangle right sides together on the pieced flying goose unit and sew along the long edge. (Refer to #4) Press seam towards the medium fabric. Repeat on the opposite side with the remaining 4 3/8" medium triangle, again pressing seam towards medium triangle.
Upon completion you should have one echoed flying goose unit as shown in #4 in the photo above.
Repeat this step with the remaining flying geese units, background triangles and medium triangles to create a total of FOUR echoed flying geese blocks.
Create the quilt top. . .

Using all of the units created in the steps above, lay them out as shown in the left photo. Sew rows together to form the inner quilt top as shown on the right.
Create and add the inner border. . .please use the length measurements as a guide. The most accurate way to add borders to your quilt is to measure and find out what your quilt top measures and adjust length as necessary!
Create the inner border by selecting (5) 1 1/2" x 2" rectangles, (12) 1 1/2" x 3 1/2" rectangles and (24) 1 1/2" x 2 1/2" rectangles. Randomly select and sew rectangles together into one long chain.
From the colored chain sub-cut:
(2) 1 1/2" x 14 1/2" strips for the top and bottom border (adjust to your quilt top size as necessary)
(2) 1 1/2" x 16" strips for the side borders (adjust to your quilt top size as necessary)
Sew the top and bottom borders onto the quilt top and press seam toward outer edge. Sew side borders onto the quil top again pressing towards the outer edge. This completes the inner pieced border.
Add the middle border. . .

From your (2) 2 1/2" middle border strips sub-cut:
(2) 2 1/2" x 16" top and bottom borders (adjust to your quilt top as necessary)
(2) 2 1/2" x 20 1/2" side borders (adjust to your quilt top as necessary)
Add the top and bottom borders to the quilt first, followed by the side borders. Press seams toward the outer edge.
Finish up with the outer border. . .

Create the outer border using the remaining assortment of rectangles. Just like with inner border, randomly sew the colors in a long chain. (If you have any remaining inner border you can add that in as well!)
From the long outer border chain sub-cut:
(2) 1 1/2" x 20 1/2" top and bottom borders
(2) 1 1/2" x 22" side border strips
Finish the quilt top by adding the top and bottom pieced border, followed by the side borders. Press seams towards the outer edge.
Layer your quilt top with batting and backing and quilt as desired. Bind using (3) 2 1/2" strips of fabric.
![]()
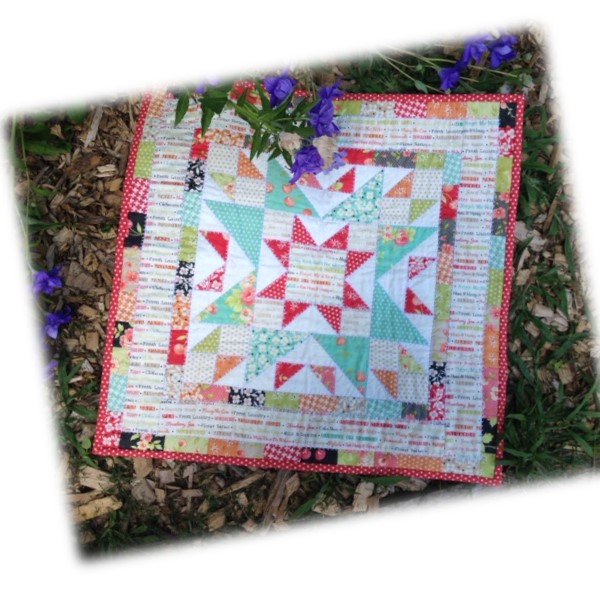
Finished project is 22" x 22" in size and makes either a fun nice table topper or wall hanging.
I just so happened to think of my great-grandmother Harriet while I assembled this project. Maybe it was the colors, maybe it was the words in the fabric, I will never know just why. But I will leave you to your binding with the following thought that she always seemed to share:
"Every day may not be good, but there is something good in every day."
Lacey Schipnewski
{pastthymepatterns.com}
![]()
Posted in: